A Crochet Octopus – Pattern is more than just a simple crafting project; it is a gateway into the soothing world of amigurumi that results in a charming, multi-tentacled companion. Whether you are looking to create a soft toy for a newborn or a decorative piece for a nautical-themed room, mastering the Crochet Octopus – Pattern allows you to explore the versatility of yarn in three dimensions. This specific octopus design has gained global popularity not only for its cuteness but also for its therapeutic benefits, as the curly tentacles are often used in hospitals to provide comfort to premature babies by mimicking the umbilical cord.
When you embark on the journey of working through a Crochet Octopus – Pattern, you are engaging in a rhythmic process that hones your ability to work in continuous rounds. The beauty of a crochet octopus lies in its symmetrical nature, allowing the maker to practice consistent tension across the head and the eight identical legs. This handmade octopus project is highly customizable, enabling you to experiment with different yarn weights—from delicate cotton for small keychains to chunky chenille for giant, huggable plushies—making the pattern accessible for various skill levels and purposes.
To achieve the best results with your Crochet Octopus – Pattern, it is essential to understand the structural balance between the “mantle” (the head) and the “tentacles” (the legs). A well-executed octopus pattern ensures that the legs have just the right amount of spring and curl, while the head remains firm and holds its shape over time. In the following sections, we will delve into the specific materials, techniques, and finishing touches required to bring your crochet sea creature to life, providing you with all the insights needed to master this beloved amigurumi project.
1. Essential Materials for the Crochet Octopus – Pattern
To begin your Crochet Octopus – Pattern, the first and most important decision is your choice of high-quality yarn. For projects intended for infants or sensitive skin, a 100% mercerized cotton yarn is the gold standard because it is breathable, durable, and does not pill easily. If you prefer a more “plush” feel for a decorative toy, a velvet or chenille yarn can make your crochet octopus feel incredibly soft and luxurious to the touch.
The size of your crochet hook plays a vital role in the structural integrity of the Crochet Octopus – Pattern. Most experts recommend using a hook that is one or two sizes smaller than what is listed on the yarn label; this creates a dense fabric that prevents the polyester fiberfill from escaping through the stitches. A 3.0mm or 3.5mm hook is typically perfect for light-weight yarn, ensuring your octopus head remains solid and professional-looking.
In addition to yarn and hooks, you will need a reliable pair of sharp craft scissors and a tapestry needle with a large eye. These tools are indispensable for the “finishing” phase of the Crochet Octopus – Pattern, where you will weave in loose ends and attach the bottom plate to the head. Clean finishing is what separates a homemade-looking toy from a boutique-quality handmade crochet gift.
Safety is a priority, so if your Crochet Octopus – Pattern is for a young child, consider using embroidered eyes instead of plastic safety eyes. While safety eyes are convenient, they can pose a risk if not installed perfectly. Using black embroidery floss to stitch a simple “sleeping” eye or a classic round eye ensures that your crochet creation is safe for all ages to enjoy.
Don’t overlook the importance of a stitch marker when working on the Crochet Octopus – Pattern. Since this design is worked in a continuous spiral without joining rounds, it is very easy to lose track of where a new row begins. A simple plastic clip or a piece of scrap yarn will help you maintain the correct stitch count, which is crucial for the symmetry of the octopus mantle.
Finally, you will need a generous amount of hypoallergenic stuffing. When filling your Crochet Octopus – Pattern, the goal is to create a firm but squeezable shape. You want the head to be round and even, without any lumps or flat spots, so take your time during the stuffing process to push the material into all the “corners” of the crochet fabric.
2. Mastering the Head and Body Structure
The “mantle” or head of the Crochet Octopus – Pattern always starts with a magic ring, which is a technique that allows you to pull the center hole completely shut. This is the foundation of almost all amigurumi, and it ensures that the very top of your octopus looks neat and professional. Starting with six or eight stitches in the ring is a common way to begin this circular crochet project.
As you progress through the Crochet Octopus – Pattern, you will use a series of staggered increases to grow the circle into a dome. To keep the head perfectly round and avoid a “hexagon” shape, it is helpful to shift the placement of your increases in every other round. This subtle adjustment makes the crochet surface much smoother and more aesthetically pleasing for your finished sea creature.
The middle section of the Crochet Octopus – Pattern consists of several rounds of “straight” stitches where no increases are made. This creates the height of the head. Depending on the pattern style, you can make the head tall and oval-like or short and stout. This is the stage where the personality of your handmade octopus really begins to emerge as the 3D shape takes form.
One of the most satisfying parts of the Crochet Octopus – Pattern is the “bottom plate,” which is a flat circle crocheted separately. This plate acts as the base where the tentacles will eventually be attached. Mastering the flat circle technique is essential here; if the plate curls too much, it can make the bottom of your octopus look uneven when it sits on a flat surface.
When it comes time to join the head to the base in your Crochet Octopus – Pattern, many crafters use the back loops only (BLO) technique. This leaves a visible horizontal line of stitches around the bottom edge, which provides a decorative ridge and a clear guide for where to start the legs. It adds a level of detail that makes the crochet pattern look more complex and well-thought-out.
Before you completely close the head of the Crochet Octopus – Pattern, this is your last chance to check the “squish factor.” Make sure the head is stuffed firmly enough to support the weight of the tentacles but still soft enough to be cuddly. Once you are happy with the volume, you can use a slip stitch to seal the two pieces together, preparing your octopus for its most iconic feature: the legs.
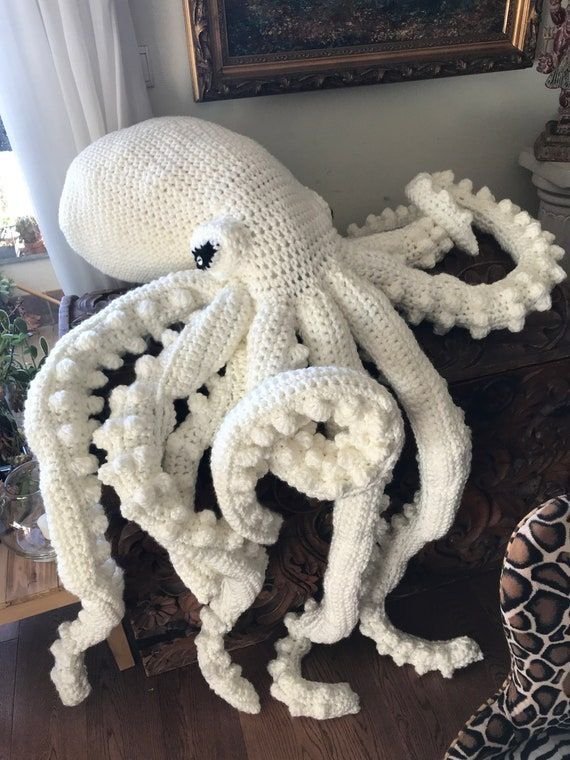
3. Crocheting the Perfect Curly Tentacles
The hallmark of a great Crochet Octopus – Pattern is the bounce and curl of the tentacles. To achieve that classic corkscrew look, you will work multiple stitches—usually two or three—into every single chain of the foundation row. This “overcrowding” of stitches is what naturally forces the yarn to twist and spiral, creating a bouncy crochet leg that is fun to pull and watch spring back.
When working on the legs of your Crochet Octopus – Pattern, you can vary the length of the initial chain to create different looks. A shorter chain results in a “baby” octopus with tight, perky curls, while a very long chain creates a “giant” octopus with dramatic, sweeping tentacles. The versatility of the pattern allows you to create an entire family of octopuses just by changing this one variable.
For a more realistic Crochet Octopus – Pattern, some makers like to use a different color for the underside of the tentacles. This can be achieved by crocheting two separate strips and joining them, or by surface-stitching a contrasting color along the bottom of the spiral. While this adds more work to the crochet project, it provides a stunning visual contrast that looks incredible in photos.
Spacing the eight legs evenly around the base is critical for the balance of your Crochet Octopus – Pattern. Use your stitch markers to divide the bottom circumference into eight equal sections before you start crocheting the legs. This ensures that your handmade octopus doesn’t end up with “gaps” and that the tentacles flow naturally from the body.
The thickness of the tentacles in your Crochet Octopus – Pattern can also be adjusted by choosing different stitches. Using single crochet will result in thin, delicate spirals, while half-double or double crochet stitches will create thicker, more substantial legs. Most octopus patterns favor the single crochet for its density and ability to hold a tight, springy shape over long periods.
Finally, ensure that you secure the end of each tentacle with a strong fastening-off knot. Since the tentacles are the parts most likely to be handled or tugged, they need to be the sturdiest part of your Crochet Octopus – Pattern. A little extra attention to the durability of the leg attachments will ensure your crochet toy lasts for years as a cherished keepsake.
4. Customizing and Finishing Your Octopus Creation
The “face” is where your Crochet Octopus – Pattern truly comes to life. Beyond just eyes, you can add a tiny blush to the cheeks using pink yarn or even a little bit of actual cosmetic blush applied with a cotton swab. This “kawaii” style is very popular in the amigurumi community and adds a layer of warmth and friendliness to your crochet octopus.
If you want to add accessories to your Crochet Octopus – Pattern, consider a small top hat, a bow tie, or a tiny flower placed near the top of the head. These small additions don’t take long to make but they give your handmade gift a unique personality. It turns a standard crochet pattern into a one-of-a-kind character with its own story.
For those looking to optimize their Crochet Octopus – Pattern for sale or for gifts, consistency is key. Try to use the same yarn brand and hook size for all your octopuses so that they look like a matching set. A cohesive collection of octopuses in various colors is a great way to display your skills at craft fairs or on social media platforms like Instagram and Pinterest.
SEO is also important if you are sharing your Crochet Octopus – Pattern online. Make sure to use descriptive titles for your photos, such as “Blue Mint Crochet Octopus Handmade,” and include your primary keyword in the alt-text of your images. This helps other crochet enthusiasts find your work when they are searching for inspiration or new projects to try.
Blocking is rarely needed for amigurumi, but for the Crochet Octopus – Pattern, you might want to gently steam the tentacles if they are curling too tightly or unevenly. Hold a steam iron an inch away from the yarn (do not touch the yarn!) to relax the fibers slightly. This can help the octopus legs hang more gracefully if you are using it as a hanging decoration.
Lastly, always include a care tag if you are gifting your Crochet Octopus – Pattern. Let the recipient know if the cotton yarn is machine washable or if the octopus prefers a gentle hand-wash and air-dry. Taking this final step shows that you value your work and want the handmade crochet octopus to be enjoyed for as long as possible.
FAQ – Frequently Asked Questions
1. Is the Crochet Octopus – Pattern suitable for total beginners?
Yes! Because it primarily uses the single crochet stitch and basic increases/decreases, it is a fantastic second or third project for someone new to the craft. The most challenging part is the magic ring, but once you master that, the rest is very straightforward.
2. Why do people make crochet octopuses for hospitals?
Studies have shown that the tentacles of a crochet octopus remind premature babies of the umbilical cord, which helps them feel safe and prevents them from pulling on their actual medical tubes. These must be made with specific 100% cotton yarn to meet safety standards.
3. How long does it take to finish a Crochet Octopus – Pattern?
A standard-sized octopus (about the size of a tennis ball head) usually takes between 2 to 4 hours to complete. Most of that time is spent on the eight curly legs, as they require a lot of repetitive stitches to create the spiral.
4. What is the best way to clean my handmade octopus?
If made with cotton, you can place it in a mesh laundry bag and wash it on a gentle cycle. However, for best results and to keep the shape of the Crochet Octopus – Pattern intact, hand-washing with mild soap and laying it flat to dry is recommended.
5. Can I use safety eyes for a baby toy?
While they are called “safety eyes,” they can still be a choking hazard if the fabric stretches or the plastic breaks. For toys intended for babies, embroidered eyes are the safest and most recommended option for any crochet pattern.
6. How do I make the tentacles longer?
Simply increase the number of stitches in your initial foundation chain. If the pattern calls for 30 chains and you want longer legs, try 50 or 60. Just remember that longer legs will require significantly more yarn!
Conclusion
In this comprehensive guide, we have explored every aspect of creating a Crochet Octopus – Pattern, from the initial selection of cotton yarn and tools to the intricate details of the spiraling tentacles.
We discussed how to build a sturdy head, how to use increases to achieve a perfect dome, and the importance of finishing touches like embroidered eyes and accessories. Whether you are crafting for charity, for a loved one, or for your own collection, the crochet octopus remains one of the most versatile and joyful projects in the world of fiber arts.