Creating a crochet peacock using unique patterns is one of the most visually stunning and satisfying projects in the crochet world.
With its vibrant feathers, graceful shape, and symbolic meaning, the peacock is a favorite subject among crafters looking to challenge themselves or add a decorative piece to their homes. This guide dives into everything you need to know to start or improve your journey with crochet peacock – patterns.
Whether you’re an experienced crocheter or just starting out, there are numerous ways to approach the art of making a crochet peacock.
From simple appliqués to full 3D models, this article will help you explore different techniques and tips for achieving detailed and beautiful results. Using well-structured patterns, you’ll learn how to transform yarn into a colorful masterpiece.
By the end of this article, you’ll understand how to select the right yarn, read and follow crochet peacock patterns, add creative flair to your designs, and care for your finished work. This tutorial emphasizes accessibility while also offering room to grow for those who want to master more complex projects.
1. Understanding Crochet Peacock – Patterns
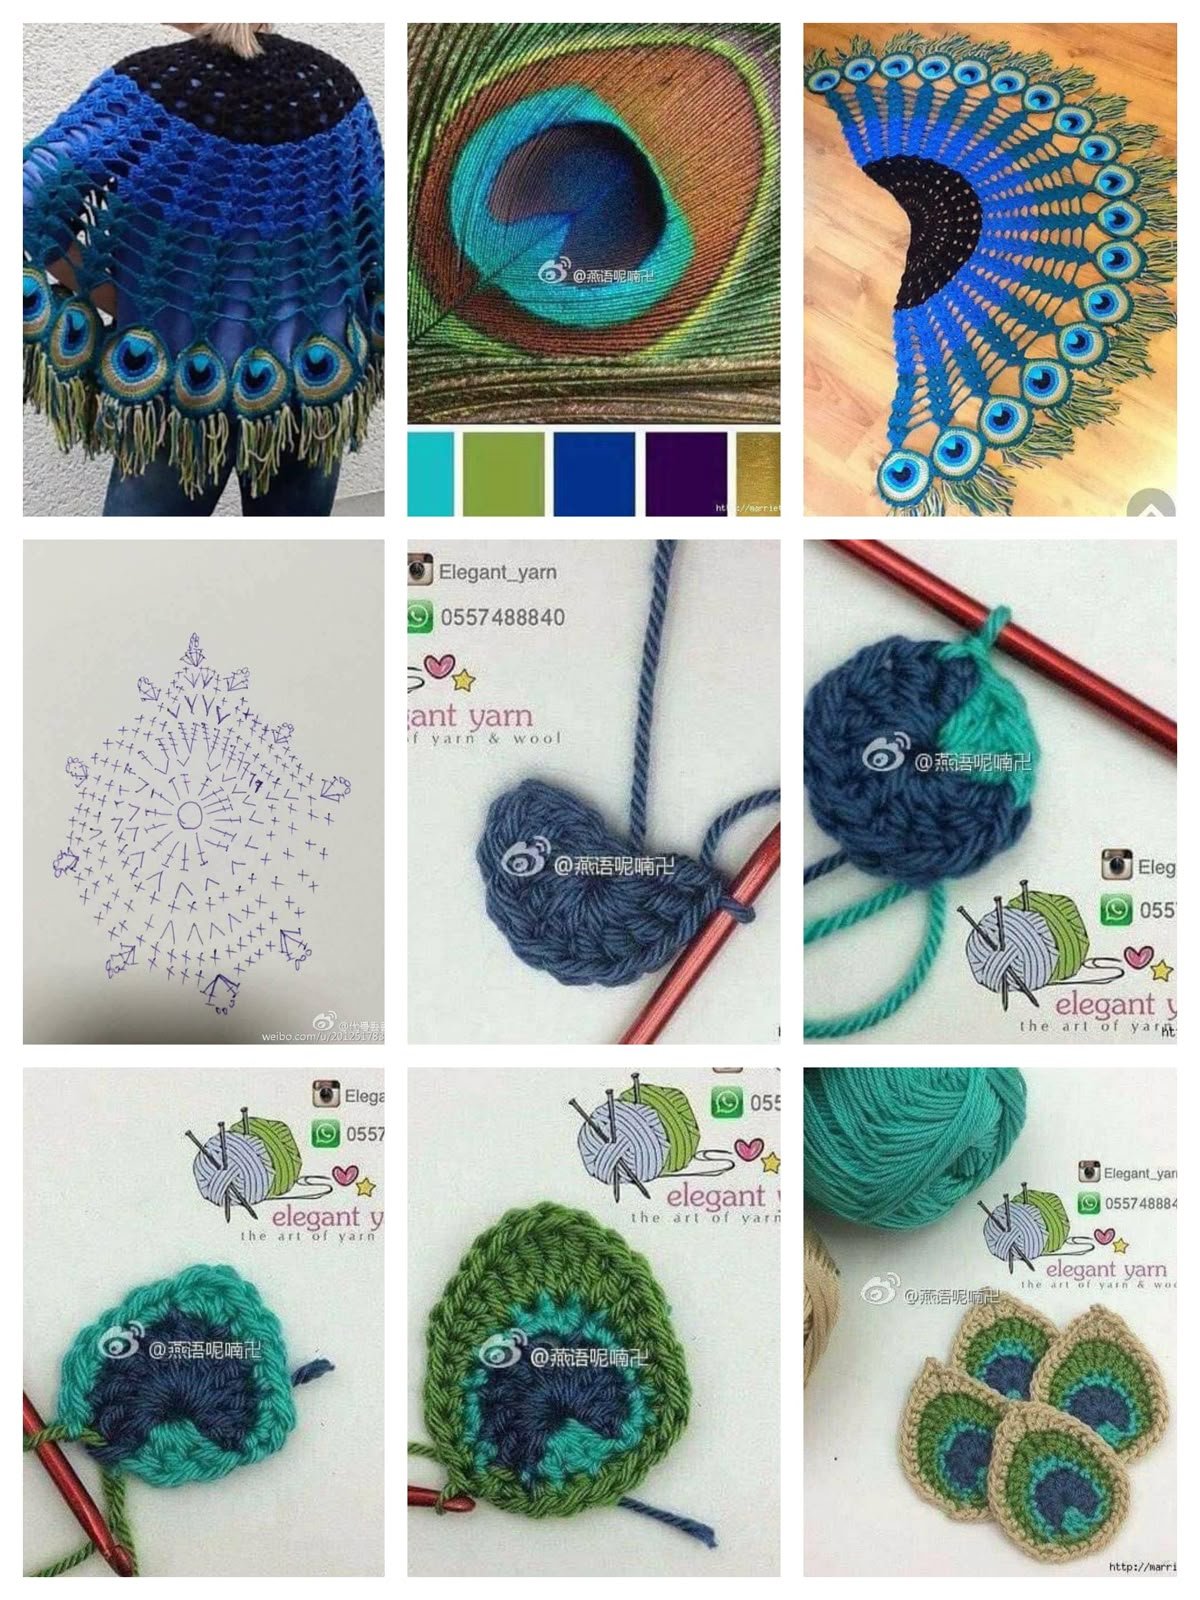
To begin any crochet peacock project, it’s essential to understand what makes this kind of pattern unique. Unlike basic crochet patterns, crochet peacock – patterns involve intricate detailing, especially when it comes to the feathers and tail structure.
The peacock’s tail is the focal point, often made using layered techniques like shell stitches, puff stitches, or picots to mimic feathers. Most patterns will provide step-by-step diagrams or charts to help you replicate these fine details. Don’t be intimidated—breaking it down stitch by stitch makes it manageable.
Common types of crochet peacock patterns include flat appliqué versions, small toys (amigurumi), wall hangings, or even large decorative centerpieces. Choosing the right style depends on your skill level and the time you want to invest.
Reading a pattern properly is half the battle. Be sure to review all abbreviations and instructions before starting. Many crochet peacock patterns include color changes, so having a color-coded plan can save you time and mistakes.
Yarn weight also matters. Lighter yarns allow for more detailed feathers, while chunkier yarns may simplify your project. Make sure to use a crochet hook that matches your yarn choice to maintain the right tension.
Lastly, consider whether you want your peacock to stand upright (3D models) or lie flat (appliqué). Each style requires slightly different pattern approaches, especially when constructing the body and tail.
2. Materials and Tools for Crochet Peacock Projects
Choosing the right materials can make a major difference in your finished crochet peacock – patterns. Start with selecting yarn in vibrant shades like emerald green, cobalt blue, turquoise, and gold to replicate the natural colors of a peacock.
Cotton yarn works well for more defined shapes, while acrylic yarn is affordable and flexible. If you’re planning to make a decorative item that won’t be handled often, metallic or glitter threads can add a shimmering effect to your design.
You’ll also need the appropriate crochet hooks. Smaller hooks (2.5mm to 3.5mm) are ideal for tight, detailed stitching required in most crochet peacock patterns. Larger hooks may create gaps in the work, which can make feathers look less refined.
Don’t forget the extras—stuffing (if making a plush peacock), stitch markers to track your rows, and embroidery needles for attaching feathers or facial features. Some patterns also include beads or sequins to enhance the tail’s eye spots.
A blocking board can help keep your finished piece flat and neat, especially if you’re working on a flat wall piece. Lightly steaming or wet blocking helps feathers hold their shape better over time.
Before beginning your project, lay out all materials and tools to stay organized. Following a detailed checklist that aligns with your chosen crochet peacock pattern ensures you won’t have to stop midway to hunt for supplies.
3. Step-by-Step Process to Create a Crochet Peacock
Starting your crochet peacock project can feel overwhelming, but breaking it into steps helps you follow along with ease. Most crochet peacock – patterns begin with the body, usually shaped using amigurumi techniques.
Begin with a magic ring and single crochets to form the peacock’s body and neck. Gradually increase to form the chest and then decrease to taper the shape. You’ll often need to stuff the body lightly as you work to maintain form.
Next comes the head and facial features. This can be as simple as two stitched eyes or include safety eyes, a crocheted beak, and a crest on top of the head using chains and loops. Details are important here—so take your time.
Now to the showstopper—the tail. The peacock’s feathers usually consist of repeated motifs or fans worked in layers. Each feather may be made separately and then sewn onto a base to form the tail fan. Some patterns offer tail bases made as semicircles for easier assembly.
Join the feathers carefully to make sure they are symmetrical and flow outward in a natural curve. Using stiffened yarn or adding starch can help the feathers stand up and keep their shape long-term.
Attach the tail securely to the back of the body using a yarn needle and strong stitches. If the pattern includes legs, these are usually crocheted last and attached at the bottom to help the bird stand or sit properly.
Finish your peacock by weaving in all yarn ends and adding any final embellishments like sequins, beads, or embroidery to enhance realism and texture. Your handmade crochet peacock is now complete!
4. Creative Variations and Uses for Crochet Peacock Patterns
There’s no limit to how creative you can get with crochet peacock – patterns. Beyond traditional colors and structures, you can customize peacocks in whimsical hues or minimalist designs to suit your home or gift-giving needs.
Turn a small crocheted peacock into a keychain or bag charm. Using lightweight yarn and a mini pattern, you can create adorable peacocks that add flair to accessories and make thoughtful handmade gifts.
Larger peacock projects can be transformed into wall decor. Simply mount your finished work onto a canvas or wooden board and display it as art. Some crafters even use crochet peacock patterns for table runners or pillow appliqués.
For children, plush peacock toys make great companions. Just ensure all parts are securely fastened and safe. Use soft, non-toxic yarn and avoid small choking hazards like beads.
Holiday décor is another great option. A golden or white crochet peacock can become an elegant tree ornament or a centerpiece for festive dinners. Add loops or hangers for easy display.
Lastly, explore using crochet peacock patterns in wearable items. Some creative crafters integrate feathers into shawls, scarves, or brooches, making each piece one-of-a-kind and conversation-worthy.
FAQ – Crochet Peacock – Patterns
Q1: Are crochet peacock patterns suitable for beginners?
Some are! Look for basic appliqué or simple amigurumi versions. Start small before moving on to more complex feather designs and layered tails.
Q2: What’s the best yarn for a crochet peacock project?
Cotton yarn gives a neat, crisp finish while acrylic is soft and versatile. Choose yarns in rich, vibrant colors to match the peacock’s natural beauty.
Q3: How long does it take to complete a crochet peacock?
It depends on the size and complexity. A small appliqué can take 2–3 hours, while a full 3D peacock may take several days.
Q4: Can I customize my peacock colors?
Absolutely! While traditional colors mimic real peacocks, you can use any palette to match your décor or express your creativity.
Q5: Where can I find reliable crochet peacock – patterns?
You can find free and paid patterns on websites like Ravelry, Etsy, Pinterest, and popular crochet blogs. Always check pattern reviews for guidance.
Q6: How do I keep the feathers stiff and shaped?
Block the feathers using steam or cold water. For extra firmness, apply fabric stiffener or starch to maintain their structure over time.
Conclusion
Working with crochet peacock – patterns is both a creative and rewarding experience. This guide has walked you through understanding the pattern structure, choosing materials, step-by-step creation, and innovative ways to use your finished peacock designs. Whether you’re making a toy, décor item, or wearable piece, this project offers endless possibilities for expression and craftsmanship.
We’d love to hear your thoughts! If you’ve tried one of these patterns or have suggestions to improve this guide, leave a sincere opinion and your feedback below. Your input helps fellow crafters and makes our content even better for future readers. Happy crocheting!