The world of modular crochet offers endless motifs for crafters, but few possess the charm, texture, and versatility of the Crochet Pernille’s Square – Pattern. This specific square motif has gained popularity for its intricate central detail, often resembling a flower or a geometric star, bordered by a solid, easy-to-join perimeter. Mastering the Pernille’s Square allows you to create everything from stunning blankets and decorative cushions to unique garments and bags, making it an invaluable addition to any crocheter’s skill set.
Embarking on a Crochet Pernille’s Square – Pattern project is a fantastic way to utilize your yarn stash and practice key crochet techniques, including working in the round, color changes, and cluster stitches. The repetitive yet engaging nature of the pattern makes it an excellent, meditative craft. Since the squares are small and portable, they are perfect for on-the-go crocheting, allowing you to build a substantial project one beautiful piece at a time.
This comprehensive guide will serve as your definitive resource for successfully executing the Crochet Pernille’s Square – Pattern. We will delve into the best yarn choices for showcasing the unique texture, essential techniques for achieving perfect corners and flat edges, and creative ideas for joining these stunning squares into larger masterpieces. Prepare your hook, select your favorite colors, and let’s unravel the secrets to Pernille’s Square.
1. Choosing the Right Yarn and Hook for the Crochet Pernille’s Square – Pattern
The visual success of the Crochet Pernille’s Square – Pattern hinges on highlighting its central texture. Therefore, yarn choice is paramount, as the fibers must offer excellent stitch definition to make the decorative elements pop.
For most projects using the Pernille’s Square, a medium-weight ($4$) yarn, often referred to as worsted weight or Aran, is the most popular choice. This weight provides a good balance between bulk (allowing the project to work up quickly) and definition. Natural fibers like cotton or a soft wool blend are excellent, as they hold the shape of the intricate central motif beautifully.
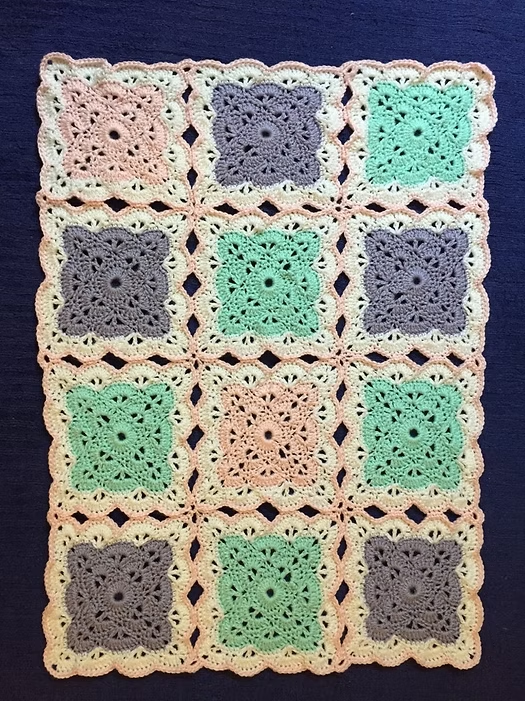
When selecting colors, consider the two primary elements of the Crochet Pernille’s Square: the central motif and the border. Using two or three highly contrasting colors—a bright color for the center, a complementary color for the body of the square, and a neutral color for the joining border—will visually emphasize the pattern’s texture.
To ensure the intricate detail of the Pernille’s Square is clearly visible, a yarn that is not overly fuzzy or hairy is recommended. Smooth, tightly spun yarns, such as mercerized cotton or acrylics labeled as anti-pilling, are ideal as they prevent the decorative cluster stitches from becoming obscured.
The hook size should correspond to your chosen yarn weight, but typically, you will aim for a hook that creates a fabric with a moderate density. For a worsted weight yarn, a hook size between $4.0\text{mm}$ and $5.5\text{mm}$ is common. The pattern will usually specify a starting hook size, but always make a test square to check your personal gauge.
Consistency in tension is crucial, especially when working the clusters and popcorns that often form the center of the Pernille’s Square. If your tension is too tight, the fabric will cup. If it’s too loose, the square might lose its firm shape. Aim for a comfortable, even tension throughout the entire square to ensure all your finished motifs are the same size for joining.
2. Mastering the Center Motif and Corner Shaping in the Pattern
The Crochet Pernille’s Square – Pattern is defined by two key structural elements: the unique, often floral, central motif, and the precise shaping of the four corners that transforms the round center into a perfect square.
The center of the Pernille’s Square usually begins with a magic ring or a foundation chain loop, followed by rounds that utilize complex stitches like popcorn stitches, cluster stitches, or shell stitches. These stitches are grouped together to create the dimensional, highly textured element that gives the square its signature look.
When working these dimensional stitches, such as the popcorn, ensure you pull the top loop tightly closed after forming the cluster. This action cinches the stitch together, forcing it to “pop” out from the fabric, giving the square its unique 3D texture.
The transition from the initial circular rounds to the square shape is done through a process of strategic increases. In the rounds following the center motif, stitches are grouped into clusters and separated by chain spaces at four specific points to define the corners. This transformation requires precise counting and placement.
A perfect crochet square corner is typically formed by working a sequence like $(\text{2 dc, ch 2, 2 dc})$ into the same corner chain space. The two chain stitches in the middle create the necessary space and flexibility for the square to lie flat when turned at the corner.
Pay meticulous attention to the stitch count in the sides between the corners. The sides must have an equal number of stitches for the square to be symmetrical. If the count is off, the finished square will lean or buckle, making the final joining process incredibly difficult.
Finally, practice the art of seamless color change if your Pernille’s Square uses multiple colors. Learning to change colors neatly at the end of a round and weave in the ends as you go will save you considerable time during the final finishing phase. A clean color change makes the transitions between the motif and the border crisp and professional.
3. Techniques for Joining the Pernille’s Squares into Larger Projects
The true potential of the Crochet Pernille’s Square – Pattern is realized when the individual motifs are joined together to form a larger piece, such as a blanket, scarf, or cushion cover. The method of joining is crucial for the finished look and durability.
There are several popular methods for joining crochet squares, each offering a distinct aesthetic. The slip stitch join or single crochet join is the most common, creating a distinct, raised seam that adds texture and strength to the overall fabric. This method is fast and provides a very durable connection.
For a flatter, less visible seam, consider using the mattress stitch or invisible join worked with a tapestry needle. This method involves whipping the two squares together through the back loops only, creating a seam that sinks down and almost disappears, allowing the beauty of the Pernille’s Square motif to remain the focus.
The join-as-you-go (JAYG) method is a fantastic technique for the Crochet Pernille’s Square – Pattern. Instead of making all the squares first and then sewing them together, you attach the last round of the new square to the sides of the adjacent completed squares as you crochet it. This saves a tremendous amount of time on the final assembly.
When joining, whether by sewing or JAYG, ensure that the sides you are joining have an equal number of stitches. An uneven stitch count will cause one square to gather or stretch, resulting in a distorted finished object. Count your stitches and corner spaces before beginning the join.
For projects like blankets, the arrangement of colors and patterns is key. Create a small color map or sketch beforehand to plan the placement of your different colored Pernille’s Squares. A planned, deliberate color layout prevents a chaotic look and gives the final project a cohesive, professional design.
Always block your individual Pernille’s Squares before joining them, especially if they are slightly different sizes or have cupped edges. Blocking (wet or steam) forces all the squares to the same size and shape, ensuring a perfectly straight line when they are stitched together, which is vital for any large, modular crochet project.
4. Customizing and SEO Optimization for Your Pernille’s Square Pattern
Once you have mastered the foundational Crochet Pernille’s Square – Pattern, customization and strategic SEO are the final steps to making your creations unique and highly visible in the digital crafting community.
To customize the look, experiment with the final border of the Pernille’s Square. Adding a simple picot stitch or a small shell stitch border to each square before joining gives the motif a more delicate, lacy edge. Conversely, using a heavier yarn weight for the final round can create a bolder, more defined separation between the squares.
Vary the size of the finished square. You can easily make a smaller Pernille’s Square by stopping after the center motif and adding only one or two squaring-up rounds. Similarly, you can create a larger version by adding extra border rounds to the basic pattern, increasing its versatility for different projects.
For SEO, when sharing your finished Crochet Pernille’s Square – Pattern or a tutorial, use highly specific, appealing keywords in your titles, descriptions, and tags. Good examples include: “Free Crochet Pernille’s Square Pattern Tutorial,” “Textured Floral Granny Square Motif,” and “Pernille’s Square Blanket JAYG Tutorial.”
Ensure your content is well-structured with clear headings and detailed instructions. Highlight the versatility of the square—that it can be used for blankets, scarves, or pillows. Use related keywords like “modular crochet,” “textured granny square,” and “crochet motif” naturally throughout the text.
High-quality photography is essential for showcasing the texture of the Pernille’s Square. Take bright, focused images of the individual square and a finished, joined project (like a blanket). Use close-ups to highlight the cluster stitches. Name your image files with your main keywords (e.g., crochet-pernille-square-pattern-closeup.jpg) to aid search engine visibility.
Finally, engage with your audience by encouraging them to share their color combinations. Creating a specific project hashtag (e.g., #PernillesSquareBlanket) promotes user-generated content, which is a powerful signal of authority and popularity to search engine algorithms.
Frequently Asked Questions (FAQ) about Crochet Pernille’s Square – Pattern
1: Why is my Crochet Pernille’s Square buckling or not lying flat?
Buckling (wavy edges) or cupping (curling up) is almost always a tension or stitch count issue. If it’s buckling, you likely have too many stitches on the sides or too many chains in the corners. If it’s cupping, you might not have enough increases. Blocking is the primary solution to correct minor imperfections.
2: Can I use different stitch types for the cluster motif in the center?
Yes, you can substitute the cluster stitches. If the pattern calls for a popcorn stitch, you can often replace it with a bobble stitch or a puff stitch of similar height. Just be aware that this will slightly change the overall texture and dimension of the Pernille’s Square.
3: What is the best method for joining Pernille’s Squares for a blanket?
For a textured, durable blanket, the Join-As-You-Go (JAYG) method is excellent, as it eliminates the need for separate sewing and creates a clean seam. Alternatively, the single crochet join (worked through the back loops only) creates a neat, slightly raised seam that is very sturdy.
4: How do I ensure all my Pernille’s Squares are the same size for joining?
The most reliable way is to block every single square before joining. Wet or steam the squares and pin them out to a consistent, exact size (e.g., $6 \text{ inches}$ by $6 \text{ inches}$) on a blocking mat. Once dry, they will hold the precise shape needed for a perfect join.
5: Can I use self-striping or variegated yarn for the Pernille’s Square?
Yes, you can. However, be aware that self-striping or variegated yarn may obscure the beautiful textured details of the central motif. It often works best if the variegated yarn is used for the outer border, while a solid color is used for the intricate center.
6: How can I turn the Crochet Pernille’s Square into a continuous pattern?
To turn the square into a continuous pattern (to avoid joining), you would typically follow the Pernille’s Square Pattern until the desired size is reached. Then, instead of stopping, you would work a border round that forces the corners to lay flat, and then continue working in rows across the top edge for the rest of the project.
Conclusion
The Crochet Pernille’s Square – Pattern is a remarkable motif that beautifully marries intricate central texture with simple, functional squaring. We have thoroughly explored the journey, from the critical selection of smooth, defining worsted weight yarn to the mastery of dimensional stitches like the popcorn and the precise corner-shaping techniques. Emphasis was placed on the importance of pre-joining blocking and the efficiency of the Join-As-You-Go method for large projects.
The strategic use of contrasting colors ensures the unique texture of Pernille’s Square remains the dazzling focal point of any creation.We sincerely hope this detailed guide has provided you with the inspiration and technical confidence to successfully integrate the stunning Crochet Pernille’s Square into your next crochet masterpiece.