If you’re looking for a quick, fun, and festive project, the Crochet Pumpkin Keychain – Pattern is the perfect pick. These tiny autumn-themed accessories are adorable, easy to make, and incredibly versatile. Whether you’re a beginner or an advanced crocheter, you can enjoy creating this seasonal favorite in less than an hour.
Using a crochet pumpkin keychain – pattern allows you to combine creativity with functionality. You’re not only crafting a cute pumpkin but also making a charming keychain that can be gifted, sold, or kept as a personal fall favorite. The best part? It uses minimal yarn and supplies—ideal for using up those leftover scraps from larger projects.
In this article, we’ll explore how to choose the best materials, walk through the creation process step-by-step, offer customization ideas, and explain how to care for and gift your crochet keychains. Whether you’re preparing for a fall market or just want something festive for your bag, this guide has everything you need.
1. Choosing the Right Crochet Pumpkin Keychain – Pattern
Before diving into the stitches, it’s important to find the crochet pumpkin keychain – pattern that suits your skill level and project goals. Since keychains are small in size, they’re great for beginners and satisfying for advanced crafters looking for a quick make.
Many free and paid patterns are available online. Websites like Etsy, Ravelry, and popular crochet blogs offer a variety of pumpkin keychain designs—ranging from realistic textures to kawaii-inspired styles with cute little faces.
Look for a pattern that includes clear instructions, photos, and possibly a video tutorial. This is especially helpful if you’re new to working in the round, as most keychain patterns are made using circular techniques like the magic ring and single crochet increases.
Some patterns also offer multiple sizes or slight variations, such as ribbed pumpkins, striped designs, or stems made with embroidery floss or twisted yarn. These small changes can help your project stand out, especially if you’re making several for gifts or sale.
When selecting your pattern, check the materials and skill level. Most crochet pumpkin keychain – patterns use simple stitches, but shaping and stuffing require attention to detail. Make sure the pattern includes stuffing tips and how to secure hardware like key rings or clips.
Finally, consider if you want to add a face, leaf, or even a cinnamon stick stem. Many patterns give options for these features, allowing you to fully personalize your creation based on your style or the recipient’s preferences.
2. Materials and Tools Needed
Creating a Crochet Pumpkin Keychain – Pattern requires just a few materials, most of which you may already have in your stash. One of the reasons this project is so popular is how accessible and affordable it is.
First and foremost, you’ll need yarn. Worsted weight (medium) yarn is commonly used, especially in orange, green, and brown. Acrylic yarn is a great choice for its durability, affordability, and wide color range. Cotton yarn also works well for a neater stitch definition.
You’ll also need a crochet hook—typically between 3.5 mm and 4.0 mm, depending on your yarn and the pattern’s gauge. Using a smaller hook helps keep the stitches tight so that stuffing doesn’t show through.
For stuffing, use fiberfill or polyester stuffing. A small amount goes a long way for a mini keychain, but be sure to stuff it firmly enough to give it shape while keeping it soft.
To assemble the keychain, you’ll need key rings or lobster clasps, which can be easily found at craft stores or online. Use a yarn needle to sew the pumpkin closed and attach any embellishments. A stitch marker may also be helpful when working in continuous rounds.
Optional items include felt for leaves or faces, embroidery floss for stitching details, safety eyes for a “kawaii” look, and fabric glue if you prefer not to sew certain parts.
Keep scissors nearby and prepare your workspace to be organized and comfortable—this project won’t take long, but precision matters for small items like keychains.
3. Step-by-Step Process to Make a Pumpkin Keychain
Once you’ve chosen your Crochet Pumpkin Keychain – Pattern and gathered your materials, it’s time to begin the fun part: crocheting! This step-by-step overview gives you a general idea of the process involved in most pumpkin keychain patterns.
Start with a magic ring or adjustable loop. This technique allows you to begin crocheting in the round with a tight center, which is especially important for small amigurumi-style pieces.
Work your way through a few rounds of single crochet increases to form the pumpkin’s base. Make sure your stitches are even and tight. This prevents the stuffing from poking through and gives the pumpkin a clean, round shape.
Once you reach the desired width, you’ll begin a series of decrease rounds. This narrows the shape to form the top of the pumpkin. Before the final round, insert the fiberfill stuffing and adjust the shape to be full but not overstuffed.
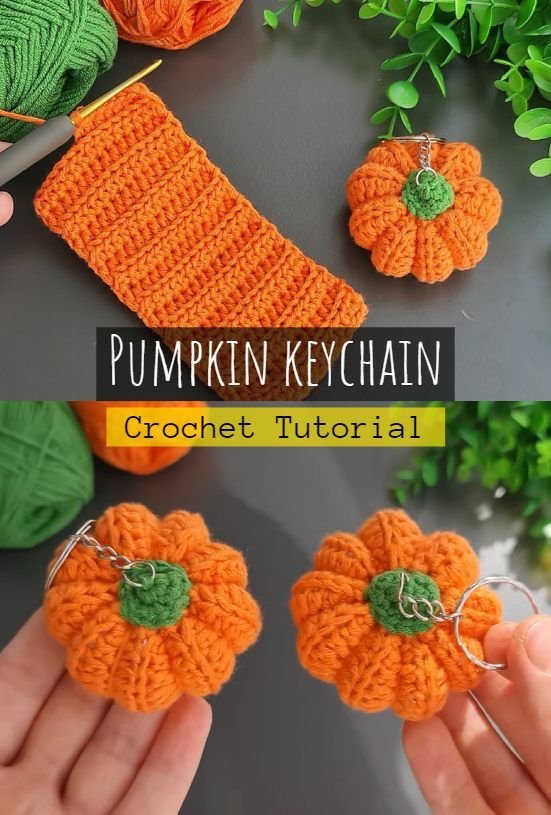
Close the pumpkin and use a yarn needle to create the pumpkin’s characteristic ridges. This is often done by threading yarn from top to bottom and pulling tightly to create segments, usually 5 to 6 around the body.
Next, crochet or attach the stem and leaf. The stem is often a small chain with a few rows, and the leaf can be made with basic stitches like single crochet and half-double crochet. Attach them securely to the top of the pumpkin.
Lastly, sew the key ring or lobster clasp onto the top. You can either use a small chain or stitch it directly into the pumpkin’s top. Make sure everything is secure, especially if it’s going to be used regularly on keys or bags.
4. Creative Customization and Gifting Ideas
The beauty of the Crochet Pumpkin Keychain – Pattern is in how easily you can personalize it. These tiny creations offer endless opportunities for creativity, whether you’re making them for yourself, as gifts, or for a craft fair.
Consider making a set of keychains in different pumpkin shades: classic orange, pale yellow, white, or even multicolor variegated yarn. This is perfect for fall-themed collections or gift bundles.
Add tiny faces to your pumpkins using safety eyes, embroidery floss, or felt. You can create happy, sleepy, or even spooky expressions for Halloween-themed keychains.
If you’re gifting your pumpkin keychains, consider attaching a gift tag with a seasonal message like “Thankful for You” or “Have a Gourd Day.” Presentation goes a long way in making your handmade item feel extra special.
You can also incorporate essential oils by placing a drop of fall-scented oil (like cinnamon or pumpkin spice) on the stuffing before sealing the pumpkin. This turns your crochet into a tiny, seasonal air freshener.
Attach them to zippers, backpacks, purses, or car mirrors—they’re not limited to just keyrings. These keychains also make great party favors, teacher gifts, or small giveaways at markets and events.
Finally, if you plan to sell them, consider bundling with other fall-themed crochet items like acorns, leaves, or mini ghosts. A well-curated set makes a strong impact at craft markets or online shops.
FAQ – Crochet Pumpkin Keychain – Pattern
1. Is the crochet pumpkin keychain beginner-friendly?
Yes, most Crochet Pumpkin Keychain – Patterns are ideal for beginners. They use basic stitches like single crochet and offer a great introduction to working in the round.
2. How much yarn do I need for one pumpkin keychain?
Very little—usually less than 20 yards of worsted weight yarn for the body, plus small scraps for the stem and leaf.
3. Can I use cotton yarn instead of acrylic?
Absolutely! Cotton yarn gives a neat, structured look and works great for small projects like keychains.
4. How do I attach the keyring securely?
Sew the keyring or clasp through the stem area using a strong thread or yarn. Reinforce with multiple passes to ensure durability.
5. What size should my finished pumpkin be?
Most finished pumpkins for keychains are about 1.5 to 2 inches wide. You can adjust the size slightly by changing hook size or yarn weight.
6. Can I sell finished keychains from a pattern I found online?
Yes, but always check the designer’s terms. Most allow the sale of finished items with credit given, but you cannot resell the pattern itself.
Conclusion
The Crochet Pumpkin Keychain – Pattern is the perfect seasonal project for crochet lovers of all levels. It’s quick, budget-friendly, and full of opportunities for creative expression. From selecting yarn and mastering the stitches to adding cute personal touches, each step allows you to craft something both beautiful and useful.
Whether you’re making a gift, stocking up for fall markets, or just adding charm to your own keyring, this project delivers festive fun with a handmade heart. We hope this guide inspired you to pick up your hook and give it a try!
Have you made a pumpkin keychain before? Or do you have tips to share? Leave your honest opinion and suggestions in the comments below—we’d love to hear from you and learn about your favorite fall crochet projects!
Happy crocheting!