If you’re searching for a project that is cute, portable, and perfect for gifting, the Crochet puppy keychain pattern made with seals – Pattern is a wonderful choice. This small yet detailed design brings together the charm of a tiny puppy and the secure crafting of seal stitches, all wrapped into a functional and fun accessory you can take anywhere.
This delightful keychain project is ideal for crochet lovers who want to create something unique and meaningful. It works as a great introduction to amigurumi techniques while still being quick enough for experienced crocheters to enjoy. The use of seal stitches not only adds durability but also provides a polished, well-structured finish.
Throughout this article, we’ll walk you through everything you need to know about the Crochet puppy keychain pattern made with seals – Pattern — from materials and tools to step-by-step creation, design variations, and care instructions. By the end, you’ll feel confident to start crafting this adorable piece for yourself or as a thoughtful handmade gift.
1. Materials and Tools You’ll Need
Before starting your Crochet puppy keychain pattern made with seals – Pattern, it’s important to gather the right materials. Choosing high-quality tools will ensure your keychain is both durable and visually appealing.
You’ll need a small amount of cotton or acrylic yarn in your preferred puppy color. Light or neutral shades work well to bring out the details, while darker tones give the keychain a more realistic or classic look. Make sure the yarn weight is suitable for fine, tight stitches—typically sport or DK weight is ideal.
A crochet hook in size 2.0 mm to 3.0 mm is recommended. A smaller hook helps achieve the tight tension needed for seal stitches, which give the keychain its firm shape. You’ll also need a yarn needle for sewing the parts together, and small scissors for trimming.
To bring your puppy to life, you’ll need two safety eyes or you can embroider them using black thread if preferred. A tiny bit of stuffing, like polyester fiberfill, is necessary to fill the head and body of your puppy without adding too much bulk.
You’ll also need a metal key ring and possibly a small jump ring or lobster clasp to attach your finished crochet puppy. These are easy to find in craft stores or online and turn your crochet into a functional accessory.
Don’t forget stitch markers. These are especially helpful when working in continuous rounds — as is typical with amigurumi and the Crochet puppy keychain pattern made with seals – Pattern. Marking the beginning of each round helps keep your work accurate and tidy.
2. Step-by-Step: Creating Your Puppy Keychain
Now that you have your supplies ready, let’s go through the main steps to create your Crochet puppy keychain pattern made with seals – Pattern. This process involves crocheting in rounds and assembling various parts together to create your final shape.
Start with the head. This is usually crocheted in a round form using seal stitches or tight single crochets to ensure structure. Begin with a magic ring and increase gradually to form a sphere. This is where the facial features will be added later.
Next, make the body. The body is smaller and slightly oval, giving a cartoonish but charming puppy shape. You’ll work in rounds again, making sure to maintain the firmness with your seal-like tight stitching. This prevents the stuffing from poking out over time.
Crochet the ears and limbs. These small parts are usually made separately and attached with a yarn needle. Ears can be floppy or upright depending on the style you prefer. Limbs are optional for some patterns but add extra detail and personality.
Don’t forget the tail! A tiny curved tail completes the design and gives your puppy more character. Again, this can be made with a few rows of tight single crochet and attached at the base of the body.
Once all parts are complete, it’s time to assemble. Start by sewing the head to the body, then add the ears, limbs, and tail. Finally, secure the safety eyes and embroider the nose and mouth. Use black or brown thread for a classic puppy look.
Attach the metal key ring by sewing or looping it securely onto the top of the head. Your adorable Crochet puppy keychain pattern made with seals – Pattern is now ready to accompany keys, bags, or be gifted with love.
3. Personalizing Your Puppy Keychain
One of the best things about working with the Crochet puppy keychain pattern made with seals – Pattern is how easily it can be customized. You can change colors, features, and accessories to match personalities, pets, or themes.
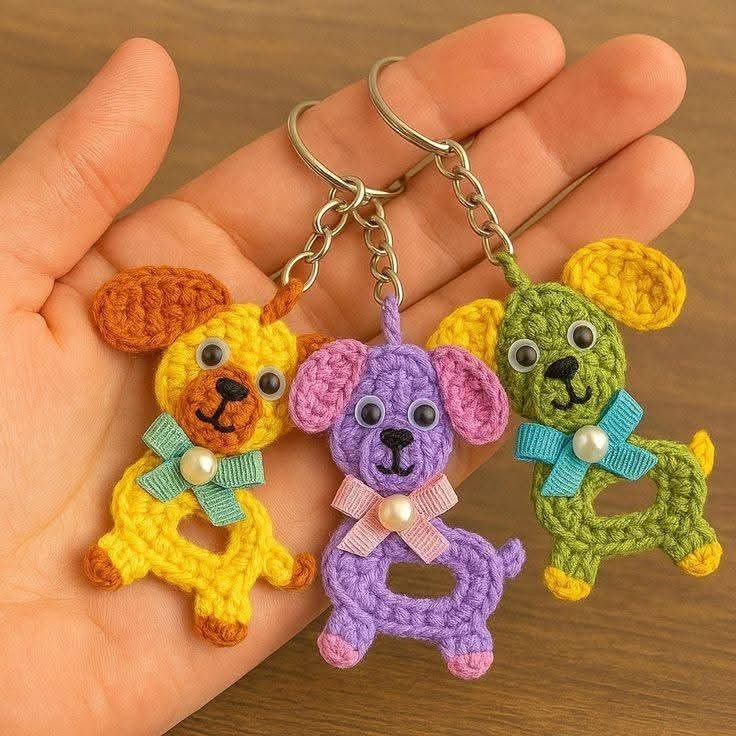
For a realistic look, choose natural dog colors like beige, brown, white, or black. If you’re making the keychain for a child or as a fun gift, go bold with pinks, purples, or even rainbow combinations. Let your imagination guide you.
Add details like a mini collar or bow tie. A small ribbon or a crocheted strip with a tiny charm attached can make your puppy look extra special. These finishing touches are simple yet make your keychain truly one-of-a-kind.
Consider creating themed puppies for holidays. Use red and green for Christmas, pastels for Easter, or spooky shades for Halloween. These versions are perfect for seasonal gifts or craft fairs.
You can also create sets. Craft a series of puppies with different ear shapes or tail styles. Some can sit, while others can stand or lay down. Variation adds interest and makes the collection more appealing.
To represent real pets, customize the features to match a specific dog breed. Whether it’s a dachshund with long ears or a pug with a wrinkled face, small details can mimic real-life features and make the keychain more sentimental.
Lastly, consider adding a scent. A drop of essential oil (lavender or citrus) to the stuffing can turn your Crochet puppy keychain pattern made with seals – Pattern into a mini-scented charm. Just make sure the recipient isn’t sensitive to fragrances.
4. Finishing, Gifting, and Care Tips
Finishing your keychain the right way ensures it lasts and looks professional. With a few extra steps, you can turn your Crochet puppy keychain pattern made with seals – Pattern into a gift-worthy masterpiece.
Start by checking all the seams. Tug gently on ears and limbs to ensure they’re securely sewn. Reinforce any loose parts to avoid them falling off after daily use. Your keychain should be durable enough to hang on bags or keys without damage.
Weave in all ends neatly using a yarn needle. Any visible yarn tails can make the keychain look unfinished or messy. Take your time to hide these properly within the stitches or body of the puppy.
If gifting, consider packaging your keychain in a small drawstring pouch or box. Adding a handmade tag or label gives it a boutique-style feel and shows that it was made with care.
For selling or sharing online, take good photos of your keychain with good lighting and neutral backgrounds. Show close-ups of the details like eyes, nose, and stitches. Mention that it’s made using the Crochet puppy keychain pattern made with seals – Pattern for authenticity.
To clean your keychain, hand-wash gently with mild soap and warm water. Avoid machine washing or heavy scrubbing as that can damage the safety eyes or distort the shape. Let it air dry thoroughly before using again.
Store or hang your keychain in a cool, dry place. If possible, avoid prolonged sun exposure, which can cause the yarn to fade over time. With care, your adorable puppy will stay fresh and huggable for years to come.
FAQ – Frequently Asked Questions
Is the Crochet puppy keychain pattern made with seals – Pattern suitable for beginners?
Yes, this project is beginner-friendly, especially if you’re familiar with basic stitches like single crochet. Using seal stitches just means working tightly, which comes with practice.
How long does it take to make one keychain?
On average, about 1.5 to 2 hours. With experience, you can complete it in under an hour, especially if you’ve pre-made multiple parts.
Do I need safety eyes, or can I embroider them?
Safety eyes add a polished look but are optional. Embroidered eyes are safer for children under 3 and also give your puppy more expression.
Can I sell keychains made from this pattern?
Most pattern creators allow selling finished items with credit to the designer. Always check the terms if you’re using a purchased pattern.
What are seal stitches in crochet?
“Seal stitches” refer to very tight, secure stitches—usually single crochets used in amigurumi—to create a firm shape. They’re not an official stitch, but the term describes the style of dense work.
Is it okay to stuff the keychain with cotton instead of fiberfill?
Yes, you can use cotton or scrap yarn, but fiberfill provides the most consistent shape and light weight for keychains.
Conclusion
The Crochet puppy keychain pattern made with seals – Pattern is the perfect project to combine creativity, function, and cuteness all in one. Whether you’re making it as a thoughtful gift, a fun personal accessory, or a product for your craft shop, this pattern delivers joy with every stitch.
We explored all the essential steps — from choosing your materials, crafting with precision, customizing your design, and ensuring durability — to help you bring this puppy to life
in the palm of your hand.
We’d love to hear your thoughts! If you’ve made your own puppy keychain or have ideas for variations, please leave a sincere opinion or suggestion below. Your feedback supports the crochet community and inspires others to start creating.
Happy hooking! 🧶🐶