Crochet Reindeer Hat – Pattern is the perfect way to bring festive charm, warmth, and handmade love into the holiday season. Whether you’re crafting for children, adults, or even as a decorative gift topper, a Crochet Reindeer Hat – Pattern adds a delightful touch of whimsy to winter celebrations. Right from the first stitch, this adorable project allows you to blend creativity with practicality, resulting in a cozy accessory that highlights everything we love about handmade crochet work.
Creating a reindeer-themed hat is not only fun but also surprisingly accessible, even for crocheters who are still building confidence with amigurumi-style features like antlers, ears, and noses. With careful attention to detail, you can craft a hat that looks professional and unique. Throughout this article, you’ll learn all the essential steps and valuable tips needed to complete your own Crochet Reindeer Hat – Pattern, while also ensuring your project stays durable, comfortable, and visually appealing.
With holiday crafts becoming more popular every year, having a go-to Crochet Reindeer Hat – Pattern in your pattern collection is a must. This article will guide you through materials, stitching methods, assembly techniques, and finishing touches to help you achieve the best possible results. Now let’s dive into the details so you can begin creating a festive accessory that everyone will adore.
1. Materials Needed for Crochet Reindeer Hat – Pattern
To begin your Crochet Reindeer Hat – Pattern, it’s important to gather the correct materials. The right yarn, hook size, and accessories will determine how well your hat fits, how comfortable it is, and how long it lasts.
Start with yarn selection. Soft, medium-weight (worsted) yarn is ideal for this project because it provides warmth while remaining lightweight enough for comfortable wear. Choose a primary shade of brown for the reindeer’s face, a darker brown for the antlers, and additional colors like red, black, and white for facial details. This color combination will bring your Crochet Reindeer Hat – Pattern to life with festive accuracy.
Your hook size will depend on your tension and chosen yarn, but a 4.5 mm to 5 mm hook typically works well for hats. Using the correct hook ensures the hat maintains its shape while remaining elastic enough to fit comfortably on the head.
You will also need safety eyes or black yarn to embroider the eyes. Safety eyes offer a polished, toy-like appearance, while embroidered eyes are a safer choice for small children. A large blunt-tipped needle will help sew features and weave in yarn ends neatly.
Other materials include polyester stuffing for shaping the antlers, stitch markers for tracking rounds, and optional embellishments such as a pom-pom or jingle bell for the nose. These elements add personality and charm to your Crochet Reindeer Hat – Pattern.
Finally, ensure you have a measuring tape handy. Accurate measurements guarantee that your hat fits its intended wearer perfectly, whether it’s for a child, teen, or adult. Proper preparation ensures your crafting experience is smooth from start to finish.
2. Crochet the Main Base of the Reindeer Hat
The base of the Crochet Reindeer Hat – Pattern is essentially a classic beanie shape, worked from the top down or bottom up depending on your preferred method. Most crafters prefer the top-down method because it allows easy adjustment for size.
Start by forming a magic ring, which gives the top of the hat a clean and secure finish. Work your first round of double crochet or half-double crochet stitches, depending on the texture you prefer. As you expand outward, ensure the increases are evenly spaced. A smooth, circular crown is vital for a comfortable and well-fitted hat.
After establishing the crown, continue working in rounds without increases. This builds the length of the hat. Measure frequently to ensure it reaches the appropriate height for the intended wearer. Using soft, flexible yarn ensures your Crochet Reindeer Hat – Pattern provides warmth without feeling too tight or heavy.
Adding ribbing at the brim is a great way to enhance the hat’s fit. You can use front-post and back-post double crochet stitches to create stretchy ribbing that hugs the head comfortably. The ribbed brim also adds a finished, professional look.
As you progress, ensure your stitches remain consistent. Uneven stitching can cause parts of the hat to look lumpy or stretched, affecting the final appearance. The more consistent your tension, the more polished your Crochet Reindeer Hat – Pattern will appear.
Once the base is complete, it’s time to move on to creating the features that turn an ordinary beanie into an adorable festive reindeer.
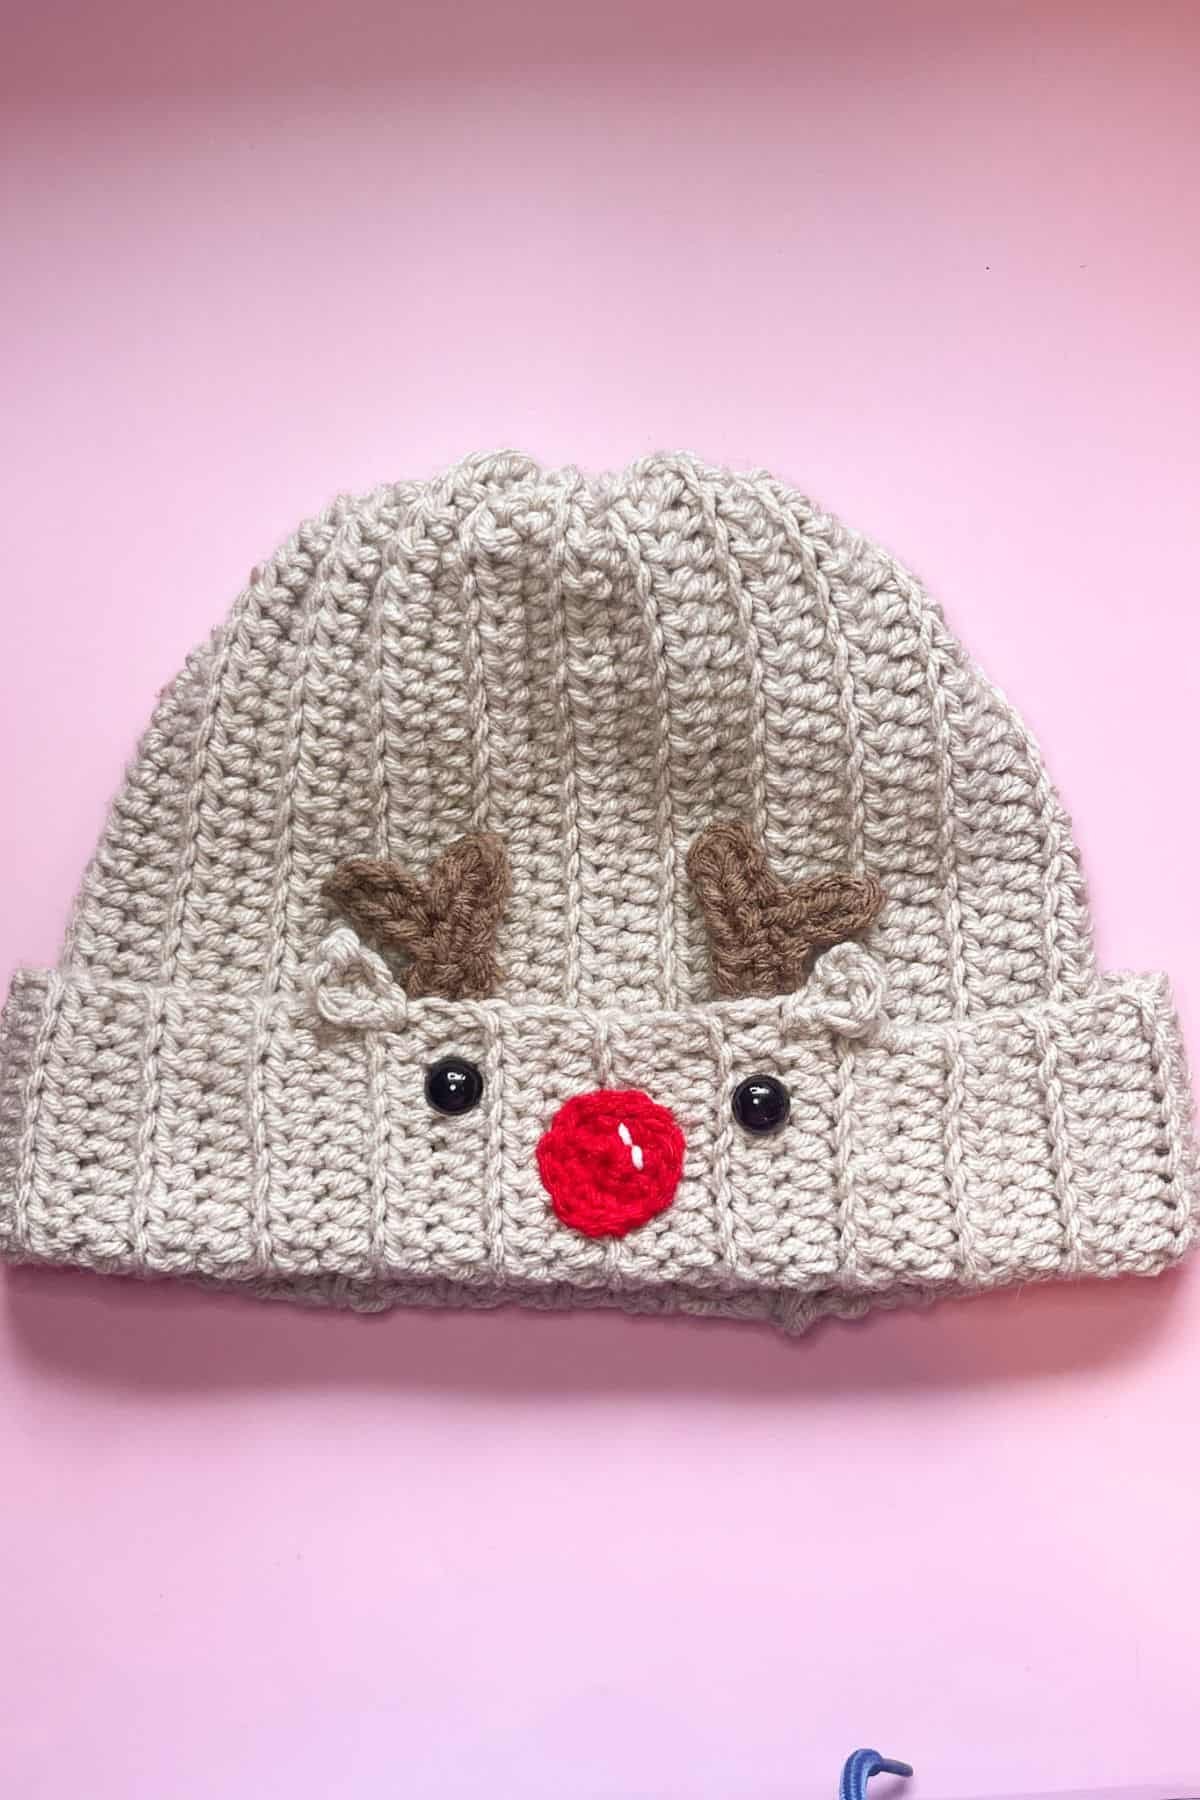
3. Crafting the Reindeer Features: Antlers, Ears, and Nose
The defining elements of your Crochet Reindeer Hat – Pattern are the features that give the reindeer its personality. The antlers, ears, and nose are what transform the hat from a simple accessory into a whimsical holiday favorite.
Start with the antlers. These are usually worked in tight single crochet stitches to create firm, stable shapes. Make two identical antlers, stuffing them lightly with polyester fiberfill as you work. Overstuffing can make them too heavy, preventing them from standing upright. Understuffing can make them floppy. Finding the right balance ensures the antlers sit perfectly.
Next, craft the ears. Reindeer ears have a soft, rounded shape that complements the stronger lines of the antlers. Ears are often worked flat and then folded slightly to create a realistic curve. Using a slightly lighter shade of brown or adding a touch of cream yarn for the inner ear adds visual depth.
The nose is one of the most iconic elements. Traditionally, a Crochet Reindeer Hat – Pattern features a bright red nose for a Rudolph-inspired look, but brown or black noses are also adorable. You can crochet a small sphere or oval shape and stuff it lightly, or attach a pom-pom for a fluffy alternative.
Once all pieces are crocheted, arrange them on the hat before sewing. This step ensures proper placement and symmetry. The antlers should be centered near the top, the ears positioned slightly below, and the nose centered above the brim.
Use strong, secure stitching to attach the pieces. Since the hat may be worn frequently or handled by children, durability is important. Proper attachment ensures your Crochet Reindeer Hat – Pattern remains intact for many holiday seasons.
4. Finishing Touches and Customization Ideas
After assembling the facial features, it’s time to add the finishing touches that make your Crochet Reindeer Hat – Pattern uniquely yours. These small details can transform a simple design into a standout holiday masterpiece.
Start by adding embroidered details, such as eyebrows or small cheek blush marks. A few extra stitches can bring expression and personality to your reindeer, giving it a friendly and animated appearance.
You can also add holiday-themed embellishments. A small jingle bell sewn onto the nose or brim adds sound and festive charm. Little crochet holly leaves or snowflakes can be attached for extra decoration. These additions enhance the holiday theme and make your Crochet Reindeer Hat – Pattern even more special.
Consider making a matching scarf, mittens, or boot cuffs in coordinating colors. This creates a complete winter ensemble that makes adorable family photos or memorable gifts.
If you’re gifting the hat, adding a personalized tag or gift label can make it even more meaningful. Handmade items carry sentimental value, and thoughtful touches enhance the emotional connection.
Finally, block the hat lightly to smooth out the stitches and help the assembled features settle into their final positions. This improves the overall aesthetic and ensures the hat looks polished and professional.
Your reindeer hat is now ready to wear, gift, or display proudly. With its cozy design and festive charm, your Crochet Reindeer Hat – Pattern is sure to become a favorite during the holiday season.
FAQ About Crochet Reindeer Hat – Pattern
1. Is the Crochet Reindeer Hat suitable for beginners?
Yes, beginners can make it with patience, especially if they follow a clear Crochet Reindeer Hat – Pattern step-by-step.
2. Can I adjust the hat to different sizes?
Absolutely. Increasing or decreasing rounds and measuring frequently allows you to customize the hat for babies, kids, or adults.
3. What type of yarn works best?
Soft, medium-weight acrylic yarn is ideal for comfort and durability.
4. Are safety eyes safe for infants?
No. For babies, embroidered eyes are recommended for safety.
5. Can I wash the hat?
Yes. Hand washing is best to preserve the shape and attached features.
6. Can I customize the nose color?
Yes! Red is classic, but brown, black, or even sparkly yarn can make adorable alternatives.
Conclusion
Crafting a Crochet Reindeer Hat – Pattern is a joyful and rewarding project that blends creativity with festive cheer.
This guide covered materials, stitching the hat base, crafting reindeer features, and adding special finishing touches. Now you’re fully prepared to create a heartwarming accessory that spreads holiday magic wherever it goes.
