The Crochet Rose – Pattern is one of the most beloved projects in the world of needle arts, offering a timeless way to capture the beauty of nature using only a hook and a bit of yarn. Whether you are looking to create a romantic bouquet that will never wilt, embellish a winter hat, or add a floral touch to your home décor, mastering this specific design is a rite of passage for many crafters. Unlike real flowers, a handmade rose carries a sense of permanence and personal effort that makes it an extraordinary gift for birthdays, anniversaries, or Mother’s Day.
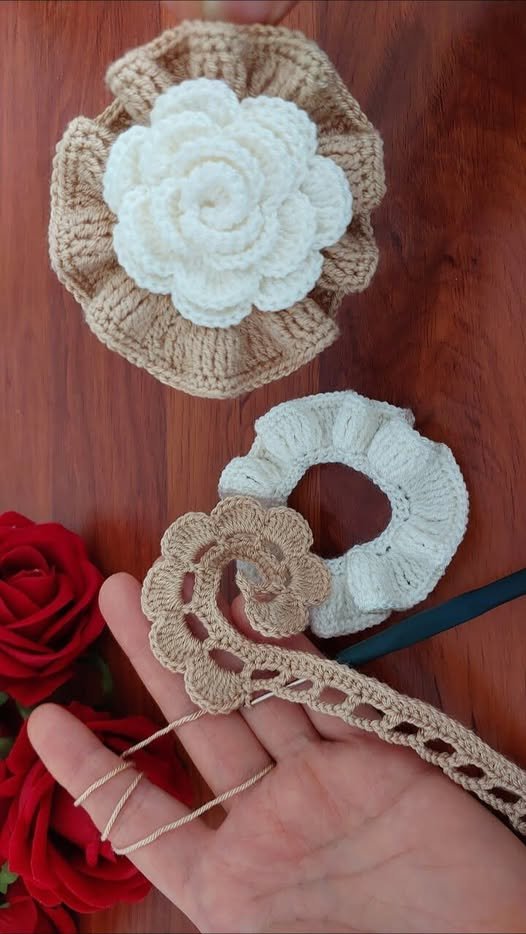
Working on a Crochet Rose – Pattern allows you to experiment with various textures, yarn weights, and colors to mimic different species of roses, from delicate tea roses to robust cabbage roses. The construction is surprisingly logical, usually involving a long, scalloped strip that is coiled and stitched into place, but the magic lies in the details of the petals. As you progress through the stitches, you will see how a simple string of yarn begins to take on a three-dimensional form, blooming right between your fingertips with every completed row.
In this comprehensive guide, we are going to explore the intricacies of the Crochet Rose – Pattern, breaking down the essential materials you need to ensure your flower looks realistic and holds its shape. We will also dive into the technical aspects of the stitch work, from the foundation chain to the final assembly of the petals. By the end of this article, you will have a deep understanding of how to customize your floral creations to suit any style, ensuring that your handmade crochet flowers stand out as professional-grade pieces of art.
1. Choosing the Perfect Materials for Your Crochet Rose – Pattern
The final look of your Crochet Rose – Pattern depends heavily on the type of yarn you select. For a delicate, classic look, many crafters prefer mercerized cotton yarn, which has a subtle sheen and excellent stitch definition, allowing the edges of the petals to look crisp. If you want a larger, more rustic flower, a wool or acrylic blend in a worsted weight can create a soft, cozy rose that works perfectly as a brooch or a blanket embellishment.
Hook size is equally important when following a Crochet Rose – Pattern. If your stitches are too loose, the petals will flop over and lose their botanical structure; if they are too tight, the rose will look stiff and unnatural. Generally, using a hook that is slightly smaller than what the yarn label suggests is a clever trick to ensure the petals have enough tension to stand upright without the need for wires or stiffening agents.
Color selection plays a vital role in how “real” your Crochet Rose – Pattern appears. While a solid red is the quintessential choice, using a variegated yarn or a “cake” yarn with slow color transitions can mimic the natural ombre effect found in real petals. Some advanced artists even use two different shades of the same color—a darker one for the inner bud and a lighter one for the outer petals—to give the flower more visual depth and dimension.
You will also need a high-quality tapestry needle to assemble your Crochet Rose – Pattern. Once the long strip of petals is finished, the needle is used to sew the base of the coils together. A blunt tip is preferred so that you don’t split the yarn fibers while securing the flower, ensuring that the structural integrity of the rose remains intact even if it is handled frequently or attached to a garment.
For those who want to create a long-stemmed version of the Crochet Rose – Pattern, floral wire or bamboo skewers are essential additions to your toolkit. You can wrap these supports in green yarn to create a realistic stem. Having a hot glue gun or strong fabric glue on hand can also help in securing the “calyx” (the green part at the base of the flower) to the stem, providing a professional finish to your crochet bouquet.
Lastly, don’t overlook the importance of stitch markers. When working on a complex Crochet Rose – Pattern, especially one with many layers of petals, it is easy to lose count of your repetitions. Placing a marker at the start of each petal sequence ensures that your flower remains symmetrical. This small step prevents the frustration of having to “frog” your work because one side of the rose ended up significantly larger than the other.
2. Master Techniques for Shaping Realistic Petals
The foundation of a successful Crochet Rose – Pattern is usually a long foundation chain. The number of chains determines how many petals your rose will have and how “full” the final bloom will appear. A common technique is to work a series of V-stitches or shells into this chain, which creates the wide, flared shape necessary for the petals to overlap naturally once the strip is rolled into its final spiral shape.
Shaping the petals in a Crochet Rose – Pattern is achieved by varying the height of the stitches. Typically, you will start a petal with a short stitch like a single crochet, move up to half-double and double crochets in the center, and then descend back down to a single crochet. this “arc” creates the rounded, soft edge of a flower petal, making your crochet floral art look far more organic than if you used uniform stitch heights throughout.
Some variations of the Crochet Rose – Pattern utilize the “Picot Stitch” at the very center of a petal’s edge. A picot is a tiny loop made of three chains that creates a slight point, which is perfect for mimicking the “pointed” petals seen on certain hybrid tea roses. This tiny detail adds a level of professional crochet texture that makes the flower look like it was purchased from a high-end boutique rather than made at home.
The rolling process is where the Crochet Rose – Pattern truly comes to life. How tightly or loosely you roll the finished strip will dictate the flower’s personality. A tight roll creates a “bud” that is just beginning to open, while a loose roll results in a full-bloomed rose. Mastering the sculptural assembly of the rose is just as important as the crochet itself, as it allows you to control the diameter and height of the finished piece.
To prevent your Crochet Rose – Pattern from looking flat, you can work into the “back loops only” (BLO) during certain rows. This technique leaves a visible ridge on the front of the work, which provides a natural “fold” line for the petals. It adds a shadow effect that mimics the way light hits a real rose, enhancing the three-dimensional quality of your work and making the layers look distinct rather than muddled.
Finally, adding a “calyx” to your Crochet Rose – Pattern provides the finishing touch of realism. The calyx is the green, star-shaped piece at the bottom of the flower that holds the petals together. Following a leaf pattern for this section and sewing it firmly to the base not only hides the messy stitches from the assembly phase but also gives the rose a complete, botanical look that is essential for stems.
3. Innovative Ways to Use and Embellish Your Crochet Rose
Once you have mastered the Crochet Rose – Pattern, the possibilities for its use are endless. One of the most popular applications is creating a everlasting crochet bouquet. By making a dozen roses in varying shades of pink and white and bundling them with dried baby’s breath, you can create a stunning centerpiece for a dining table that adds a touch of cottage-core charm to your home without the maintenance of real flowers.
You can also incorporate the Crochet Rose – Pattern into wearable fashion. Small roses made from thread-weight yarn make exquisite earrings or delicate necklaces when paired with jewelry findings. Larger roses can be stitched onto the lapel of a coat or the side of a beanie to create a custom fashion statement. Because they are made of yarn, these embellishments are soft, lightweight, and completely washable.
For home décor, the Crochet Rose – Pattern can be used to create luxurious curtain tie-backs or decorative pillow covers. Imagine a plain cream pillow adorned with a cluster of three-dimensional roses in the corner; it instantly upgrades the look of a room. This type of floral crochet décor is a favorite among those who enjoy the “shabby chic” or Victorian aesthetic, adding texture and warmth to any living space.
Adding beads or pearls to the center of your Crochet Rose – Pattern can turn a simple flower into a piece of jewelry. Placing a single pearl in the heart of the rose mimics a dewdrop and adds a touch of elegance. This is a popular technique for wedding accessories, where a crochet rose hairpiece can serve as a beautiful “something old” or “something handmade” for a bride or her bridesmaids.
Scenting your Crochet Rose – Pattern is a unique way to engage more senses. You can hide a small cotton ball soaked in rose essential oil inside the base of the flower before sewing it shut. This turns your handmade flower into a natural room freshener. It’s a wonderful idea for gift-giving, as the recipient will be greeted with the sweet smell of roses the moment they open the package.
Lastly, you can scale the Crochet Rose – Pattern up to giant proportions by using “jumbo” or “t-shirt” yarn. A giant crochet rose can serve as a unique floor cushion or a bold statement piece in a child’s nursery. Using larger materials doesn’t change the logic of the pattern, but it does transform the item from a small embellishment into a significant piece of furniture that showcases your love for the craft.
4. Troubleshooting and Care for Your Crochet Flowers
One common issue when working on a Crochet Rose – Pattern is the “twisting” of the foundation strip. Because of the heavy increases used to create the petal flares, the strip will naturally want to curl. Do not worry—this is actually a good sign! This natural curl makes the rolling process much easier. If the strip is too straight, the petals won’t have the organic volume needed to look like a real flower.
If you find that your Crochet Rose – Pattern looks too small after assembly, you may need to increase the number of petals in your next attempt. Most patterns are modular, meaning you can simply add more “repeats” to the foundation chain to make a larger, more lush rose. Understanding the math of crochet repeats allows you to customize the size of the bloom without needing an entirely new set of instructions.
Maintaining the shape of your Crochet Rose – Pattern over time can be a concern, especially for items like brooches. If the petals start to sag, you can use a mixture of water and fabric stiffener or even plain hairspray to “set” the petals in place. This crochet blocking technique ensures that the rose maintains its “freshly bloomed” look even after months of being worn on a heavy coat or bag.
Cleaning your Crochet Rose – Pattern requires a gentle touch. If the rose is part of a garment, follow the care instructions for the yarn used. For standalone decorative roses, a quick dip in cool, soapy water followed by air drying is usually sufficient. Avoid the dryer, as the tumbling motion can squish the petals and ruin the delicate spiral assembly you worked so hard to perfect.
If the center of your Crochet Rose – Pattern feels loose or looks like it might fall apart, you likely need more “anchor stitches” at the base. When sewing the coil together, make sure your needle passes through every single layer of the base. This “deep stitching” creates a solid core, ensuring that the crochet rose structure remains stable and doesn’t unravel even if the flower is pulled or tugged.
Finally, if you are struggling with the edges of your petals looking “jagged,” check your transition stitches. Moving too quickly from a single crochet to a treble crochet can create a harsh step. Adding a half-double crochet in between provides a smoother gradient, resulting in a much softer, more realistic petal edge. Paying attention to these small transitions is what separates a beginner’s work from an expert’s Crochet Rose – Pattern execution.
FAQ – Frequently Asked Questions
Is the Crochet Rose – Pattern suitable for beginners?
Yes, it is considered an advanced-beginner project. If you know how to chain and work the basic stitches (single, double, and treble crochet), you can definitely make a rose. The most challenging part is the assembly (rolling and sewing), but with a little practice, it becomes very intuitive.
What is the best yarn for making roses that look real?
For the most realistic appearance, use a Size 10 crochet thread or a fingering weight cotton yarn. These thin materials allow for intricate details and sharp petal edges. However, for a softer, “shabby chic” look, a standard DK weight cotton works beautifully as well.
How long does it take to complete one Crochet Rose – Pattern?
A single rose usually takes between 30 to 60 minutes, depending on your speed and the complexity of the pattern. Because they are relatively quick to make, they are excellent projects for “on-the-go” crafting or for using up small scraps of leftover yarn from larger projects.
Do I need to use wire for the petals?
Usually, no. If your tension is correct and you use a slightly smaller hook, the stitches should be dense enough to hold their own shape. However, if you are making very large petals or using a very soft yarn, a thin craft wire can be crocheted into the final round for extra support.
Can I turn a crochet rose into a hair accessory?
Absolutely! Once you finish the Crochet Rose – Pattern, simply sew or glue the flat base of the flower onto a felt circle, and then attach that circle to a hair clip, headband, or elastic tie. It is a durable and stylish way to add a handmade touch to your hairstyle.
How do I make the leaves for my rose?
Most Crochet Rose – Patterns include a separate leaf instruction. Leaves are usually made by working around both sides of a short foundation chain, creating an oval shape with a pointed tip. Adding a few leaves in a contrasting green yarn makes the rose pop visually.
Conclusion
In this guide, we have explored the beautiful and versatile world of the Crochet Rose – Pattern, from selecting the right cotton yarns to mastering the sculptural art of rolling and sewing the petals. We’ve learned that the secret to a realistic rose lies in varying the stitch heights to create natural arcs and using a calyx to provide a professional finish.
Whether you’re creating a permanent bouquet, an elegant fashion accessory, or a scented home décor piece, the skills you’ve gained here will allow you to “grow” a garden of yarn that lasts forever. The beauty of crochet is that it allows us to take a simple material and transform it into something that evokes emotion and beauty.