Crochet Rose- Pattern designs have become a staple in the world of modern fiber arts because they offer a timeless elegance that real flowers simply cannot sustain. Whether you are looking to embellish a cozy blanket, create a stunning bridal bouquet, or simply add a touch of handmade charm to your home decor, mastering the art of the crochet rose is a rewarding milestone for any crafter. The versatility of a crochet rose- pattern lies in its ability to be adapted through different yarn weights and hook sizes, allowing you to create everything from tiny, delicate rosebuds to large, cabbage-style blooms that command attention.
In today’s fast-paced digital world, many enthusiasts are turning back to the tactile satisfaction of handmade crochet to find a sense of peace and creativity. Starting a Crochet Rose- Pattern project is an excellent way to practice essential stitches like the double crochet, half double crochet, and the delicate picot stitch for petal definition. By focusing on the structural flow of the yarn, you can transform a simple chain into a three-dimensional masterpiece that mimics the intricate layers of nature.
This comprehensive guide is designed to take you through every step of the process, ensuring your crochet rose- pattern results in a professional-grade finish suitable for gifts or even selling on boutique platforms. We will dive deep into the technical aspects of stitch tension, yarn selection, and the assembly secrets that give these flowers their realistic “lift.” By the end of this article, you will have the confidence to tackle any floral crochet project and customize it to fit your unique aesthetic style.
1. Understanding the Foundation of a Crochet Rose- Pattern
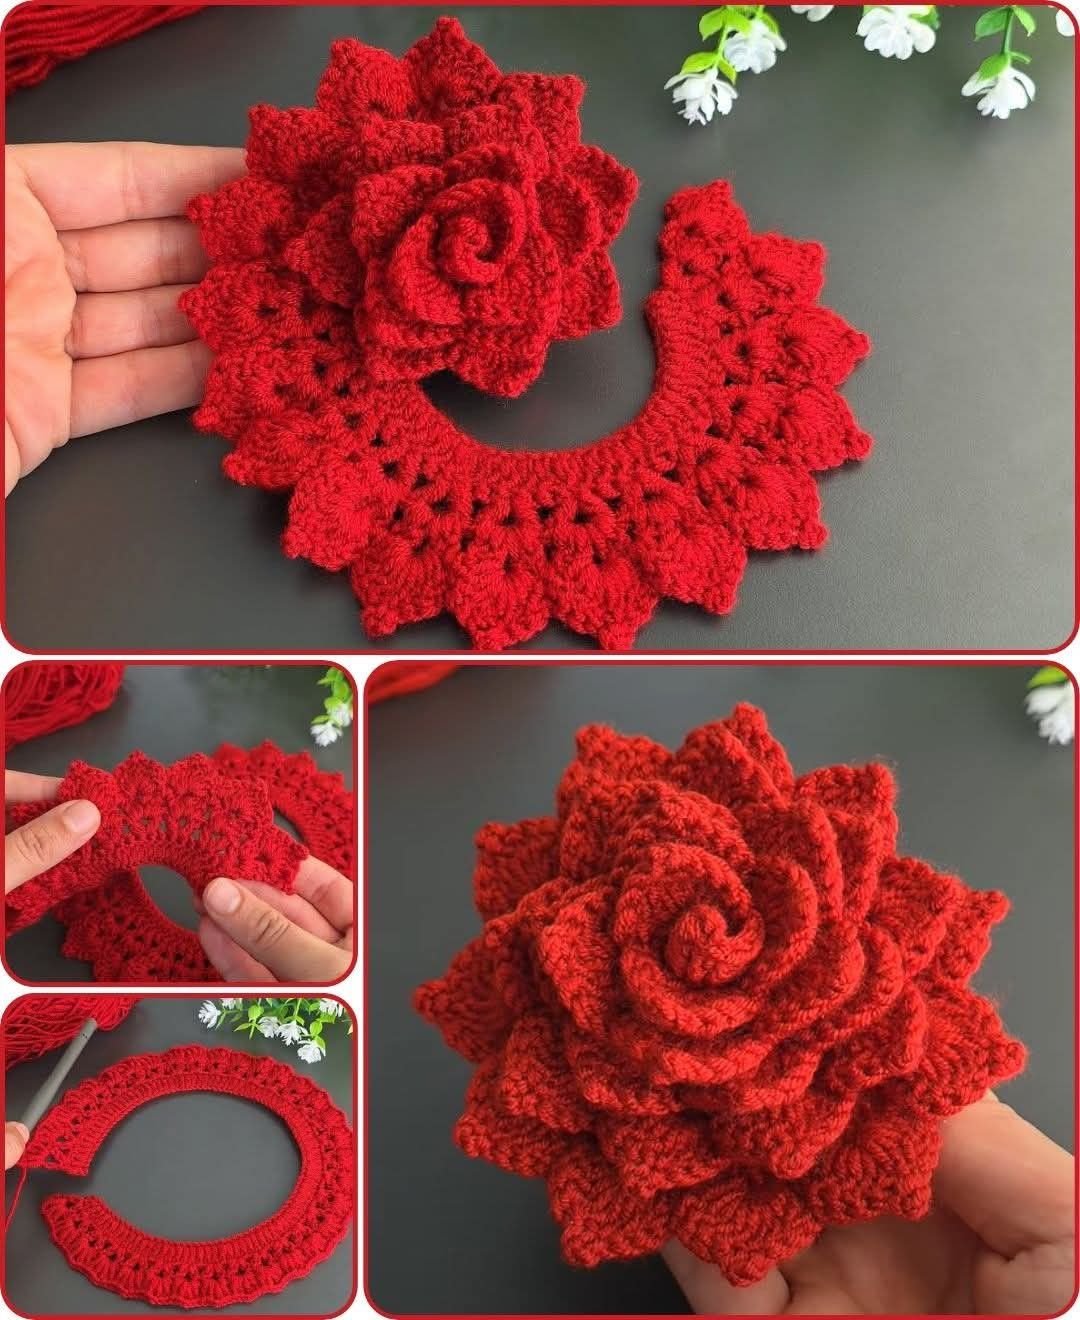
The magic of a Crochet Rose- Pattern begins with a simple foundation chain that determines the final size and fullness of your flower. Most patterns utilize a long strip of “petals” that are later coiled and sewn together, making it a very accessible project for those who are still getting comfortable with working in rows. To achieve a classic look, your foundation must be worked with consistent stitch tension to ensure the petals sit evenly once the rose is rolled into its final shape.
When choosing materials for your crochet rose, consider using a mercerized cotton yarn because it provides excellent stitch definition and a slight sheen that mimics the natural waxy texture of rose petals. A 3.5mm crochet hook (E-4) is often the “sweet spot” for medium-weight yarn, creating a fabric that is firm enough to hold its shape without being too stiff to roll. Always check your yarn gauge before starting if you are aiming for a specific size, especially for wearable accessories.
The first few rows of your Crochet Rose- Pattern usually involve creating “V-stitches” or small loops that act as the base for the larger petals to follow. This skeletal structure is vital because it provides the necessary gaps for the shell stitches that form the iconic rounded edges of a rose. Using stitch markers at the beginning of your rows can help you keep track of your count, preventing the common mistake of losing stitches as the strip grows longer.
As you progress through the pattern, you will notice that the petals often increase in size—starting with single crochet or half double crochet for the inner bud and moving toward treble crochet for the outer layers. This graduation is a key element of a high-quality Crochet Rose- Pattern because it replicates the natural blooming process where outer petals are more expansive. Precision during this stage ensures that your flower doesn’t look flat or lopsided once assembled.
Many crafters enjoy experimenting with variegated yarn or ombre yarn to give their crochet rose a more organic, multi-tonal appearance. If you prefer a solid color, deep reds, soft pinks, and creamy whites remain the most popular choices for a classic crochet rose. Regardless of the color, ensure your yarn weight is consistent throughout the project to avoid uneven petals that could disrupt the circular flow of the bloom.
Finally, don’t forget the importance of the turning chain. In a Crochet Rose- Pattern, the turning chain often counts as the first stitch, and skipping it or adding an extra one can subtly change the curve of your petal. Take your time with the initial rows, as they serve as the anchor for the entire floral structure. A well-prepared foundation is the difference between a simple craft project and a stunning piece of textile art.
2. Mastering the Petal Stitches and Technical Texture
The “soul” of any Crochet Rose- Pattern is found in the specific sequence of stitches used to create the scalloped edges of the petals. Most professional patterns rely on the shell stitch or the fan stitch to achieve that soft, organic curve. By grouping multiple double crochets into a single space, you create a fullness that naturally ripples, giving the crochet rose its signature three-dimensional depth and “ruffled” look.
To add even more realism to your Crochet Rose- Pattern, you can incorporate the front post double crochet technique to create raised ridges on the petals. This adds a physical texture that catches the light and makes the flower look more complex than a standard flat design. When you are working on the outer petals, increasing the number of stitches in each shell will allow the flower to “flare” outward, just like a rose in full bloom.
Another advanced tip for your crochet rose is the use of slip stitches between petals to create sharp transitions. This helps each petal stand out individually rather than blending into a single wavy line. If you are following a detailed crochet tutorial, look for instructions on “shaping while you go,” which often involves varying the height of your stitches within a single petal to create a more pointed or rounded tip.
The choice of fiber content also impacts how these stitches behave; for instance, acrylic yarn might produce a softer, fuzzier rose, while bamboo yarn offers a sophisticated drape. For those looking for a vintage feel, using a lace weight thread and a tiny steel hook can produce a micro-crochet rose that is perfect for jewelry or delicate lace inserts. The Crochet Rose- Pattern remains the same, but the scale change offers a completely different aesthetic.
One of the most important SEO keywords in the crafting world is “easy crochet flowers,” and this pattern fits that description perfectly while still allowing for advanced modifications. If you find the petals are curling too much, you may need to adjust your hook size or loosen your grip. On the other hand, if the petals are too floppy, a tighter tension will help the crochet rose maintain its integrity without the need for fabric stiffeners or wires.
As you finish the stitching phase of your Crochet Rose- Pattern, leave a long yarn tail (at least 12 inches) for the assembly process. This tail is crucial for “sewing” the base of the rose together once it is rolled. Using the same yarn for assembly ensures that the seams are invisible and that the flower is structurally sound, whether it’s being pinned to a hat or glued to a stem for a crochet bouquet.
3. Assembly and Shaping for a Realistic Finish
The assembly phase is where your Crochet Rose- Pattern truly comes to life, transforming from a long, flat strip of lace into a beautiful floral orb. Start by taking the end with the smallest petals (the “bud” end) and begin rolling it inward tightly. As you move outward toward the larger petals, you can begin to roll more loosely, which allows the “flower” to open up and look more natural.
While rolling your crochet rose, it is helpful to apply a small amount of tension to the bottom edge to keep the base flat. This flat base is essential if you plan on attaching the rose to a quilted project, a headband, or a flat surface. Use a tapestry needle and the long yarn tail you saved to pass through all the layers of the base every few turns, securing the shape as you go.
For those who want a 3D crochet rose that stands upright, you can insert a floral wire through the center of the bud before you finish rolling. Wrap the wire in green yarn or floral tape to create a realistic stem. This technique is frequently used in crochet flower arrangements and home decor pieces where the flower needs to “stand” in a vase alongside other crochet greenery.
A secret trick for a professional Crochet Rose- Pattern finish is “petal blocking.” Once the rose is sewn together, use your fingers to gently pull and shape each petal, curving the edges outward. If you used cotton yarn, a light mist of water and a bit of “finger-sculpting” can set the shape permanently. This step is often overlooked by beginners but is a hallmark of expert-level crochet.
You can also customize the “fullness” of your crochet rose by how tightly you overlap the petals during the sewing process. Overlapping them by half will create a dense, multi-layered bloom, while a slight overlap will result in a more delicate, open-faced flower. This flexibility is why the Crochet Rose- Pattern is one of the most searched and downloaded patterns in the DIY craft community.
Remember to weave in your ends securely at the bottom of the flower. Since a crochet rose is often handled or moved, a loose end can cause the entire structure to unravel over time. A simple knot hidden within the base layers, followed by weaving the tail through the “meat” of the stitches, will ensure your handmade flower lasts for years to come as a cherished keepsake.
4. Creative Ways to Use Your Crochet Rose
Once you have mastered the Crochet Rose- Pattern, the possibilities for its application are virtually endless. One of the most popular uses is creating crochet appliques for clothing, such as denim jackets or children’s sweaters. These roses add a pop of color and a personal touch that makes store-bought items feel unique and high-end, aligning with the growing trend of personalized fashion.
In the world of home decor, a collection of roses made from this Crochet Rose- Pattern can be turned into a stunning crochet wreath. By mixing different sizes and shades of red, pink, and burgundy, you can create a romantic piece for Valentine’s Day or a permanent floral accent for a bedroom. Adding crochet leaves in various shades of forest and sage green will provide the necessary contrast to make the rose colors “pop.”
For those who enjoy crochet for weddings, these roses are a budget-friendly and everlasting alternative to fresh flowers. You can create entire bridal bouquets, boutonnieres, and table centerpieces using the Crochet Rose- Pattern. Not only do they look beautiful in photos, but they also serve as a wonderful memento for the guests and the bridal party to keep long after the ceremony is over.
Gift-giving is another area where the crochet rose shines. Attaching a single rose to the top of a wrapped gift box adds a level of thoughtfulness that a plastic bow simply cannot match. You can even infuse the yarn with a drop of rose essential oil to give the recipient a multi-sensory experience. It’s a small detail that elevates your handicraft skills and shows the recipient how much you care.
If you are a digital creator or blogger, featuring a Crochet Rose- Pattern on your site is a great way to attract traffic, as floral patterns are evergreen and highly searchable. Use high-quality photos of your finished roses in different settings to inspire your audience. Including a step-by-step crochet tutorial with clear images will keep visitors on your page longer, which is excellent for your SEO performance.
Finally, consider using your roses for charity crochet projects. Many hospitals and senior living centers appreciate colorful, handmade items to brighten up their spaces. A small bouquet of crochet roses can bring a smile to someone’s face and provide a sense of comfort. No matter how you choose to use it, the Crochet Rose- Pattern is a gift that keeps on giving, both to the maker and the receiver.
FAQ – Frequently Asked Questions
1. What is the best yarn for a Crochet Rose- Pattern?
For the best results, a DK weight cotton yarn or a mercerized cotton is highly recommended. These fibers provide the stiffness needed to hold the petal shapes and offer a beautiful, clean finish that highlights your stitch work.
2. How long does it take to finish one rose?
An intermediate crafter can typically complete a standard Crochet Rose- Pattern in about 30 to 45 minutes, including the assembly and sewing time. It is a perfect “one-sitting” project for those looking for quick gratification.
3. Can I make the rose bigger or smaller?
Yes! To change the size, simply adjust your foundation chain length or change your yarn weight. Using a bulkier yarn with a larger hook will result in a giant rose, while using embroidery floss will create a miniature version.
4. How do I clean my crochet roses?
If you used cotton or acrylic yarn, you can gently hand wash them in cool water with a mild detergent. Reshape them while damp and let them air dry completely to maintain the 3D floral structure.
5. Do I need to use wire for the petals?
Most Crochet Rose- Pattern designs do not require wire for the petals themselves if your tension is correct. However, if you want very large, dramatic petals that stand upright, you can crochet over a thin gauge floral wire.
6. Can a beginner tackle this pattern?
Absolutely. As long as you know the basic stitches like chain, single crochet, and double crochet, you can follow a Crochet Rose- Pattern. The “rolling” technique is very forgiving for beginners.
Conclusion
In conclusion, the Crochet Rose- Pattern is more than just a craft project; it is a gateway to exploring the intricate beauty of floral fiber arts. Throughout this article, we have covered the importance of a strong foundation, the technical stitches required for realistic petals, the art of assembly, and the many creative ways to utilize your finished blooms. By focusing on stitch precision and material choice, you can create stunning, everlasting flowers that rival the beauty of nature itself.
We hope this guide has inspired you to pick up your hook and start your own floral journey. Whether you are making these for yourself, as gifts, or for a professional portfolio, the skills learned here will serve you in many future crochet projects. The beauty of handmade items lies in their imperfections and the love poured into every loop.