The Crochet rose tutorial – Pattern is one of the most rewarding projects for crafters of all skill levels, offering a timeless way to create everlasting floral beauty. Whether you are looking to embellish a cozy blanket, create a stunning bouquet, or add a delicate touch to a handmade garment, mastering the art of the crochet rose is a fundamental skill. This guide is designed to walk you through the entire process, ensuring that your finished product looks professional, vibrant, and structurally sound.
Starting a Crochet rose tutorial – Pattern allows you to experiment with various textures and colors, transforming simple yarn into a sophisticated piece of art. Many beginners find that floral patterns are the perfect entry point into three-dimensional crochet because they rely on basic stitches used in creative sequences. By following a well-structured crochet pattern, you can eliminate the guesswork and focus on the meditative rhythm of the hook and thread, resulting in a project that feels both personal and high-quality.
In this comprehensive Crochet rose tutorial – Pattern, we will explore the essential materials, the step-by-step construction of the petals, and the final assembly techniques that bring your flower to life. High-quality handmade crochet items are currently trending in home decor and fashion, making this the perfect time to sharpen your skills. Let’s dive into the details of this floral crochet project and discover how easy it is to create your very own yarn-based garden using a professional stitch guide.
1 Understanding the Crochet rose tutorial – Pattern Basics
Before picking up your hook, it is vital to understand that a Crochet rose tutorial – Pattern usually follows a linear construction that is later rolled into a spiral. This method is preferred because it creates a natural, layered look that mimics the real growth of flower petals in nature. By working on a long chain first, you establish the foundation for the entire crochet rose structure.
The beauty of this specific crochet technique lies in its versatility across different yarn weights and hook sizes. If you choose a delicate lace yarn, your crochet rose tutorial will result in a tiny, elegant bud perfect for jewelry or hair clips. Conversely, using a bulky wool yarn will produce a large, statement-making bloom suitable for decorative pillows or winter accessories.
To achieve the best results with this Pattern, you should be familiar with the “Magic Ring” or a standard starting chain, as these serve as the anchor for your work. Most flower patterns utilize a combination of slip stitches, single crochets, and double crochets to create the varying heights needed for rounded petals. Understanding how these stitches interact is the first step toward crochet mastery.
When looking at a Crochet rose tutorial – Pattern, pay close attention to the stitch count mentioned in the initial rows. Consistency is the secret to a symmetrical flower, so using a stitch marker can be incredibly helpful for keeping track of your progress. A well-organized workspace also contributes to a smoother crafting experience, allowing you to focus on the tension of your yarn.
Choosing the right crochet hook is just as important as the yarn itself, as the gauge will determine how “tight” or “loose” the petals appear. For a realistic crochet rose, a slightly tighter tension is often recommended so the flower holds its shape without needing internal wire support. This ensures your crochet project remains durable over time, even with frequent handling.
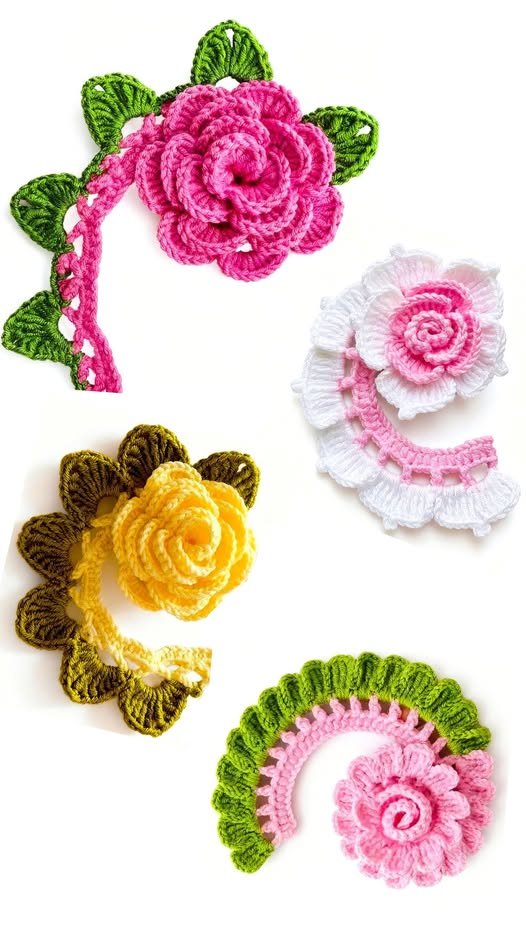
Finally, remember that every Crochet rose tutorial – Pattern is a template for your creativity, allowing for endless customization. You can use variegated yarn for a multi-tonal effect or stick to classic reds and pinks for a traditional look. As you progress through the tutorial, you will see how these simple loops of thread begin to take on an organic, botanical form.
2 Gathering Materials for Your Crochet rose tutorial – Pattern
The first physical step in your Crochet rose tutorial – Pattern journey is selecting high-quality materials that align with your vision. You will need a soft but sturdy yarn, preferably cotton or an acrylic blend, which provides excellent stitch definition for the intricate petal edges. The material choice directly impacts the final texture and longevity of your crochet flower.
In addition to your primary yarn, ensure you have a crochet hook that matches the recommended size on the yarn label. Typically, a 3.5mm or 4.0mm hook works wonders for standard medium-weight yarn, providing the perfect balance between flexibility and structure. Having the correct tools makes following the crochet tutorial a much more enjoyable and efficient process.
You will also need a pair of sharp embroidery scissors and a large-eyed tapestry needle for the assembly phase of the Pattern. The needle is essential for “sewing” the base of the rose together once you have finished the crocheted strip. Without these finishing tools, your handmade rose might lose its shape or unravel prematurely.
Optional but highly recommended materials for this Crochet rose tutorial – Pattern include fabric stiffener or floral wire. If you intend to create a bouquet that stands upright in a vase, inserting a green floral wire through the center of the rose provides the necessary support. These small additions elevate the project from a simple craft to a professional floral arrangement.
Don’t forget to consider the color palette; while the crochet rose tutorial focuses on technique, your color choices define the mood. Deep crimson suggests romance, while soft yellow or white can symbolize friendship and purity. Collecting several shades of the same color can help you create a gradient effect that looks incredibly realistic.
Lastly, keep a notebook or a digital device nearby to reference the Crochet rose tutorial – Pattern steps as you go. Visualizing the instructions while feeling the yarn in your hands helps reinforce the learning process. Preparation is the key to avoiding mistakes and ensuring that your DIY crochet rose turns out exactly as you imagined.
3 Step-by-Step Construction of the Rose Petals
Now we enter the heart of the Crochet rose tutorial – Pattern, where we create the long strip of graduated petals. Start by creating a foundation chain of approximately 60 to 70 stitches, depending on how “full” you want your rose to be. This foundation row is the backbone of your entire project and dictates the final diameter of the flower.
For the second row of your Pattern, you will work a series of V-stitches or shells into the chain, which creates the “flare” of the petals. This is a crucial part of the Crochet rose tutorial, as it adds the necessary volume that allows the strip to curl. Each shell consists of several double crochets worked into a single space, forming a rounded edge.
As you move across the row, you might want to increase the number of stitches in each shell to make the outer petals larger than the inner ones. This technique, often found in advanced crochet patterns, mimics the natural anatomy of a real rose. It ensures that when you roll the piece, the petals overlap in a way that looks authentic and high-end.
The final row of the Crochet rose tutorial – Pattern usually involves a series of picots or slip stitches to create a finished look on the petal tips. This “edging” gives the flower a crisp appearance and prevents the yarn from looking frayed. Mastery of the finishing stitch is what separates a beginner project from a professional-grade crochet masterpiece.
Throughout this stage, maintaining an even yarn tension is vital so that one side of the flower doesn’t look bulkier than the other. If you find your work curling naturally as you go, don’t worry—that is exactly what should happen in a rose pattern. The curl is a sign that your stitches are creating the three-dimensional depth required for this tutorial.
Once the strip is complete, leave a long “tail” of yarn (about 12 inches) before cutting it from the ball. This extra yarn is used for the sewing and assembly part of the Crochet rose tutorial – Pattern. Having a long tail ensures you won’t run out of material when securing the layers of your beautiful newly crocheted rose.
4 Final Assembly and Shaping Your Crochet Rose
The most magical moment of the Crochet rose tutorial – Pattern is the assembly, where a flat strip of crochet transforms into a blooming flower. Begin by holding one end of the strip and slowly rolling it inward, keeping the bottom edges aligned perfectly. This rolling technique determines whether your rose looks like a tight bud or a fully opened blossom.
As you roll, use your tapestry needle and the long yarn tail to sew through the bottom layers of the “spiral.” It is important to catch every layer with each stitch to ensure the crochet rose is secure and won’t fall apart. This structural step is the most critical part of the Pattern for creating a durable item.
Continue rolling and sewing in small sections rather than waiting until the very end to start stitching. This incremental approach allows you to adjust the placement of the petals as you go, ensuring a balanced look. Following this specific advice in the Crochet rose tutorial will result in a much cleaner and more professional finish.
Once the entire strip is rolled and the base is firmly sewn, take a moment to “fluff” the petals with your fingers. You can pull the edges outward to create a more organic shape, giving the rose a life-like appearance. Shaping is a subjective part of the Pattern, allowing you to put your own artistic touch on the final product.
If you are adding leaves to your Crochet rose tutorial – Pattern, now is the time to attach them to the base. Crocheting two small green leaves and sewing them opposite each other adds a wonderful contrast to the colorful petals. These botanical details enhance the overall aesthetic of your work and make the pattern feel complete.
Finally, weave in any remaining loose ends of yarn and trim them closely to the fabric. Your Crochet rose tutorial – Pattern is now officially finished, leaving you with a gorgeous, handmade decoration. Whether you use it as a gift or keep it for yourself, the skills you’ve learned here will serve as a foundation for many more crochet projects in the future.
FAQ: Frequently Asked Questions
1. What is the best yarn for a Crochet rose tutorial – Pattern?
Mercerized cotton is often considered the best choice because it has a slight sheen and excellent stitch definition, which makes the crochet petals look more realistic.
2. How long does it take to finish this crochet pattern?
For an intermediate crafter, a single rose usually takes between 30 to 45 minutes. Beginners may take a bit longer as they familiarize themselves with the stitch sequence.
3. Can I wash my finished crochet rose?
Yes, if you use acrylic or cotton yarn, the rose can be hand-washed. However, if you used floral wire or fabric stiffener, you should only spot clean to avoid damaging the structure.
4. Is this pattern suitable for absolute beginners?
Absolutely! This Crochet rose tutorial uses basic stitches like the chain, single crochet, and double crochet, making it a perfect project for someone just starting their crochet journey.
5. How can I make the rose bigger?
To increase the size, you can either use a thicker yarn and a larger hook or simply increase the number of stitches in your initial foundation chain.
Conclusion
In this article, we have explored the detailed process of the Crochet rose tutorial – Pattern, covering everything from material selection to the final assembly of the petals. We learned that the secret to a beautiful crochet flower lies in the tension of the stitches and the careful rolling of the finished strip.
By following these steps, you can create a variety of floral designs that bring a touch of handmade charm to any setting. This tutorial is designed to be a versatile tool in your crafting kit, allowing for endless customization in color, size, and application.