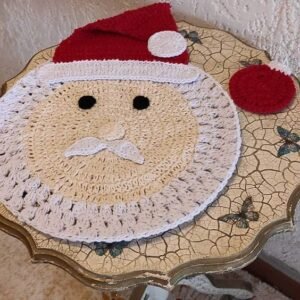
If you’re looking for a fun and creative way to elevate your Christmas table setting, a crochet Santa Claus sousplat is the perfect project.
This handmade creation adds a festive and personal touch to your holiday décor while also being functional.
In this tutorial, we’ll guide you through every step to crochet your own Santa Claus sousplat, including materials, pattern instructions, and tips for customization. Whether you’re a beginner or an experienced crocheter, you’ll find this tutorial simple to follow.

Materials You’ll Need for the Crochet Santa Claus Sousplat
To start this project, you’ll need to gather a few essential materials. These include crochet hooks, yarn, and some quilting elements. Each material has its purpose, ensuring that the Santa Claus sousplat is sturdy and vibrant.
First, you’ll need yarn in red, white, black, and gold colors to mimic the iconic colors of Santa’s outfit. Red will serve as the base, white for Santa’s beard and trimming, black for the belt, and gold or yellow for the buckle. You can choose cotton yarn for durability or soft acrylic yarn for a more plush look.
In addition to yarn, you’ll need a 4.5mm crochet hook, scissors, a tapestry needle for weaving in the ends, and quilt batting or cotton fabric to give the sousplat added thickness. Using quilt batting or fabric backing not only stabilizes the crochet work but also enhances the overall look.
Step-by-Step Instructions for Crocheting the Santa Claus Sousplat
Step 1: Creating the Base of the Sousplat
To begin the Santa Claus sousplat, you will first create the red circular base, representing Santa’s suit. This part requires basic crochet stitches such as the chain, single crochet, and double crochet.
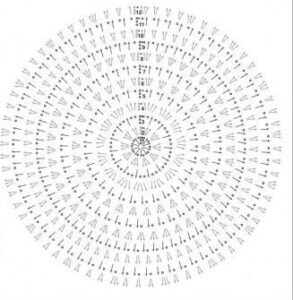
Start by making a magic ring, which will serve as the center of your sousplat. Chain 3 and then crochet 12 double crochets into the magic ring. Pull the yarn tight to close the ring, and slip stitch to the first double crochet to join the round. This will form the foundation of your crochet sousplat.
Continue working in rounds, increasing your stitches in each round to form a larger circle. For the second round, you will crochet two double crochets into each stitch around. By round three, alternate between one double crochet and two double crochets into the next stitch. Repeat this process until your circle measures approximately 12 inches in diameter. This will be the perfect size for a standard dinner plate.
Step 2: Adding Santa’s Belt and Buckle
Now that your red base is complete, it’s time to add Santa’s belt to the sousplat. This part of the project uses black yarn to crochet a belt that stretches across the diameter of the circle.
To crochet the belt, start by attaching black yarn to one edge of the circle. Chain 6 to create the width of the belt, then single crochet across the next 6-8 stitches. Continue crocheting back and forth across the diameter of the sousplat, until the belt reaches the opposite side. Fasten off and weave in the ends.
For Santa’s belt buckle, use gold or yellow yarn. Create a small square by chaining 8, then crocheting 8 single crochets into each chain. After two rows, you will have a neat square that can be sewn onto the black belt. The bright buckle adds a festive touch, completing Santa’s iconic look.
Step 3: Crocheting the Beard and Edging
No Santa Claus crochet project would be complete without the signature white beard and trimming. In this section, we’ll create the white edging that frames the sousplat, mimicking the fur trim of Santa’s suit.
Using white yarn, attach it to any stitch along the outer edge of your circle. Chain 3, then work 2 double crochets into the same stitch. Skip the next stitch and repeat this process around the entire perimeter of the sousplat. This will create a lovely, ruffled edge resembling Santa’s beard.
For an extra decorative touch, you can add more details to the white edging. For example, you could add a picot stitch in between the clusters of double crochets to create a more textured appearance. Once the edging is complete, fasten off and weave in all loose ends with your tapestry needle.

Quilting the Back for Stability: Optional Step
Although the crochet Santa Claus sousplat is sturdy on its own, you can add quilt batting or cotton fabric to the back to provide extra stability and structure. This step is particularly helpful if you plan to use the sousplat for heavy plates or hot dishes.
First, cut a circular piece of quilt batting or cotton fabric that matches the size of your crocheted base, approximately 12 inches in diameter. You can use quilt patterns if you prefer to add a more decorative touch to the backing. Ensure the fabric is well-ironed and smooth.
Attach the quilt backing to the crochet sousplat by sewing it onto the back of the project using a simple whip stitch. If you want the backing to be removable for washing, consider adding a button or Velcro closure instead. This quilting step will make your Santa Claus sousplat more durable and functional.
OTHER FREE CROCHET PATTERNS HERE!!
Customizing Your Crochet Santa Claus Sousplat
One of the best parts about crafting your own sousplat is the ability to customize it to your liking. You can easily change the yarn colors, add embellishments, or adjust the size to fit different table settings.
For example, you could switch out the black belt for a green one, transforming the sousplat into an elf-inspired design. Or, if you’re hosting a more elegant dinner, opt for metallic yarns in gold or silver to give your sousplat a shimmering finish. You can also incorporate other quilt patterns into the backing to add a unique flair.
Another idea is to add small appliques or buttons to the sousplat. Tiny crochet presents, snowflakes, or holly leaves could be sewn onto the red base for an even more festive look. The possibilities for customization are endless and allow you to tailor the project to your personal style.

Displaying and Caring for Your Crochet Santa Claus Sousplat
Once your crochet Santa Claus sousplat is finished, it’s time to showcase it on your holiday table. The sousplat can be used as a charger plate beneath your dishes or as a decorative centerpiece. Pair it with festive tableware, candles, and Christmas-themed napkins for a coordinated look.
To keep your crochet sousplat in top condition, it’s important to care for it properly. Hand wash the sousplat in cold water and lay it flat to dry to maintain its shape. If you’ve added a quilted backing, make sure to use gentle cleaning methods to prevent the fabric from shrinking or warping.
With proper care, your handmade Santa Claus sousplat will last for many holiday seasons to come. It’s a wonderful way to add a personal, handcrafted touch to your Christmas décor while also showing off your crochet skills.

Conclusion: Craft Your Own Holiday Magic with a Santa Claus Crochet Sousplat
This crochet Santa Claus sousplat tutorial is a great way to bring holiday cheer to your dining table. With a combination of basic crochet techniques and optional quilt backing, you can create a durable and festive piece that will impress your guests. From Santa’s bright red suit to his iconic belt and beard, every detail of this sousplat adds to the Christmas magic.
Whether you’re making one for yourself or as a handmade gift, this project is both fun and rewarding. Don’t be afraid to get creative and personalize your Santa Claus sousplat with different colors, patterns, or quilt designs. Happy crocheting, and Merry Christmas!
This blog post incorporates keywords such as “quilt” and “quilt patterns” to optimize SEO for better search engine rankings, focusing on a festive and creative crochet project that appeals to crafters.
