If you’re looking to dive into a whimsical underwater crochet adventure, Crochet Seahorses – Pattern is a wonderful place to start.
These adorable sea creatures make for charming decorations, thoughtful gifts, and unique additions to any amigurumi collection.
Whether you’re a beginner or a seasoned crocheter, this guide will walk you through everything you need to know to bring a crocheted seahorse to life.
Creating a crochet seahorse pattern allows you to explore texture, color, and shaping techniques, all while enjoying the calming rhythm of crochet. These patterns are typically small, quick to complete, and customizable, which makes them perfect for craft fairs or heartfelt handmade presents. The best part? You can get creative with yarn choices and make each seahorse truly unique.
In this article, we’ll explore different crochet seahorses – pattern ideas, discuss the best materials, offer helpful tips, and even tackle common questions from the crochet community. Let’s begin your undersea stitching journey!
1. Choosing the Right Crochet Seahorse Pattern
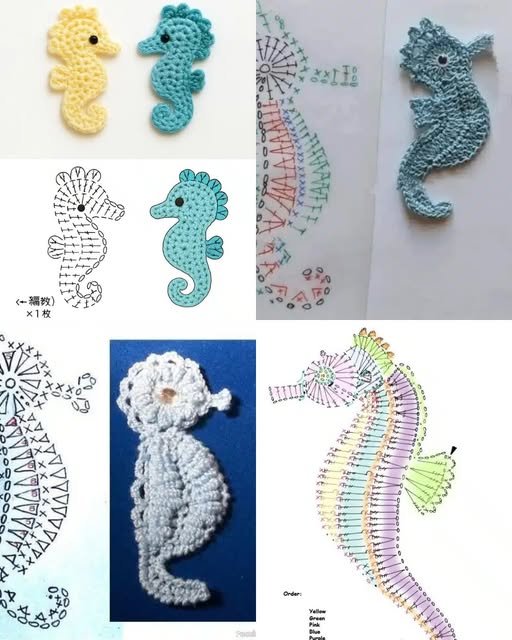
When beginning your crochet project, the first step is selecting the right crochet seahorses – pattern. Patterns vary in complexity and style, so choosing one that aligns with your skill level and desired outcome is key.
There are a variety of free and premium crochet seahorse patterns available online. Free patterns are great for beginners, while premium versions may offer more detailed instructions, shaping options, or bonus accessories like seaweed or starfish companions.
Some patterns are designed to be realistic, with accurate anatomical features, while others lean toward cute or cartoony aesthetics. Decide on the look you prefer before selecting your pattern.
Ensure the pattern you choose includes a clear list of materials, stitch abbreviations, and step-by-step instructions. A well-written pattern will also often include progress photos or even a video tutorial for extra guidance.
If you’re gifting your crochet seahorse, consider the recipient’s preferences. A child might love a bright, rainbow-colored seahorse, while a more subtle or oceanic tone may appeal to an adult collector.
Finally, read reviews or check social media to see finished versions from others who have tried the pattern. This can give you a better idea of how your project might turn out.
2. Materials You’ll Need for Crochet Seahorses
Creating your crochet seahorses – pattern masterpiece requires the right tools and materials. Let’s go over what you’ll typically need to complete your project successfully.
Yarn is the most important material. Most seahorse patterns recommend cotton or acrylic yarns in DK or worsted weight. These hold shape well and come in a variety of vibrant colors that can bring your seahorse to life.
A crochet hook that matches your yarn’s gauge is also essential. Most patterns specify a hook size between 2.5 mm and 4 mm. Smaller hooks help keep stitches tight for a more structured finish, ideal for amigurumi.
Stuffing material such as polyester fiberfill will give your seahorse volume. Some crocheters also use scrap yarn or even dried lavender for a scented toy option.
You’ll also need a yarn needle to weave in ends and join parts together neatly. Stitch markers can be very helpful for keeping track of rows, especially with spiraled patterns.
Safety eyes are often used to complete the face, but if you’re making a toy for a young child, embroidered eyes are a safer option. Don’t forget thread or yarn for any embellishments like fins or tails.
Optional materials include blush for adding cheek color, wire to add poseable features, or beads for extra sparkle. Get creative and let your imagination lead!
3. Tips for Crocheting the Perfect Seahorse
To successfully complete a crochet seahorses – pattern, you need more than just the right materials. Here are expert tips to enhance your crochet process and result.
Start by practicing the basic stitches required in your pattern. These often include single crochet, increases, and decreases. Understanding these thoroughly will make your experience smoother.
Use a magic ring (or magic circle) to start your project. This helps create a tight, gap-free start to your amigurumi and gives your seahorse a polished look.
Crochet in continuous spirals without joining rows unless your pattern states otherwise. This is standard in amigurumi and prevents visible seams in the finished toy.
Keep your tension tight and consistent. Loose stitches can cause stuffing to peek through and make the final product look less professional.
Follow instructions carefully when shaping the body, snout, and tail. These elements define your seahorse’s silhouette and must be proportioned properly.
Take breaks and stretch your hands! Crocheting small items can be intense on your fingers and wrists. Regular rests help you stay comfortable and productive.
4. Styling and Displaying Your Crochet Seahorse
Once you’ve finished your crochet seahorses – pattern, it’s time to think about presentation. These charming creatures deserve a special place in your home or craft table.
Use your seahorse as a keychain or bag charm by attaching a metal clip or ring. This turns your creation into a functional and fun accessory.
Create a mini ocean scene by crocheting additional elements like coral, shells, or seaweed. Use a small shadow box or display dome to turn your project into a work of art.
Add a ribbon loop and hang your seahorse as an ornament. This works well for nursery décor, holiday trees, or themed room accents.
Gift your crochet seahorse in eco-friendly packaging. Use kraft boxes, recycled paper, or small fabric bags to enhance the handmade feel of your gift.
Consider using your seahorse in educational settings. They can be great teaching aids in marine biology classes or for storytelling with children.
Finally, share your finished work on social media using hashtags like #crochetseahorse or #amigurumi. Engaging with the crochet community can provide inspiration and feedback.
FAQ – Crochet Seahorses – Pattern
Q1: What skill level is needed to crochet a seahorse?
A: Most crochet seahorses – pattern designs are suitable for beginners to intermediate crocheters. Basic knowledge of amigurumi stitches and shaping is helpful.
Q2: How long does it take to crochet a seahorse?
A: Depending on size and complexity, a seahorse may take anywhere from 2 to 6 hours to complete.
Q3: Can I sell seahorses made from a pattern I bought?
A: Check the copyright policy of the pattern’s creator. Many allow selling finished items with credit given, but always confirm.
Q4: What’s the best yarn to use for crochet seahorses?
A: Cotton or acrylic yarn in DK or worsted weight is ideal due to its durability and shape retention.
Q5: How do I prevent my seahorse from looking lopsided?
A: Use stitch markers, count rows carefully, and make sure your tension is consistent throughout the project.
Q6: Are crochet seahorses safe for babies and toddlers?
A: Yes, but avoid using safety eyes and opt for embroidered features to ensure the toy is safe and secure.
Conclusion
We hope this comprehensive guide on Crochet Seahorses – Pattern helped you feel more confident and inspired to start your next crochet project. From choosing the right pattern and materials to applying expert tips and displaying your creation, there’s so much joy to be found in crafting these whimsical sea creatures.
If you’ve already made a crochet seahorse, we’d love to hear your experience. Share your honest thoughts and suggestions in the comments below so we can continue improving and supporting the crochet community. Happy stitching!