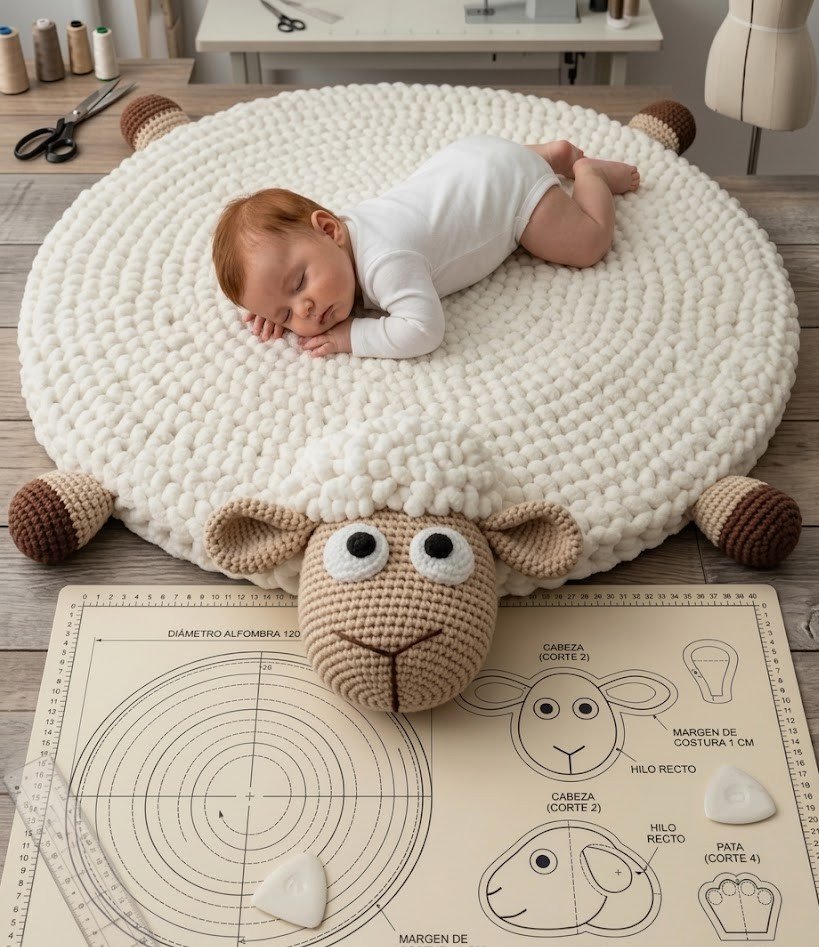
A Crochet sheep-shaped rug – Pattern is one of those delightful DIY projects that instantly transforms a room from ordinary to enchanting. Whether you are decorating a nursery or simply want a touch of whimsical comfort in your living space, creating a handmade sheep rug provides a sense of accomplishment that store-bought items simply cannot match. The soft textures and adorable aesthetic of a sheep-shaped crochet project make it a favorite among hobbyists who enjoy functional art.
When you decide to start a Crochet sheep-shaped rug – Pattern, you aren’t just following instructions; you are crafting a durable piece of home decor. This specific crochet rug design focuses on using bulky yarns and specific stitches to mimic the woolly appearance of a real sheep. Because rugs undergo a lot of foot traffic, choosing the right crochet materials and maintaining high tension control is essential for ensuring your masterpiece lasts for years to come.
Understanding the core components of a Crochet sheep-shaped rug – Pattern is the first step toward success. In this comprehensive guide, we will break down the essential techniques, from selecting your cotton or acrylic yarn to mastering the bobble stitch which gives the sheep its iconic “fluffy” look. By focusing on SEO-friendly crochet tips and clear instructions, this article will help you navigate the process of making your very own animal-shaped floor mat.
1. Choosing the Right Materials for Your Crochet Sheep-Shaped Rug – Pattern
Selecting the perfect yarn weight is the foundation of any successful crochet sheep-shaped rug – Pattern. For a rug, you want something sturdy yet soft, which is why many crafters opt for chunky t-shirt yarn or multi-strand acrylic yarn. Using a thicker material ensures the rug stays flat on the floor and provides enough cushioning for those walking or sitting on it.
The crochet hook size you choose must correspond with your yarn to prevent the rug from becoming too loose or “holey.” Generally, an 8mm to 10mm ergonomic hook is ideal for these larger projects. A tighter gauge is better for a crochet floor covering because it keeps the stitches dense, preventing dirt from settling deep into the fibers and helping the rug maintain its shape.
In addition to yarn, you will need high-quality fiberfill stuffing for the sheep’s head and ears. This gives the 3D crochet elements of your rug a plush, inviting feel. Make sure to choose a washable stuffing, as a crochet sheep-shaped rug – Pattern used in a child’s room will inevitably need a trip through the laundry at some point.
Don’t forget the importance of a non-slip rug backing. Safety is paramount when creating a crochet home accessory, especially on hardwood or tile floors. You can sew a specialized anti-slip mesh to the bottom of your finished piece or apply liquid latex dots to ensure your handmade sheep rug stays securely in place.
Color selection plays a huge role in the final look of your Crochet sheep-shaped rug – Pattern. While classic cream or white is the most popular choice for a realistic sheep rug, don’t be afraid to experiment with soft greys or even pastel pinks. Neutral tones tend to be better for SEO-friendly home decor searches, as they fit into more interior design styles.
Lastly, ensure you have a large-eye tapestry needle and sharp scissors. Weaving in the ends of a large-scale crochet project can be tedious, but a good needle makes the process much smoother. Having these tools ready before you begin your Crochet sheep-shaped rug – Pattern will save you time and frustration during the assembly phase.
2. Essential Stitches for a Fluffy Crochet Sheep-Shaped Rug – Pattern
To achieve the signature look of a Crochet sheep-shaped rug – Pattern, you must master the bobble stitch. This stitch creates the raised, “bubbly” texture that perfectly simulates sheep’s wool. It involves working several incomplete double crochets into the same stitch and then pulling the yarn through all loops to create a textured “pop.”
The magic ring technique is another vital skill for starting the head and limbs of your sheep. This method allows you to begin crocheting in the round without leaving a visible hole in the center. For a professional-looking Crochet sheep-shaped rug – Pattern, a tight and seamless start is what separates beginners from intermediate crafters.
When working on the flat “body” section of the rug, you will mostly use single crochet or half-double crochet stitches between the bobbles. This provides a stable base and ensures the rug isn’t overly bulky in places where it doesn’t need to be. Balancing textured stitches with flat ones is the secret to a well-proportioned animal rug pattern.
Increasing and decreasing stitches correctly is what gives your Crochet sheep-shaped rug – Pattern its unique silhouette. You will need to learn how to do invisible decreases to keep the sheep’s face looking smooth and rounded. Clear stitch definition is important here, as it helps the features of the sheep stand out against the textured body.
For the ears and tail, you might use the slip stitch and chain stitch to create smaller, more delicate shapes. These details are what add personality to your crochet animal rug. Even though the body is the largest part, these small accents are what truly define the sheep-shaped design and make it recognizable and cute.
Finally, understanding tension consistency is crucial for a rug that lies flat. If your tension is too tight, the edges of your Crochet sheep-shaped rug – Pattern might curl upward, creating a tripping hazard. Practice keeping a relaxed but firm grip on your crochet hook to ensure the rug remains perfectly symmetrical and flat on the ground.
3. Assembling and Shaping Your Crochet Sheep-Shaped Rug – Pattern
Once you have finished the individual pieces of your Crochet sheep-shaped rug – Pattern, the assembly process begins. This is where you sew the head, legs, and tail onto the main textured body. Using the whip stitch with a matching yarn color ensures that the seams are nearly invisible, giving your handmade rug a polished finish.
The placement of the head is the most critical part of the Crochet sheep-shaped rug – Pattern assembly. Most patterns suggest placing it at one of the narrower ends of the oval body. Centering it correctly is vital for the visual balance of the rug; use stitch markers or safety pins to hold the head in place before you start the permanent sewing.
Stuffing the head requires a “less is more” approach. You want the sheep’s face to be firm enough to hold its shape but not so heavy that it causes the crochet rug to flip over. Distribute the poly-fill stuffing evenly to avoid lumps, ensuring your Crochet sheep-shaped rug – Pattern looks great from every angle in the room.
Adding the facial features is the fun part where you can get creative. You can use safety eyes for a professional look, or embroider the eyes with black yarn for a more baby-safe alternative. A simple “Y” shape for the nose is the standard for a minimalist crochet sheep, adding just enough detail without overcomplicating the design.
The legs should be attached symmetrically to the underside or sides of the rug body. Depending on your Crochet sheep-shaped rug – Pattern, you might want the legs to lay flat or be slightly stuffed. Flat legs are often preferred for nursery rugs as they reduce the risk of little ones tripping while playing near the rug.
After assembly, give your Crochet sheep-shaped rug – Pattern a gentle “block.” Blocking involves lightly steaming or dampening the rug and pinning it into the desired shape. This helps settle the stitches and ensures the finished crochet project looks its absolute best before it is placed on the floor for display.
4. Maintenance and Care for Your Crochet Sheep-Shaped Rug – Pattern
A Crochet sheep-shaped rug – Pattern is a labor of love, so knowing how to care for it is essential. Because rugs live on the floor, they will inevitably collect dust. Regular shaking or a gentle vacuuming with a handheld attachment (avoiding the beater bar) will keep the bobble stitches looking fresh and free of debris.
If your handmade rug gets a stain, spot cleaning is always the first line of defense. Use a mild detergent and a soft cloth to dab the area. Avoid rubbing, as this can cause the yarn fibers to pill or frizz, which can ruin the texture of your Crochet sheep-shaped rug – Pattern over time.
For a deeper clean, check your yarn label. If you used washable cotton yarn, you might be able to put the rug in a mesh laundry bag and wash it on a delicate cycle. However, air drying is always recommended for a crochet sheep rug. Lay it flat on a clean towel to dry to prevent the weight of the water from stretching the rug out of shape.
Over time, you may notice some “pilling” on the surface of your Crochet sheep-shaped rug – Pattern, especially if it is made from wool or certain acrylics. A simple fabric shaver can remove these tiny balls of fluff, making your crochet floor mat look brand new again. Regular maintenance ensures the longevity of your DIY home decor.
Rotation is another tip for extending the life of your rug. If the Crochet sheep-shaped rug – Pattern is in a sunny spot, rotating it every few months will prevent uneven fading of the yarn. Similarly, changing its position helps the stitch texture wear evenly, especially if one side gets stepped on more frequently than the other.
Finally, keep an eye on the attachments. Because the head and legs are sewn on, the weight of the rug or frequent movement can sometimes loosen the threads. A quick “check-up” every few months allows you to reinforce any loose seams in your Crochet sheep-shaped rug – Pattern, ensuring it remains a safe and beautiful part of your home.
FAQ – Frequently Asked Questions
How long does it take to finish a Crochet sheep-shaped rug – Pattern?
The timeframe depends on your skill level and the yarn weight. On average, an intermediate crocheter can complete a sheep rug in about 15 to 25 hours. Using super bulky yarn can significantly speed up the process.
Can a beginner attempt this Crochet sheep-shaped rug – Pattern?
Yes, but it is helpful to have a basic understanding of increasing/decreasing and the bobble stitch. If you are a complete novice, practice the textured stitches on a small swatch before starting the full rug project.
What is the best yarn for a durable crochet rug?
For maximum durability and easy cleaning, a cotton-poly blend or a high-quality stiff acrylic yarn is best. These materials hold their shape well and can withstand the friction of being used as a floor covering.
Is a Crochet sheep-shaped rug – Pattern safe for a baby’s nursery?
Absolutely, provided you follow safety precautions. Use embroidered eyes instead of plastic safety eyes to prevent choking hazards, and always add a non-slip backing to prevent the rug from sliding underfoot.
How much yarn will I need for this project?
Typically, for a medium-sized rug (about 30 inches wide), you will need approximately 800 to 1200 yards of bulky weight yarn. Always buy an extra skein to ensure you have the same color dye lot for the entire project.
Conclusion
In this guide, we have explored the wonderful world of the Crochet sheep-shaped rug – Pattern, covering everything from the initial material selection to the final assembly and long-term care.
We learned that the secret to a beautiful sheep rug lies in mastering the bobble stitch, choosing the right durable yarn, and ensuring the piece is safely backed for floor use. Whether you are making this for your own home or as a heartfelt gift, a handmade crochet rug adds a unique, cozy charm that reflects your creativity and skill.