If you’re a fan of handmade crafts and nostalgic characters, the Crochet Smurf Amigurumi – Pattern offers a delightful project that merges creativity with childhood joy. Smurfs, those tiny blue creatures with their signature white hats, have enchanted generations—and now, you can recreate them in yarn form with this detailed and adorable pattern.
Whether you’re a beginner in amigurumi or an experienced crocheter looking for a fun challenge, this project will capture your imagination.Creating a Crochet Smurf Amigurumi – Pattern involves more than just basic crochet stitches. It’s an artful mix of shaping, color work, and character detailing.
From the expressive eyes to the rounded nose and iconic white trousers, every element works together to create a recognizable and charming miniature Smurf. These make excellent gifts, collectibles, or display pieces for anyone who loves vintage cartoons or unique handmade toys.
In this article, we’ll explore how to get started with your own Crochet Smurf Amigurumi – Pattern, including choosing the right materials, understanding the construction process, adding personal touches, and finishing your character professionally. We’ll also answer common questions and give tips to make your amigurumi project successful and fun.
1. Getting Started with the Crochet Smurf Amigurumi – Pattern
Before diving into your project, it’s essential to understand the basic structure of the Crochet Smurf Amigurumi – Pattern. Amigurumi, the Japanese art of crocheting small stuffed creatures, uses specific techniques to create 3D shapes that are firm, detailed, and long-lasting. The Smurf version of amigurumi typically includes a head, body, limbs, and accessories like hats or clothing—crocheted separately and sewn together.
Begin by reviewing the entire pattern before you start. Most Crochet Smurf Amigurumi – Patterns are broken into sections, including head, body, arms, legs, and hat. Familiarize yourself with the abbreviations and stitch instructions so you can follow the pattern smoothly without confusion.
Materials are key. You’ll need worsted-weight or DK cotton yarn in specific colors—mainly blue for the skin, white for the hat and pants, and a small amount of black and white for facial details. Use a crochet hook that is slightly smaller than usual for your yarn to create tight, sturdy stitches that hold the stuffing well.
Safety eyes, stuffing, tapestry needle, and stitch markers are also essential for a professional result. Safety eyes give your Smurf a finished, toy-safe look, while polyester fiberfill ensures your character is soft yet holds its shape. A tapestry needle is used for joining parts and hiding yarn tails discreetly.
When starting your project, make sure to use a magic ring or adjustable loop to create a tightly closed starting round—especially important for the head and body. Count your stitches carefully, and don’t skip the stitch markers; they help maintain the correct shape and stitch placement.
As you complete each piece, stuff it firmly but not too tightly. Overstuffing can stretch the stitches and leave gaps, while understuffing may cause your Smurf to lose its shape. Aim for a plush, even finish that feels balanced and soft.
2. Crafting the Head, Body, and Signature Hat
One of the most important aspects of the Crochet Smurf Amigurumi – Pattern is getting the head and body proportions just right. These define the personality and overall shape of the character. Typically, the head is slightly larger than the body, giving your Smurf a whimsical and cartoon-like look.
The head usually starts as a sphere, gradually shaped with increases and decreases. This section often includes placement of safety eyes and embroidered details like a smile or eyebrows. If the pattern calls for inserting the eyes before closing the head, be sure to measure and center them properly.
Once the head is complete, the body follows. It’s generally cylindrical or egg-shaped, tapering slightly at the bottom. Color changes may be required to create the illusion of pants. Use the invisible color change technique to ensure smooth transitions between blue and white yarn.
The signature white hat is a beloved and recognizable detail of any Smurf. This part is often crocheted separately in a rounded triangle or cone shape and then sewn onto the head. Use shaping techniques like decreases to get the soft, curved tip of the Smurf hat to fall naturally to one side.
After attaching the hat to the head, it’s time to join the head to the body. Align the stitches carefully to ensure the head is centered. A strong, even whipstitch will create a seamless join and help maintain stability in your final plush.
Finish this section by reinforcing any loose stitches, securing the yarn tails, and gently reshaping the figure. At this stage, your Crochet Smurf Amigurumi – Pattern should already look lively and nearly complete—just missing limbs and accessories.
3. Creating Arms, Legs, and Adding Final Features
With the main structure complete, it’s time to crochet the smaller appendages. The Crochet Smurf Amigurumi – Pattern typically includes stubby arms and rounded legs that are sewn onto the sides and bottom of the body. These elements add movement and character to your plush.
Arms are generally simple tubes that taper slightly at the wrist. You can leave the hands rounded or add basic shaping for fingers. Arms should be attached on either side of the torso, slightly below the neckline. Position them symmetrically for a balanced appearance.
Legs are usually crafted in a similar way, but slightly thicker and longer. Since Smurfs wear white pants and white shoes, most of the leg will be crocheted in white yarn. Sew the legs firmly to the base of the body, making sure they help the Smurf sit or stand depending on your design.
Some patterns allow the Smurf to sit flat with legs spread slightly outward, while others are designed to stand upright. If you want your Smurf to stand, consider adding a flat base with a cardboard circle inside or lightly weighting the feet with pellets.
Facial features are what bring your Smurf to life. If you haven’t already added safety eyes, now’s the time. Embroider a friendly smile, small nose, and optional eyebrows or eyelids for extra personality. Use black or dark gray yarn for contrast.
For advanced crafters, you can even create accessories. Think of Papa Smurf’s red hat, a tiny book, or a mushroom for your Smurf to sit on. These extra details make your amigurumi project unique and give it added storytelling charm.
Finish by weaving in all loose ends, trimming excess yarn, and reshaping your Smurf if needed. A light spray of water and gentle hand shaping can help settle the yarn and ensure your plush looks polished and professional.
4. Personalizing Your Crochet Smurf Amigurumi – Pattern
The best part of using a Crochet Smurf Amigurumi – Pattern is that you can make it your own. Even though Smurfs are iconic, each one has a unique character, and you can reflect that in your crochet design through color, accessories, or posture.
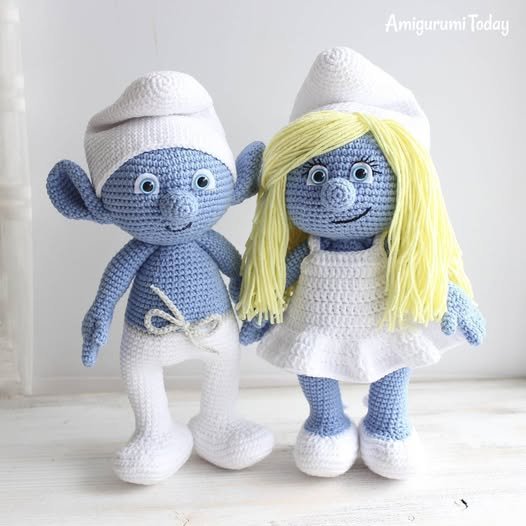
Want to create Smurfette? Use long yellow yarn to crochet or embroider her hair. Make her dress from white fabric or crochet a tiny skirt as part of the body. Personalizing your Smurfs adds depth to your collection and makes them even more special as gifts.
You can also recreate specific characters from the Smurf village like Papa Smurf with his red clothes, Brainy Smurf with tiny glasses, or Clumsy Smurf with his endearing pose. Each version adds variety and creativity to your crafting.
Consider changing expressions too. Instead of a standard smile, try adding a smirk, sleepy eyes, or a surprised look. These small changes make your Smurf feel more animated and emotional.
Using different yarn textures can also change the look. A soft cotton blend gives a clean finish, while fluffy or chenille yarn creates a fuzzy, toy-like feel. Experimenting with materials helps your finished item stand out.
If you’re making a gift, include a small tag or message with your Smurf. Handmade toys with names and dates become keepsakes, especially for children. You can also add a keychain ring or attach your Smurf to a mobile or wreath.
Lastly, don’t forget to share your finished Crochet Smurf Amigurumi – Pattern on social media or with other crafters. Join amigurumi communities online to show off your work, get feedback, and inspire others.
FAQ: Crochet Smurf Amigurumi – Pattern
Q1: Is the Crochet Smurf Amigurumi – Pattern beginner-friendly?
Yes, many patterns are suitable for beginners with basic crochet knowledge. As long as you’re comfortable with single crochet, increases, and decreases, you can complete the project.
Q2: What yarn should I use for a Smurf amigurumi?
Use 100% cotton or acrylic yarn in blue, white, black, and optional accent colors. Cotton yarn provides better stitch definition, while acrylic is softer and more forgiving.
Q3: What size hook is recommended?
A 2.5mm to 3.5mm hook is typical for amigurumi, depending on your yarn weight. Use a hook smaller than the yarn recommends to get tight, gap-free stitches.
Q4: Can I wash my crochet Smurf?
Yes, if made with washable yarn and securely fastened parts. Hand washing
is best. Always check your yarn label for care instructions.
Q5: How do I make the Smurf stand on its own?
Add weight to the base using plastic pellets or a cardboard insert. Shape the legs and feet carefully to provide balance.
Q6: Can I sell my finished Smurfs?
If the pattern allows for commercial use and you’re not infringing on copyrights, yes. Always credit the pattern designer if required.
Conclusion
The Crochet Smurf Amigurumi – Pattern is more than just a craft project—it’s a journey into creativity, storytelling, and joy. With a bit of yarn, a hook, and some imagination, you can bring a beloved character to life and share smiles with everyone who sees it.
From choosing the right materials and mastering the construction process to adding detailed personal touches, we’ve explored everything you need to successfully complete your Smurf amigurumi. Whether you’re making a nostalgic gift or adding to your handmade toy collection, this pattern delivers charm and satisfaction.
Have you tried this pattern yourself? We’d love to hear from you! Leave a sincere opinion or suggestion below to help others and inspire more crochet magic. Happy stitching!