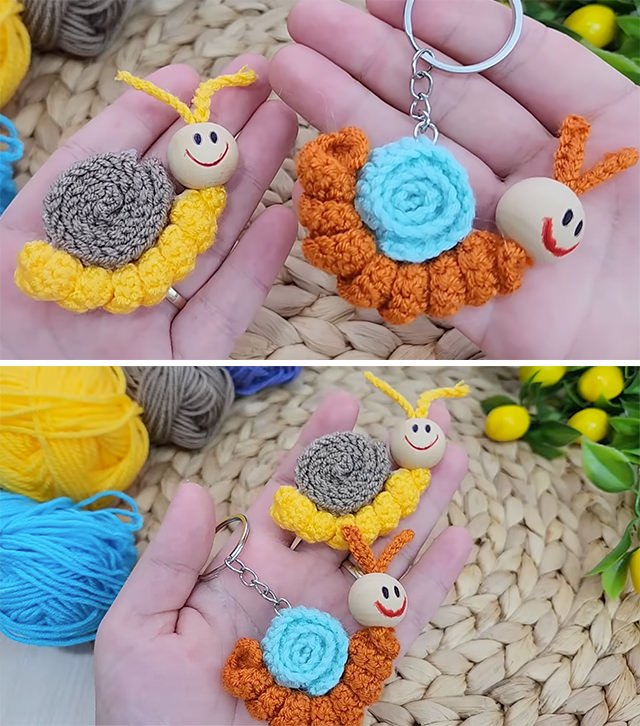
The Crochet Snail – Pattern is one of the most charming and whimsical projects you can find in the world of amigurumi and fiber arts. These delightful little creatures are not only a joy to look at but also offer a wonderful opportunity for crafters to play with color, texture, and spiraling shapes. When you choose a Crochet Snail – Pattern, you are embarking on a creative journey that combines the simplicity of basic stitches with the fascinating geometry of a snail’s shell, resulting in a handmade toy or decorative item that appeals to children and adults alike.
Working with a Crochet Snail – Pattern is an excellent way to use up leftover yarn scraps from larger projects, as the body and shell can be made in contrasting or variegated colors. The process involves creating two distinct parts: the soft, elongated body with its characteristic tentacles, and the coiled, sturdy shell that gives the snail its iconic silhouette. By following a well-designed Crochet Snail – Pattern, you can ensure that the proportions are just right, making your finished snail look balanced, stable, and incredibly cute on any shelf or as a gift for a loved one.
In this comprehensive guide, we will explore the essential elements of the Crochet Snail – Pattern, providing you with the insights needed to master this design. We will focus on the two main keywords: the Crochet Snail, which refers to the finished three-dimensional stuffed creature, and the Pattern, which represents the technical instructions, stitch counts, and assembly steps required to bring the project to life. Whether you are a beginner looking for your first amigurumi project or an expert seeking a relaxing weekend craft, this Crochet Snail – Pattern overview will provide all the inspiration and technical knowledge you need to succeed.
1. Choosing the Ideal Materials for Your Crochet Snail – Pattern
When starting your Crochet Snail – Pattern, the choice of yarn is perhaps the most important decision you will make. For a crisp, well-defined look, a 100% mercerized cotton yarn is highly recommended because it holds its shape well and shows off the intricate spiral of the shell perfectly. Cotton also prevents the stuffing from poking through the stitches, ensuring your Crochet Snail remains neat and durable over time, especially if it is intended to be a toy for a child.
The size of your crochet hook should be slightly smaller than what the yarn label suggests to ensure a tight fabric. For most amigurumi projects like this Crochet Snail – Pattern, a 2.5mm or 3.0mm hook works beautifully with DK or sport-weight yarn. Creating a dense fabric is crucial because it keeps the polyester fiberfill inside the Crochet Snail hidden, providing a professional finish that looks store-bought rather than handmade but still retains that cozy, artisan charm.
For the stuffing, high-quality polyester fiberfill is the standard choice to give your Crochet Snail – Pattern its squishy yet firm structure. You want the body to be soft enough to bend slightly but the shell to be firm enough to stand upright without sagging. When working through the Pattern, remember that the way you stuff the pieces can drastically change the final character of your snail, so take your time to add small amounts of fluff at a time to avoid lumps.
Safety eyes are another critical component of the Crochet Snail – Pattern. Most patterns suggest using 6mm or 8mm plastic safety eyes, which provide a secure and expressive face for your creature. If you are making the Crochet Snail for an infant, you might consider embroidering the eyes with black embroidery floss instead. This modification ensures the Pattern remains safe for all ages while still giving the snail a friendly and inviting appearance.
Don’t forget the importance of stitch markers and a yarn needle. Because the Crochet Snail – Pattern is usually worked in continuous spirals rather than joined rounds, a stitch marker is essential for keeping track of the beginning of each row. The yarn needle will be used for the final assembly, allowing you to sew the shell onto the body with invisible stitches. These small tools make the technical side of following the Pattern much more manageable and less prone to errors.
Lastly, consider adding a bit of weight to the bottom of the shell using plastic pellets or a small clean stone enclosed in a fabric pouch. This little trick, which can be incorporated into any Crochet Snail – Pattern, helps the snail stay upright on flat surfaces. It adds a premium feel to the finished Crochet Snail, making it feel more substantial and well-crafted, which is particularly satisfying if you plan to use it as a desk accessory or a nursery decoration.
2. Technical Steps for Creating the Spiral Shell and Body
The most distinctive part of the Crochet Snail – Pattern is the spiral shell, which is typically worked as a long, tapered tube that is then coiled and sewn together. This “roll-up” technique is ingenious because it allows the Pattern to remain simple while producing a complex visual effect. By increasing the number of stitches gradually as you work through the tube, you create the natural expansion of a real snail shell, making your Crochet Snail look remarkably realistic yet stylized.
For the body of the Crochet Snail – Pattern, you will likely use basic stitches like the single crochet (sc) and simple increases and decreases. The body usually starts at the head, where you create the “face” and the tentacles, before tapering off into a tail. Mastering the “magic ring” is essential for this part of the Pattern, as it allows you to start the head without a hole in the center, ensuring the stuffing stays exactly where it belongs inside your Crochet Snail.
Color changes are where the Crochet Snail – Pattern truly shines. Many crafters choose to use variegated yarn for the shell to simulate the natural patterns found in nature. Alternatively, you can change colors every few rounds to create a striped effect. Following the color-change instructions in the Pattern meticulously will ensure that your stripes are even and that the transitions are hidden on the underside of the shell when it is finally coiled and attached to the body of the Crochet Snail.
The tentacles, often called “eye stalks,” are a unique challenge in the Crochet Snail – Pattern. They are usually very small and require working with a low number of stitches in the round, such as 4 or 5 sc. While this can be a bit fiddly, it adds immense personality to the Crochet Snail. Some variations of the Pattern might suggest using a pipe cleaner inside the tentacles to make them poseable, which is a fantastic way to add interactivity to your finished creation.
Assembly is the stage where the Crochet Snail – Pattern truly comes together. You will lay the long tube flat, roll it into a disc shape, and use your yarn needle to stitch through the layers. This creates the solid, circular shell. Once the shell is finished, you will pin it to the center of the body before sewing. Proper pinning is a vital step in the Pattern because it allows you to check the symmetry and balance of your Crochet Snail before making any permanent attachments.
Finally, you can add small details like a crocheted flower or a leaf for the snail to sit on. These extra elements are often included in a comprehensive Crochet Snail – Pattern and help to tell a story. Whether your snail is a garden explorer or a sleepy forest dweller, these finishing touches elevate the Pattern from a simple toy to a complete decorative scene, showcasing your skill and attention to detail as a fiber artist.
3. Customizing Your Snail for Different Seasons and Styles
One of the best things about a Crochet Snail – Pattern is how easily it can be adapted for different themes. For a festive autumn snail, you can use oranges, browns, and deep reds, and perhaps add a tiny crocheted pumpkin to its back. By modifying the colors of the Crochet Snail, you can create a collection of seasonal companions that follow the same basic Pattern but look completely different and unique to the time of year.
If you prefer a more modern or minimalist aesthetic, you can work the Crochet Snail – Pattern in neutral tones like gray, beige, or cream. Using a high-quality wool or mohair blend can add a sophisticated texture to the Crochet Snail, making it look like a high-end designer piece rather than a traditional colorful toy. This demonstrates the versatility of the Pattern, proving that it can fit into any home decor style regardless of how vibrant or muted your palette may be.
For children, you can make the Crochet Snail – Pattern extra fun by using “glow-in-the-dark” yarn or adding a small rattle box inside the shell. These sensory additions make the Crochet Snail a favorite for playtime. You can even upsize the Pattern by using chunky velvet yarn and a larger hook, turning a small palm-sized snail into a large, huggable plushie that is incredibly soft to the touch and serves as a perfect pillow for toddlers.
Personalizing the face of your Crochet Snail – Pattern is another way to make it your own. Instead of safety eyes, you can use small buttons or even embroider sleepy, closed eyes for a “bedtime snail” theme. Some crafters like to add a tiny smile or rosy cheeks using a bit of pink yarn or actual cosmetic blush. These small character traits are what make the Crochet Snail feel like it has its own little soul, thanks to the foundation provided by the Pattern.
You can also use the Crochet Snail – Pattern to create functional items. For example, by leaving the shell slightly open or adding a small loop, you can turn the snail into a tape measure cover or a pin cushion. The sturdy shape of the shell in the Pattern makes it perfect for holding sewing pins, making the Crochet Snail a helpful companion in your craft room while still being a cute piece of art that brightens up your workspace.
The beauty of the Crochet Snail – Pattern is that it encourages experimentation. You can try different “surface crochet” techniques on the shell after it is finished to add more swirls or even tiny “jewels” like beads and sequins. No two snails will ever be exactly alike, as each maker brings their own tension, color choices, and personality to the Pattern. This uniqueness is exactly why the Crochet Snail remains such a beloved project in the international crochet community.
4. Tips for Success and Maintaining Your Stuffed Snail
To ensure your Crochet Snail – Pattern turns out perfectly every time, it is important to maintain consistent tension throughout the project. If your tension changes, the shell might not roll up evenly, or the body might look lumpy. If you find yourself getting tired, it is better to take a break and come back to the Pattern later. This keeps your stitches uniform and ensures that the finished Crochet Snail has the smooth, professional finish that every crafter strives for.
Another tip for a successful Crochet Snail – Pattern is to leave long yarn tails when you finish each piece. These “tails” are incredibly useful for sewing the parts together. Instead of starting with a new piece of yarn for assembly, using the existing tails from the Crochet Snail body or shell ensures that the color matches perfectly and reduces the number of ends you have to weave in later, which is a major plus when following any amigurumi Pattern.
If your Crochet Snail – Pattern involves many color changes, try to “carry” the yarn inside the piece rather than cutting it every time. This technique, often used in amigurumi, saves yarn and keeps the interior of the Crochet Snail neat. However, if the colors are very different (like black and white), be careful that the darker yarn doesn’t show through the lighter stitches, as this can detract from the clean look of the Pattern.
Cleaning and care are essential if your Crochet Snail is going to be handled frequently. If you used cotton yarn and safety eyes, you can usually spot-clean the snail with a damp cloth and mild soap. If it needs a deeper clean, place the Crochet Snail in a mesh laundry bag and wash it on a gentle cycle. Because you followed a high-quality Crochet Snail – Pattern, the stitches should be tight enough to withstand a wash without losing the internal stuffing.
If you are a beginner and find the Crochet Snail – Pattern a bit daunting, don’t be afraid to use a larger hook and thicker yarn for your first attempt. Everything is easier to see when the stitches are bigger. Once you understand the logic of how the shell coils and how the body is shaped, you can then move on to a smaller, more delicate version of the Crochet Snail, confident in your ability to read and execute the Pattern flawlessly.
Finally, remember that the most important part of working on a Crochet Snail – Pattern is to have fun. Don’t worry if your first snail is a little wonky—real snails aren’t perfectly symmetrical either! Every mistake is a learning opportunity that will make your next Crochet Snail even better. The joy of crochet is in the process of creation, and with this Pattern, you are creating a tiny bit of magic that will surely bring a smile to anyone who sees it.
Frequently Asked Questions (FAQ)
Is the Crochet Snail – Pattern suitable for absolute beginners?
Yes, it is very beginner-friendly! Most snails use basic stitches like the single crochet, increase, and decrease. The most “complex” part is the assembly of the shell, but once you understand the coiling technique, it becomes very straightforward.
How long does it take to finish a Crochet Snail?
Depending on your speed and experience, you can typically complete a Crochet Snail – Pattern in about 2 to 4 hours. It is a perfect “one-sitting” project for experienced crafters or a relaxing weekend project for those just starting out.
What is the best stuffing to use for amigurumi?
Polyester fiberfill is the most popular and effective choice. It is lightweight, washable, and holds its shape well. For the Crochet Snail – Pattern, make sure to stuff firmly but not so much that the stitches stretch and show the white fluff inside.
Can I make the snail larger or smaller?
Absolutely! To change the size of your Crochet Snail, simply change the yarn weight and hook size. Using a bulky yarn with a 6mm hook will result in a giant snail, while using embroidery floss with a 1mm hook will create a tiny micro-snail.
How do I attach the shell so it doesn’t fall off?
The key is to use many small, tight stitches around the base of the shell where it meets the body. Following the assembly guide in your Crochet Snail – Pattern and using plenty of pins to hold it in place before sewing will ensure a secure attachment.
What can I do if my shell is too floppy?
If the shell isn’t holding its shape, you might need to add more stuffing or use a stiffer interfacing inside the tube before you roll it up. You can also sew through the entire disc of the coiled shell to pull the layers tighter together.
Conclusion
The Crochet Snail – Pattern is a delightful project that perfectly blends technical skill with creative expression. Throughout this article, we have explored the best materials to use, the step-by-step technical construction of the spiral shell and body, and the endless ways you can customize your snail for any occasion.
We also shared practical tips for maintaining your Crochet Snail to ensure it remains a cherished item for years to come. Whether you are making one for a gift or building a whole family of colorful garden friends, the foundational skills you gain from this Pattern will enhance your overall crochet journey. We would love to hear your thoughts on this project—please leave your sincere opinion and any suggestions or photos of your own snails in the comments!