The Crochet soccer ball – Pattern is one of the most rewarding projects for any craft enthusiast who wants to combine their love for sports with the art of amigurumi. Whether you are making a soft toy for a toddler, a decorative piece for a sports-themed room, or a gift for a dedicated fan, mastering this crochet pattern requires a blend of geometry and creativity. This guide is designed to take you through the entire process, ensuring your finished product looks professional, symmetrical, and durable enough for actual play.
Starting a Crochet soccer ball – Pattern project might seem intimidating at first because of the iconic pentagon and hexagon shapes that make up a classic ball. However, once you break it down into individual motifs, the process becomes a relaxing and repetitive rhythm that even intermediate beginners can handle. By using the right yarn weight and a consistent tension, you can create a plush version of the world’s most popular sports equipment that is safe for indoor use and incredibly charming to look at.
In the world of handmade toys, the Crochet soccer ball – Pattern stands out because it teaches essential skills like invisible decreases, color changes, and precise seaming. This article will provide a comprehensive walkthrough, explaining the importance of each step and how to optimize your SEO crochet projects for better visibility if you plan on selling your creations. Let’s dive into the specifics of materials, assembly, and the mathematical beauty behind the soccer ball crochet design.
1. Understanding the Geometry of the Crochet soccer ball – Pattern
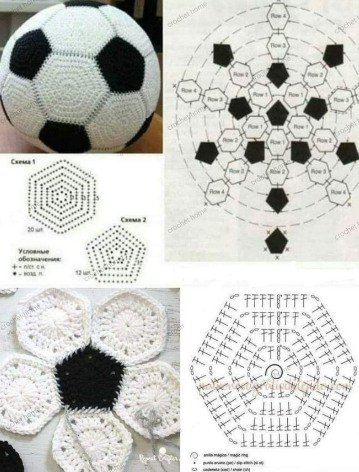
To successfully complete a Crochet soccer ball – Pattern, you must first understand that a standard soccer ball is a truncated icosahedron. This means you will need to crochet exactly 12 black pentagons and 20 white hexagons. Each side of these shapes must be the exact same length to ensure they fit together perfectly during the assembly process.
The Crochet soccer ball – Pattern relies heavily on the magic ring technique to start each piece. Starting with a magic circle ensures that the center of your shapes is tight and secure, preventing any polyester fiberfill from leaking out. Consistency is your best friend here; if one shape is larger than the others, the ball will end up lopsided or “bumpy.”
When working on your Crochet soccer ball – Pattern, choosing the right crochet hook size is vital. Most makers prefer a hook that is slightly smaller than what the yarn label recommends. This creates a denser fabric, which is a hallmark of high-quality amigurumi and ensures the stuffing stays hidden inside the stitches.
The pentagons in this Crochet soccer ball – Pattern act as the anchors of the design. Each black pentagon will be completely surrounded by white hexagons. Visualizing this layout before you start sewing will save you a lot of time and prevent the frustration of having to undo your whipstitches later on.
Using cotton yarn or a high-quality acrylic blend is often recommended for a Crochet soccer ball – Pattern. Cotton provides excellent stitch definition, making the edges of your geometric shapes crisp and easy to join. It also holds up well to the frequent handling and washing that a handmade soccer ball usually undergoes.
Lastly, remember that the Crochet soccer ball – Pattern is a modular project. You don’t have to do it all at once. Many crafters find it helpful to crochet all 32 pieces first, keeping them organized in small bags, before moving on to the final construction phase. This keeps your workspace tidy and your mind focused on the task at hand.
2. Essential Materials for Your Crochet soccer ball – Pattern
Before you begin your Crochet soccer ball – Pattern, you need to gather specific supplies to ensure success. You will need worsted weight yarn in black and white, though you can certainly experiment with “home team” colors for a personalized touch. The yarn texture should be smooth to highlight the clean lines of the soccer ball design.
A stitch marker is an indispensable tool when following a Crochet soccer ball – Pattern. Since you will be working in continuous rounds for the shapes, it is very easy to lose track of your stitch count. Marking the first stitch of every round ensures that your pentagons have five sides and your hexagons have six.
For the Crochet soccer ball – Pattern, you will also need a sharp pair of scissors and a tapestry needle with a large eye. The needle is used for the joining technique, which is arguably the most important part of the project. A blunt tip is preferred so you don’t split the yarn fibers while sewing the pieces together.
Polyester stuffing or fiberfill is what gives the Crochet soccer ball – Pattern its bounce and shape. You want a stuffing that is lightweight but firm. It is important to wait until the ball is about 80% sewn together before you start adding the filling, as this allows you to reach all the corners effectively.
Adding a small rattle insert or a bell inside the stuffing is a popular modification for the Crochet soccer ball – Pattern. This transforms the item into a sensory toy for babies. If you choose to do this, make sure the insert is securely placed in the very center of the stuffing so it remains muffled and safe.
Finally, keep a measuring tape nearby. While the absolute size doesn’t matter as much as the relative size between pieces, you want to ensure your Crochet soccer ball – Pattern stays within the desired dimensions. A typical finished ball using medium weight yarn usually measures about 6 to 8 inches in diameter.
3. Step-by-Step Guide to Stitching the Motifs
The first step in the Crochet soccer ball – Pattern is creating the 12 black pentagons. You will typically start with 5 single crochet stitches in a magic ring and increase systematically until each side has the required number of stitches. Accuracy in the increase rounds is what defines the sharp points of the pentagon.
Next, the Crochet soccer ball – Pattern requires 20 white hexagons. These follow a similar logic but start with 6 single crochet stitches in the magic ring. It is essential that the final stitch count on each side of the hexagon matches the stitch count on the sides of the pentagons to ensure a seamless joining process.
In any Crochet soccer ball – Pattern, the “wrong side” and “right side” of your work should be clearly identified. Usually, the “v-shape” of the stitches should face outward. This gives the handmade ball a smooth, professional appearance that mimics the look of a real synthetic leather soccer ball.
To keep the Crochet soccer ball – Pattern looking neat, use the invisible join method when finishing each individual piece. Instead of a bulky slip stitch, the invisible join creates a seamless loop that looks like a regular stitch, making your seaming much easier to manage and less visible to the eye.
While working on the Crochet soccer ball – Pattern, you might find it helpful to leave a long yarn tail on each piece. These tails can be used to sew the shapes together later, reducing the number of knots you need to tie and hide inside the finished crochet project.
Don’t be discouraged if your first few shapes look a bit curled. As you join them together in the Crochet soccer ball – Pattern, the tension of the surrounding pieces will pull them flat. The 3D shape only truly begins to take form once you have joined at least five hexagons to a central pentagon.
4. Assembly and Finishing Touches for the Ball
The assembly of the Crochet soccer ball – Pattern is like solving a puzzle. Start by taking one black pentagon and sewing one white hexagon to each of its five sides. This creates a flower-like shape. This “flower” forms the top of your ball and serves as the foundation for the rest of the pattern layout.
As you continue the Crochet soccer ball – Pattern assembly, remember the golden rule: two pentagons should never touch each other. They are always separated by hexagons. This is the key to achieving the correct spherical shape and maintaining the classic soccer ball aesthetic.
The whipstitch is the most common seaming method for a Crochet soccer ball – Pattern. By going through the back loops only of the stitches, you can create a decorative ridge, or you can go through both loops for a flatter, more integrated seam. Choose the style that fits your personal crochet style.
When your Crochet soccer ball – Pattern is nearly closed, start adding the stuffing. Do not overstuff, as this can stretch the stitches and show the white filler through the black yarn. However, understuffing will result in a “saggy” ball that doesn’t roll well. Find a balance that feels firm but “squishy.”
To finish the Crochet soccer ball – Pattern, sew the final hexagon into place using a hidden stitch. Secure your yarn with a double knot and use your needle to weave the end deep into the center of the ball. This finishing technique ensures that the ball won’t come apart during vigorous play.
After completing your Crochet soccer ball – Pattern, give it a good roll and a squeeze to distribute the stuffing evenly. If you find any small gaps, you can use a small piece of matching yarn to reinforce the area. Congratulations, you have successfully completed a complex geometric crochet project!
FAQ – Frequently Asked Questions
1. What is the best yarn for a Crochet soccer ball – Pattern?
The best choice is usually a mercerized cotton or a sturdy acrylic yarn. Cotton provides great stitch definition, while acrylic offers more stretch and is often softer for children.
2. How long does it take to finish this pattern?
For an intermediate crocheter, completing a Crochet soccer ball – Pattern typically takes between 8 to 12 hours, depending on your speed and how much time you spend on the seaming process.
3. Can I wash my handmade crochet soccer ball?
Yes, if you use washable yarn and high-quality polyester stuffing, you can machine wash it on a gentle cycle. It is recommended to place it inside a pillowcase or laundry bag first.
4. Why does my soccer ball look more like an oval?
This usually happens due to uneven tension or inconsistent stuffing. Ensure all your hexagons and pentagons are the same size before assembly to keep the ball perfectly round.
5. Is this pattern suitable for beginners?
While it requires knowledge of basic stitches, the Crochet soccer ball – Pattern is considered an intermediate project because of the precise assembly and the number of pieces involved.
Conclusion
Creating a Crochet soccer ball – Pattern is a fantastic way to sharpen your skills in geometric crochet and amigurumi construction. Throughout this article, we have explored the mathematical requirements of 12 pentagons and 20 hexagons, the importance of choosing the right yarn and hook, and the step-by-step process of assembling a durable and attractive handmade toy.
By following these guidelines, you can create a high-quality piece that serves as a perfect gift or a unique addition to your craft portfolio.