The Crochet square bucket hat – Pattern has become a global sensation in the world of DIY fashion, blending the nostalgic charm of the 90s with the intricate beauty of handmade fiber arts. If you have spent any time on social media lately, you have likely seen these vibrant, structured hats adorning the heads of trendsetters and craft enthusiasts alike. Unlike traditional round-top hats, this specific design utilizes geometric shapes to create a modern, slightly “boxy” silhouette that stands out in a crowd. It is the perfect project for those who want to combine the classic utility of a sun hat with the artistic flair of modular crochet construction.
Choosing to follow a Crochet square bucket hat – Pattern allows for a level of creative expression that mass-produced accessories simply cannot replicate. By working with individual squares—often referred to as granny squares—you can experiment with endless color palettes, floral motifs, or even checkerboard designs before joining them into a functional garment. This “modular” approach makes the project highly portable and less intimidating for beginners, as you can complete one small piece at a time during your commute or while relaxing at home. It is a true celebration of “slow fashion” that results in a high-quality, durable piece of headwear.
In this extensive guide, we will dive deep into everything you need to know about mastering the Crochet square bucket hat – Pattern. We will discuss the structural logic of how five or more squares come together to form a crown and brim, the best yarn choices for all-season wear, and the technical finishing touches that ensure your hat retains its shape over time. Whether you are looking to make a boho-chic accessory for a summer festival or a cozy, chunky version for the autumn breeze, this article provides the blueprint for success. Let’s explore the wonderful intersection of geometry and yarn as we build your new favorite accessory from the ground up.
1. Selecting High-Quality Materials for Your Crochet Square Bucket Hat – Pattern
The first step in any successful Crochet square bucket hat – Pattern is choosing the right fiber for the job. Since a bucket hat needs to hold its shape without drooping into your eyes, a 100% cotton yarn is generally the gold standard. Cotton is breathable, making it ideal for summer wear, and it possesses a natural rigidity that helps the crochet squares stay flat and crisp. If you prefer something softer, a cotton-acrylic blend can offer a nice compromise between structural integrity and tactile comfort, ensuring the hat feels good against the forehead.
Your choice of crochet hook is equally vital when executing a Crochet square bucket hat – Pattern. To achieve a “tight” stitch that prevents the sun from peeking through the gaps, many designers recommend using a hook size slightly smaller than what the yarn label suggests. For a standard worsted weight yarn, a 3.5mm or 4.0mm hook usually works best to create a dense, opaque fabric. This tight tension is the secret to a professional-looking crochet hat that doesn’t lose its form after just a few wears.
Color planning is where the Crochet square bucket hat – Pattern truly comes to life. You will typically need enough yarn for five main squares (one for the top and four for the sides) plus additional yarn for the brim. Using a multi-colored approach can highlight the intricate “rounds” of each square, while a monochromatic look offers a more minimalist, high-fashion aesthetic. Don’t forget to buy a bit extra of your “joining color”—the yarn you use to connect the squares—to ensure a cohesive look throughout the handmade headwear.
Beyond yarn and hooks, you will need a few essential notions to complete the Crochet square bucket hat – Pattern. A sharp pair of embroidery scissors and a blunt-tipped yarn needle are non-negotiable for weaving in the many ends that come with multi-colored squares. You might also want to invest in some stitch markers to help you keep track of your corner increases, especially when you transition from the flat squares to the rounded brim. Having these tools organized beforehand makes the assembly process much more fluid and enjoyable.
For those who want an extra-sturdy brim in their Crochet square bucket hat – Pattern, consider purchasing a roll of “millinery wire” or a thick nylon cord. Crocheting over this wire in the final round of the brim allows you to “pose” the hat, giving it a flared or flipped look that stays in place. While not strictly necessary for every design, it is a fantastic trick for those who want their DIY bucket hat to have a more commercial, high-end finish that stands up to wind and movement.
Lastly, consider the “gauge” or the size of your finished squares. In a Crochet square bucket hat – Pattern, the size of your head is determined by the size of the individual squares. Before you start your project, crochet a test square and measure it. Most adult hats require squares that are roughly 4.5 to 5 inches wide. If your square is too small, your hat will be too tight; if it’s too large, it will slip down. Checking your gauge is the most important “prep” step for a custom-fit crochet accessory.
2. The Step-By-Step Logic of Modular Hat Construction
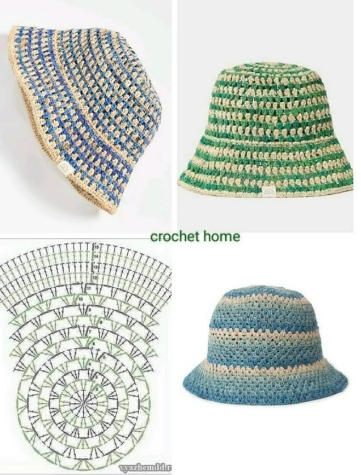
The core of the Crochet square bucket hat – Pattern is the assembly of five identical squares. You begin by crocheting the “Top Square,” which serves as the flat crown of the hat. Once that is complete, you move on to the four “Side Squares.” These squares form the walls of the hat that wrap around your temples and the back of your head. Mastering the granny square technique is essential here, as it provides the foundation for the entire silhouette, ensuring a balanced and symmetrical result.
Joining the pieces is the most transformative part of the Crochet square bucket hat – Pattern. There are several methods to choose from, such as the “Whip Stitch,” the “Slip Stitch Join,” or the “Join-As-You-Go” method. The Slip Stitch Join creates a raised, decorative ridge that can add a cool, industrial look to your crochet hat, while the Whip Stitch is nearly invisible, allowing the patterns within the squares to take center stage. Choosing the right joining technique depends on the final “vibe” you want to achieve.
Once the five squares are joined into a cube-like shape (with the bottom open), it is time to work on the brim of the Crochet square bucket hat – Pattern. The brim is worked in continuous rounds starting from the bottom edge of the side squares. To get that iconic “flare,” you will need to perform regular increases. A common rule of thumb is to increase in every 5th or 6th stitch in the first round of the brim, which allows the fabric to spread outward rather than continuing straight down, creating the classic bucket hat shape.
As you continue the brim of your Crochet square bucket hat – Pattern, you can decide on the length. A shorter brim creates a “cloche” or “fishermans” style that is very popular in streetwear, while a wider, floppier brim offers more sun protection and a bohemian feel. The beauty of hand-crocheted hats is that you can try the piece on as you go. Simply slip the hat on, look in the mirror, and decide if you want to add two more rounds or stop right there for a “micro-brim” look.
The transition from the squares to the brim in a Crochet square bucket hat – Pattern can sometimes leave small gaps at the corners where the squares meet. To fix this, many patterns suggest working a round of single crochet all the way around the bottom edge of the joined squares before starting the formal brim increases. This “leveling round” acts as a sturdy anchor and ensures that the weight of the brim doesn’t pull on the corners of your handmade squares, keeping the structural integrity intact.
Finally, the “Top-Down” versus “Modular” debate is something to consider. While this specific Crochet square bucket hat – Pattern focuses on joining pre-made squares, some variations allow you to crochet the top and then “grow” the squares directly from the edges. However, for beginners, the modular method of sewing squares together is much easier to manage because it allows you to fix errors in individual squares without having to “frog” (unravel) the entire hat. This makes the square-based hat a very forgiving project.
3. Customizing Your Hat with Different Granny Square Motifs
The most traditional version of the Crochet square bucket hat – Pattern uses the “Classic Granny Square,” which consists of groups of three double crochets (clusters) separated by chains. This design is iconic and creates a very breathable, “holy” fabric that is perfect for summer. However, you aren’t limited to the classics. You can use a solid square pattern if you want a warmer hat for the winter or a more “opaque” look that hides your hair completely.
For a feminine, vintage touch, many people adapt the Crochet square bucket hat – Pattern to include “Sunburst” or “Sunflower” squares. These motifs feature a circular floral center that transitions into a square border. When joined together, they create a beautiful, repeating garden effect across the head. Using a bright yellow for the center and a dark brown for the “seeds” turns your crochet bucket hat into a wearable piece of floral art that is perfect for spring photoshoots.
If you are a fan of modern, minimalist aesthetics, you can use a “Circle-to-Square” motif in your Crochet square bucket hat – Pattern. This involves starting with a flat circle and using taller stitches (like trebles) in the corners to square it off. This creates a geometric, polka-dot effect that looks very high-end when worked in neutral tones like cream, tan, and charcoal. It is a great way to show off your advanced crochet stitches while maintaining a wearable, everyday style.
Texture can also play a huge role in your Crochet square bucket hat – Pattern. Using “Puff Stitches” or “Popcorn Stitches” within your squares adds a 3D element that makes the hat look much more expensive and intricate. While these stitches use more yarn, the result is a thick, squishy fabric that provides excellent cushioning and warmth. A textured square hat is a fantastic statement piece that adds depth to even the simplest outfit, like a white tee and jeans.
For those who love the “Alt” or “Grunge” aesthetic, the Crochet square bucket hat – Pattern looks amazing in a checkerboard or “Mosaic” style. By alternating two high-contrast colors like black and white or pink and green, you can create a hat that fits perfectly into the Y2K revival trend. This type of colorwork crochet requires a bit more focus during the square-making process, but the visual impact of the finished “checkerboard bucket” is well worth the extra effort.
Lastly, don’t forget that you can mix and match! You can use a different square motif for the top of the hat than you do for the sides of your Crochet square bucket hat – Pattern. For example, a solid square on top provides sun protection for your scalp, while “lacey” squares on the sides allow for ventilation. This kind of functional customization is exactly why handmade items are superior to store-bought ones—you are the architect of your own comfort.
4. Professional Finishing and Care for Long-Lasting Wear
Once the crochet hook is set down, the “Finishing” stage of your Crochet square bucket hat – Pattern begins. The first task is weaving in the ends. With at least five squares and multiple color changes, you might have 20 or more yarn tails to hide. Use your yarn needle to weave the tails through the “meat” of the stitches rather than just under the surface. This ensures that the ends don’t pop out when the hat is stretched or washed, keeping your crochet project looking tidy.
“Blocking” is the secret step that separates amateur work from professional results in a Crochet square bucket hat – Pattern. Blocking involves wetting the hat (or steaming it) and shaping it over a form—like a wig head or a large bowl—to dry. This “sets” the stitches, flattens the seams where the squares are joined, and ensures the brim has a perfect, even flare. A blocked crochet hat looks much more polished and sits better on the head than one taken straight off the hook.
Washing your hat requires a gentle touch to preserve the work put into the Crochet square bucket hat – Pattern. If you used 100% cotton, you can hand-wash it in cool water with a mild detergent. Avoid wringing the hat, as this can distort the squares and make the hat lopsided. Instead, roll it in a dry towel to remove excess water and then reshape it on a flat surface. Proper fiber care ensures that your colors stay vibrant and your stitches stay tight for years.
Stiffness is often a concern with the Crochet square bucket hat – Pattern. If you find your brim is a bit too floppy, you can use a fabric stiffener spray or a light starch. This is especially helpful for “festival style” hats where you want the brim to stand out sharply. Just a light misting on the underside of the brim followed by a quick press with a cool iron can give your handmade bucket hat that “brand new” store-bought crispness.
If you notice your hat has stretched out over time, don’t panic. One of the perks of the Crochet square bucket hat – Pattern being made of cotton is that a quick wash and a tumble in the dryer (on low heat) can often “reset” the fibers and shrink the hat back to its original size. However, be careful with acrylic yarns, as they can “dead” or melt if they get too hot. Always check your yarn’s care instructions before applying any high heat.
Finally, think about storage. To keep your Crochet square bucket hat – Pattern in top shape, avoid crushing it at the bottom of a heavy bag. While they are foldable and travel-friendly, they prefer to be stored flat or stuffed with a little tissue paper to maintain the “box” shape of the crown. By treating your handcrafted accessory with a little respect, you ensure that the hours of labor you put into those squares continue to pay off every time you step out into the sun.
FAQ – Frequently Asked Questions
Is the Crochet square bucket hat – Pattern beginner-friendly?
Yes! Since the hat is made of small, individual squares, it is one of the best projects for beginners. If you can make a basic granny square, you can make this hat. The only “tricky” part is the brim, which simply requires basic increasing skills.
How many balls of yarn do I need?
For a standard Crochet square bucket hat – Pattern, you typically need 2 to 3 balls of 50g cotton yarn. If you are making a multi-colored hat, you can often use “scraps” for the centers of the squares and just one full ball for the main joining color and the brim.
How do I make the hat larger or smaller?
The size is determined by the squares. To make a larger hat, add an extra round to each of the five squares. To make a child-sized version of the Crochet square bucket hat – Pattern, stop your squares after 3 or 4 rounds. Always measure across the diagonal of the square to check the fit.
Can I use a different stitch for the brim?
Absolutely. While most Crochet square bucket hat – Pattern designs use single crochet for the brim for sturdiness, you can use half-double or double crochet for a softer, floppier look. Just remember that taller stitches will make the brim grow faster but will be less “stiff.”
Why is my hat looking more like a ball than a bucket?
This usually happens if you aren’t increasing enough in the brim. If the brim continues straight down, it creates a “beanie” shape. To get the “bucket” look, ensure you are adding enough stitches in the first few rounds of the brim to force the fabric to flare outward.
What is the best way to join the squares?
The “Slip Stitch Join” is the most popular for the Crochet square bucket hat – Pattern because it is very strong. However, if you want a completely flat seam that won’t rub against your head, the “Whip Stitch” using a yarn needle is the most comfortable option.
Conclusion
The Crochet square bucket hat – Pattern is a fantastic project that combines the best of vintage style and modern “slow fashion” ethics. In this article, we’ve explored the essential materials needed, the modular logic of joining squares to form a crown, and the many ways you can customize your design with different motifs like sunflowers or checkerboards.
We also discussed the importance of blocking and proper care to ensure your handmade treasure lasts a lifetime. By breaking the hat down into five simple squares, this pattern becomes an accessible and rewarding journey for crafters of all levels. There is nothing quite like the pride of wearing a piece of art that you built, stitch by stitch, with your own two hands.