Creating a Crochet Square with Celtic Knot – Pattern is one of the most rewarding projects for any fiber artist looking to blend ancient symbolism with modern craft. This intricate design combines the timeless geometry of Celtic knots with the versatility of the standard crochet square, resulting in a stunning piece of textile art. Whether you are aiming to create a heirloom blanket, a decorative cushion, or a sophisticated wall hanging, mastering this specific pattern will significantly elevate your technical skills and aesthetic repertoire.
The beauty of the Crochet Square with Celtic Knot – Pattern lies in its visual complexity, which is often much simpler to achieve than it looks once you understand the logic of interlocking loops. By using post stitches and clever overlapping techniques, you can mimic the endless flow of traditional Irish knotwork. This project serves as a fantastic bridge between basic crochet motifs and advanced texture work, making it a favorite among intermediate crocheters who want to impress their peers with “how did you do that?” results.
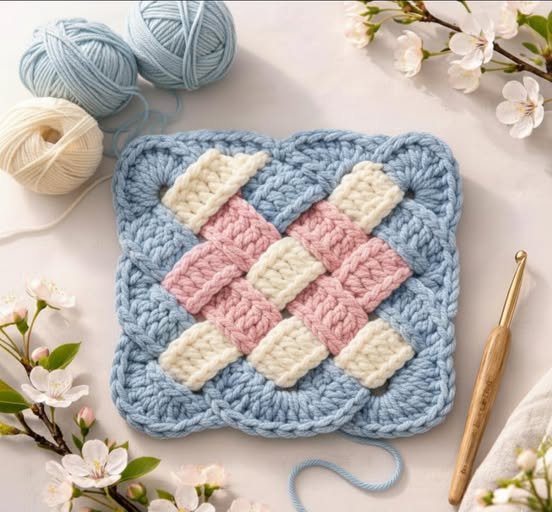
When you dive into this Crochet Square with Celtic Knot – Pattern, you aren’t just following a set of instructions; you are engaging in a tradition of storytelling through yarn and hook. The interwoven cables represent eternity and interconnectedness, themes that resonate deeply within the handmade community. In the following guide, we will break down the essential components, from selecting the right worsted weight yarn to mastering the front post double crochet stitches that give the knot its distinctive raised profile and 3D effect.
1. Understanding the Anatomy of the Crochet Square with Celtic Knot – Pattern
The foundation of a Crochet Square with Celtic Knot – Pattern starts with a solid center base, usually worked in the round. Unlike a simple granny square, this pattern requires a flat background—often made of half double crochet or double crochet—to allow the raised knotwork to stand out. It is crucial to maintain a consistent stitch count to ensure the knot remains centered and the square doesn’t warp during construction.
The “knot” itself is typically created using extended post stitches or by crocheting long i-cords that are later woven into a Celtic shape and stitched onto the square. Some advanced patterns integrate the knot directly into the rows using cabled crochet techniques. Regardless of the method, the goal is to achieve a seamless look where the interlacing lines appear to have no beginning or end, true to the Celtic tradition.
Choosing the right hook size is a vital part of the Crochet Square with Celtic Knot – Pattern process. If your tension is too tight, the cables will feel stiff and bulky; if it’s too loose, the definition of the knot will be lost. Most designers recommend a G/4.0mm or H/5.0mm hook depending on your yarn choice to ensure the texture is crisp and the square remains pliable for joining.
Color selection plays a massive role in how the pattern is perceived by the eye. Using a high-contrast color for the knot against a neutral background can make the Celtic geometry pop. Alternatively, a monochromatic approach using a single solid color relies entirely on the shadows and highlights created by the raised stitches, giving the finished piece a sophisticated, architectural feel that looks great in modern home decor.
In this Crochet Square with Celtic Knot – Pattern, the corners are just as important as the center. You will typically use chain spaces and corner increases to transform the circular flow of the knot into a perfect geometric square. This ensures that when you make multiple crochet blocks, they can be easily seamed together using a mattress stitch or slip stitch join without any uneven edges or gaps.
Finally, blocking your finished Crochet Square with Celtic Knot – Pattern is the secret step that separates amateurs from pros. Since cabled stitches tend to pull the fabric inward, a good wet-blocking session will open up the knotwork and flatten the edges. Use blocking mats and T-pins to stretch the square to its intended dimensions, allowing the interlocking loops to settle into their final, beautiful form.
2. Essential Materials for the Crochet Square with Celtic Knot – Pattern
To get the best results from your Crochet Square with Celtic Knot – Pattern, you should prioritize smooth yarns with excellent stitch definition. A mercerized cotton or a high-quality acrylic blend works wonders because they don’t have too much “fuzz,” which can obscure the intricate interlacing of the knot. Avoid variegated yarns with short color changes, as they can distract from the structural beauty of the Celtic design.
Your toolkit for this pattern should also include a variety of stitch markers. Because the Crochet Square with Celtic Knot – Pattern involves complex stitch placements and skipping stitches to create the “under-over” effect, marking your turning chains and corner clusters will save you from a lot of frogging. It’s much easier to track your cables when you have a visual guide on your crochet fabric.
Don’t forget a sharp tapestry needle for weaving in your ends. The Crochet Square with Celtic Knot – Pattern often involves several yarn carries or joining points, and a clean finish is essential. If you are using the appliqué method for the knot, a needle is also required to invisibly secure the crocheted cords to the base square so that the knotwork doesn’t shift over time.
A measuring tape is another indispensable tool for anyone following a Crochet Square with Celtic Knot – Pattern. If you are making a large-scale project like a Celtic throw, you need to ensure every individual square is the exact same size. Even a small discrepancy in gauge can lead to a lopsided blanket once all the knotted motifs are joined together, so check your progress frequently.
For those who prefer a more comfortable experience, an ergonomic crochet hook is highly recommended. The post stitches and triple crochets often used in a Crochet Square with Celtic Knot – Pattern can be strenuous on the hands due to the constant maneuvering around the stitch posts. A comfortable grip allows you to maintain a steady tension, which is the key to a professional-looking Celtic motif.
Lastly, keep a row counter or a printed copy of the pattern diagram nearby. The Crochet Square with Celtic Knot – Pattern is highly visual, and many find that following a symbol chart is much easier than reading long lines of text. Being able to see the path of the yarn on paper helps you anticipate where the next crossover occurs, making the crochet process much more intuitive and relaxing.
3. Step-by-Step Techniques for the Celtic Knot Texture
The primary technique used in a Crochet Square with Celtic Knot – Pattern is the Front Post Treble Crochet (Fptr). By working around the stem of a stitch from a previous row, you pull the stitch forward, creating the raised ribbing that forms the knot. Mastery of post stitches is essential because it allows the yarn to “sit” on top of the fabric, mimicking the look of knitted cables or braided ropes.
Another critical skill for the Crochet Square with Celtic Knot – Pattern is understanding stitch staggering. To create a diagonal line—which most Celtic knots require—you will need to move your post stitches one or two stitches to the left or right in each subsequent row. This creates a slanted texture that defines the curves and bends of the traditional Celtic knotwork within the square.
“Crossing over” is the most magical part of the Crochet Square with Celtic Knot – Pattern. This involves skipping a set of stitches, working into the next ones, and then going “back” to work into the skipped stitches. This cross-stitch technique creates the physical overlap that makes the knot look like it’s actually woven. It requires a bit of patience to find the hidden stitches, but the visual payoff is immense.
For patterns that use crocheted cords (the appliqué method), the focus shifts to weaving logic. You will crochet a long foundation chain or lucet cord, then follow a weaving template to loop the cord over and under itself. Once the Celtic knot shape is formed, it is pinned onto the crochet square and sewn down. This method is often preferred by beginners who find integrated cables too intimidating.
Tension management is a specific challenge in the Crochet Square with Celtic Knot – Pattern. Because cables use more yarn and “pull” the fabric, the rows containing the knotwork may be shorter than the plain rows. You might need to use extended stitches (like a double treble) when crossing over large gaps to ensure the square remains flat and doesn’t “cup” or bowl in the center.
The final touch in the Crochet Square with Celtic Knot – Pattern is the border. After completing the complex knotwork, a simple single crochet or crab stitch border can frame the piece perfectly. This stabilizes the edges of the square and provides a clean surface for joining. A well-executed border highlights the Celtic knot as the centerpiece of the design, ensuring it catches the eye immediately.
4. Advanced Tips for Customizing Your Celtic Crochet Projects
Once you have mastered the basic Crochet Square with Celtic Knot – Pattern, you can start experimenting with colorwork. Using a self-striping yarn with long color transitions can create a beautiful gradient effect across the knot. Alternatively, try “Tapestry Crochet” techniques to change colors only within the knotwork, making the Celtic symbol a different hue than the surrounding background stitches.
Size customization is another way to adapt the Crochet Square with Celtic Knot – Pattern. By changing your yarn weight—for example, using chunky yarn and a large hook—you can turn a small motif into a large cushion cover or a baby blanket base. Conversely, using lace-weight thread allows you to create delicate Celtic jewelry or coasters using the same fundamental pattern logic.
You can also integrate the Crochet Square with Celtic Knot – Pattern into larger garments. Imagine a crochet cardigan where the back panel is one large Celtic knot square, or a tote bag featuring the pattern on the front pocket. The structural integrity of the cabled stitches makes this pattern very durable, which is perfect for items that will see a lot of use and wear.
Adding embellishments like beads can take your Crochet Square with Celtic Knot – Pattern to a luxury level. By threading beads onto your yarn before you start, you can drop a bead into the “valleys” of the knotwork or along the border. This adds weight, sparkle, and a unique handcrafted touch that makes your Celtic crochet stand out in a crowd or at a craft fair.
For a more rustic look, try working the Crochet Square with Celtic Knot – Pattern in un-dyed wool or linen yarn. The natural fibers enhance the organic feel of the Celtic knot, giving it a “forest-folk” or “medieval” aesthetic. This style is particularly popular for winter accessories and home decor in hygge-styled interiors, where texture is the primary focus.
Lastly, don’t be afraid to combine the Crochet Square with Celtic Knot – Pattern with other textured stitches. Pairing a Celtic center with popcorn stitches, puff stitches, or waffle stitch borders can create a rich, multi-dimensional masterpiece. The only limit is your imagination and your willingness to experiment with the versatile world of crochet cabling.
FAQ: Frequently Asked Questions about the Celtic Knot Crochet Square
Is the Crochet Square with Celtic Knot – Pattern suitable for beginners?
While it is more challenging than a basic granny square, a confident beginner who knows post stitches can certainly tackle it. It is recommended to practice Front Post Double Crochet (FPDC) before starting the full pattern.
What is the best yarn for showing off the Celtic Knot?
A solid-colored, non-fuzzy yarn like a cotton/acrylic blend is best. This ensures the shadows created by the raised cables are clearly visible, which is essential for the knotwork to be defined.
How do I prevent my square from curling?
Curling is common in cabled crochet. Ensure your tension is not too tight on the cross-over stitches, and always block your finished square to relax the fibers and flatten the knot.
Can I make a full blanket using this pattern?
Yes! You can repeat the Crochet Square with Celtic Knot – Pattern multiple times and join them together. This creates a stunning Celtic afghan with a repetitive, rhythmic texture that is both warm and decorative.
How much yarn does one Celtic knot square usually require?
Because post stitches and cables are “yarn eaters,” a Celtic knot square will use about 30-50% more yarn than a flat square of the same size. Always buy an extra skein to be safe.
Do I need to know how to read charts for this?
While not mandatory, many find visual charts extremely helpful for the Crochet Square with Celtic Knot – Pattern. Seeing the path of the stitches helps clarify where the interlocking occurs.
Conclusion
In this guide, we have explored the intricate world of the Crochet Square with Celtic Knot – Pattern, covering everything from its historical symbolism to the technical execution of cabled stitches. We’ve discussed the importance of yarn selection, the necessity of post stitches, and the “magic” of blocking to achieve a professional finish.
This pattern is more than just a craft project; it is a way to create a timeless piece of art that showcases your growth as a maker. By following these steps, you can confidently produce a stunning motif that brings the elegance of Celtic tradition into your modern crochet work.