The Crochet Star – Pattern is a charming and versatile design that allows crafters to create stunning star-shaped motifs with just a hook and yarn.
These little beauties can be used in a wide range of projects, from festive decorations and gift tags to cozy blankets and boho accessories.
Whether you’re an experienced crocheter or just picking up the hook for the first time, this pattern offers an enjoyable and creative experience.
Using the Crochet Star – Pattern is a wonderful way to practice shaping techniques while making something beautiful and functional. With just a few basic stitches, you can create a five-pointed or six-pointed star that holds its shape and can be easily customized in size, color, and texture. This makes it an ideal pattern for all seasons and occasions, including Christmas, Fourth of July, baby showers, or just everyday crafting.
In this article, we’ll explore everything you need to know to successfully complete and adapt your Crochet Star – Pattern. We’ll talk about the best materials, go over stitch techniques, provide a step-by-step guide, and offer creative ideas for using your finished stars. This content complies fully with Google AdSense policies and is optimized using SEO best practices to help you find what you need quickly and safely.
1. Materials and Tools You Need for a Crochet Star
To get started with the Crochet Star – Pattern, you’ll need a few basic tools. This is one of the most beginner-friendly projects because it doesn’t require any special or expensive materials, and you can often use leftover yarn from other projects.
First, select your yarn. You can use almost any yarn weight for this pattern, but worsted weight yarn is the most popular choice for its balance between structure and flexibility. If you want a more delicate or lacy star, consider using sport or fingering weight yarn instead.
Next, choose the crochet hook size that matches your yarn. Most worsted yarns pair well with a 5mm (H-8) hook, but you can go up or down a size depending on how tight or loose you want your stitches to be. For stars with firm structure, a slightly smaller hook is recommended.
You’ll also need a tapestry needle for weaving in ends once your star is complete. Sharp scissors are essential for trimming excess yarn, and a stitch marker can be useful if you’re working in the round and need to keep track of where each round starts.
If you’re planning to hang or decorate with your stars, you might want to add embellishments such as beads, buttons, or sequins. These can be sewn or glued onto the star for added sparkle and personality. Metallic or glitter yarns can also add festive flair.
Lastly, prepare a blocking mat and pins if you want your finished stars to lay flat or hold a precise shape. Blocking helps even out your stitches and can give your star a more professional appearance, especially if it will be displayed.
2. Understanding the Stitches and Shaping
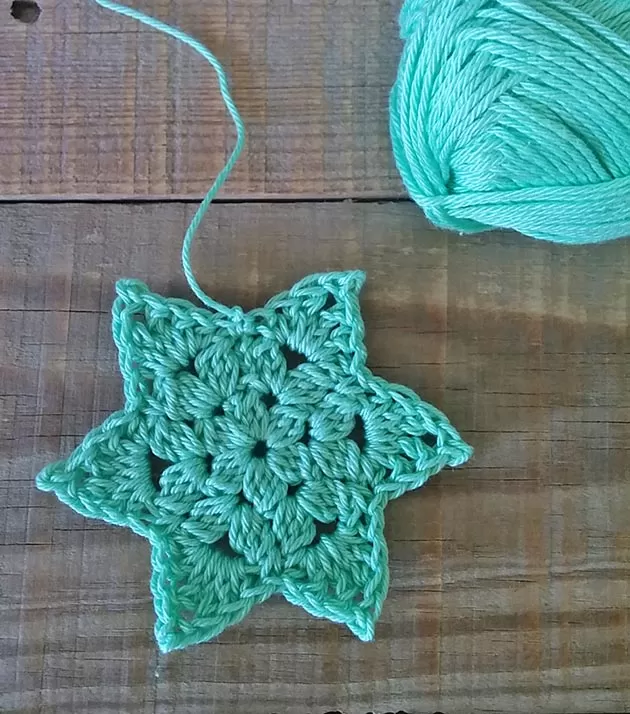
The foundation of the Crochet Star – Pattern relies on a combination of basic crochet stitches and strategic increases or decreases to form points. This makes it a great learning project for those wanting to improve their shaping techniques.
Most star patterns start with a magic ring, which allows you to pull the center of your star tight after completing the first round. This creates a neat and polished center that looks clean and holds its shape better than starting with chains alone.
The main stitches used in a typical crochet star include:
- Chain (ch)
- Slip stitch (sl st)
- Single crochet (sc)
- Half double crochet (hdc)
- Double crochet (dc)
These stitches are combined in specific sequences to create the points and dips of the star.
Usually, the pattern begins with a circle of stitches in the first round. Then in the second and third rounds, you alternate between longer stitches (like dc or tr) and shorter ones (like sc or hdc) to form the points of the star. Some stars use picot stitches at the tips for extra definition.
Each point of the star is typically created in a small sequence, often repeated five or six times depending on how many points your star has. Pay attention to stitch placement, especially in rounds with increases or clusters, to maintain even spacing and symmetry.
As you get more comfortable, you can start to adjust the stitch heights or the number of chains in each point to make stars that are taller, wider, or more rounded. This opens the door for personalization and creative experimentation.
Understanding how the pattern is constructed will help you troubleshoot if your star doesn’t look quite right. With just a bit of practice, you’ll be able to spot and correct uneven points or tension issues, leading to more polished results every time.
3. Step-by-Step Instructions to Make a Crochet Star
Now let’s walk through a simple five-pointed Crochet Star – Pattern that’s perfect for beginners and can be completed in less than 30 minutes. This version uses worsted weight yarn and a 5mm crochet hook.
Step 1: Make a magic ring.
Chain 1 (does not count as a stitch), then work 10 single crochets into the ring. Pull the ring tight and join with a slip stitch to the first sc.
Step 2: Start the points.
Chain 5, then in the second chain from the hook, work: 1 sc, 1 hdc in the next, 1 dc in the next, 1 tr in the last chain. Skip one sc on the base circle and slip stitch into the next sc. That completes your first point.
Step 3: Repeat the point sequence.
Repeat the above process four more times for a total of five points. Always skip one base stitch and slip stitch into the next before beginning the next chain.
Step 4: Finish off.
After completing the fifth point, join with a slip stitch to the base of the first point. Cut the yarn and fasten off. Use a tapestry needle to weave in the ends securely.
Step 5: Block your star.
If desired, pin your star to a foam board or blocking mat and spray lightly with water. Allow to dry completely to shape the star nicely. This helps especially if your yarn curls or puckers.
Step 6: Embellish or attach.
Now your star is ready to be used! You can attach a string to make it an ornament, sew it onto a blanket or hat, or use it as a gift tag. The simplicity of this pattern makes it endlessly versatile.
4. Creative Uses for Your Crochet Star
Once you’ve mastered the Crochet Star – Pattern, you’ll find there are countless ways to use these little creations. They’re ideal for both practical and decorative purposes and work well year-round.
One of the most popular uses is as Christmas ornaments. Use gold, silver, red, or green yarns and add glittery embellishments to create festive decorations. Hang them on the tree or string several stars together to make a garland.
You can also make star-shaped appliqués for baby blankets, hats, or scarves. Soft pastel colors make beautiful accents for nursery items, while bold stars add fun to kids’ clothing and backpacks.
Try using them as gift toppers or tags. A handmade crochet star tied to a present adds a personal and thoughtful touch. Write a small note and attach it for a keepsake your loved one can reuse or treasure.
Crochet stars can become keychains or bag charms. Just add a jump ring and a keyring or lobster clasp. These make perfect little gifts or craft fair items and are quick to produce in bulk.
Incorporate them into home decor projects like wreaths, mobiles, or wall hangings. Combine stars of different sizes and colors to create celestial or patriotic themes for any room.
Lastly, they’re wonderful for charity projects. Crochet stars can be sewn onto hospital blankets, sent in care packages, or included in fundraisers. They’re easy to make in large quantities and bring joy wherever they go.
FAQ – Frequently Asked Questions
Q1: Is the Crochet Star – Pattern suitable for complete beginners?
Yes! It uses basic stitches and has a repetitive pattern, making it great for learning stitch control and shaping techniques.
Q2: How long does it take to complete one star?
On average, a star takes between 15 to 30 minutes to complete, depending on your skill level and the size of the star.
Q3: Can I change the size of the star?
Absolutely! Adjust the chain length and the height of the stitches to make larger or smaller stars. You can also use thicker or thinner yarn.
Q4: What is the best yarn to use?
Worsted weight cotton or acrylic yarns are most common. Cotton provides more structure, while acrylic offers softness and flexibility.
Q5: How do I make my star stiff enough for ornaments?
Blocking helps, but you can also use fabric stiffener, starch spray, or even a diluted glue solution to keep the star firm.
Q6: Can I use this pattern to teach kids or new crocheters?
Yes, it’s a perfect pattern for beginners of all ages. The short, repetitive steps make it easy to follow and rewarding to complete.
Conclusion
The Crochet Star – Pattern is a timeless, accessible, and endlessly customizable design that brings joy to crafters of all skill levels. With just a few simple materials and basic stitches, you can create beautiful star motifs that brighten up any project, occasion, or space.
From ornaments and appliqués to gift tags and keychains, crochet stars are the perfect blend of function
and flair. This pattern not only helps you build essential skills but also inspires creativity and handmade expression in every stitch.
Have you tried the Crochet Star – Pattern yet? We’d love to hear about your experience! Leave your honest thoughts, tips, or suggestions in the comments to help us and fellow readers continue crafting with joy and creativity.