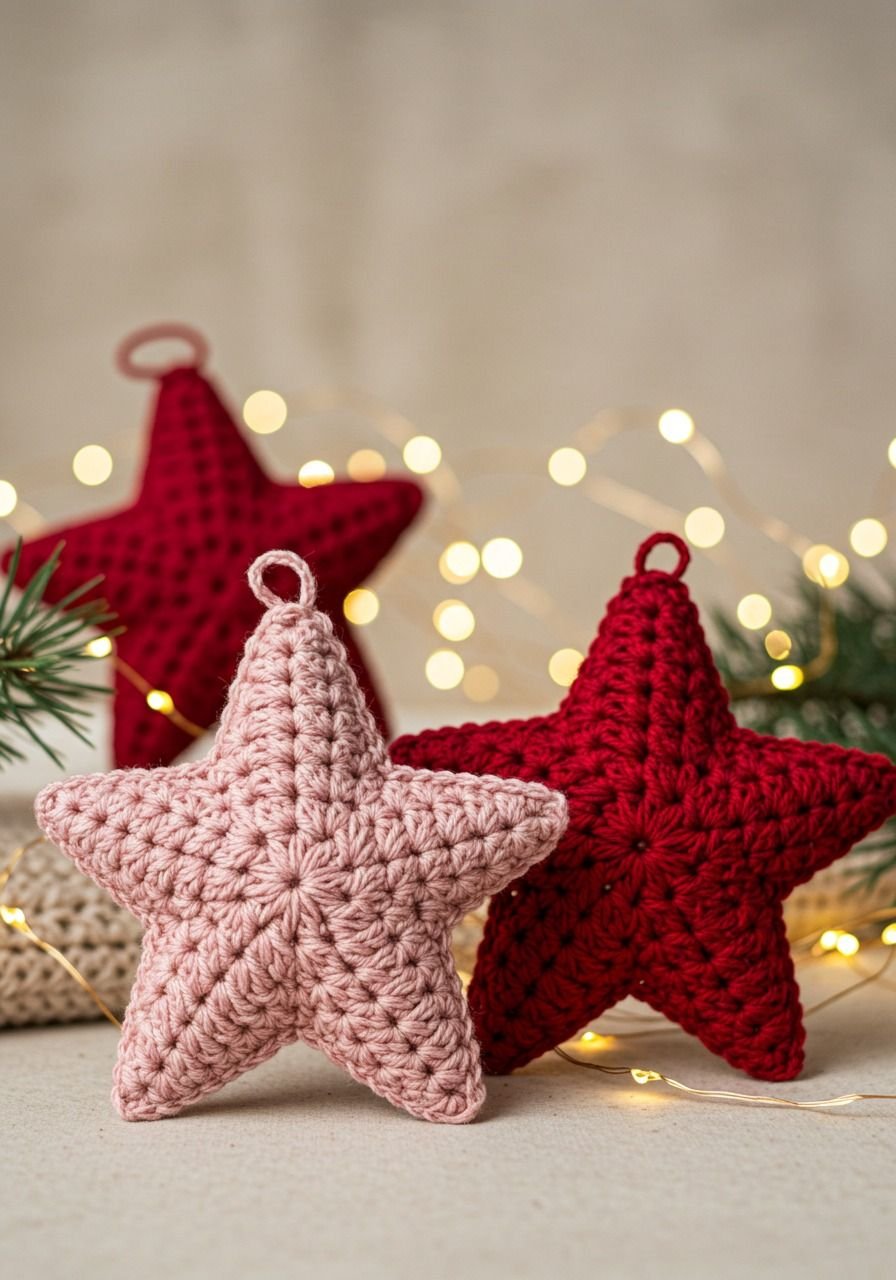
If you’re looking to create something small, beautiful, and versatile, then the Crochet Star – Pattern is the perfect project to try. Crochet stars are quick to make, require very little yarn, and can be used for just about anything—from Christmas decorations to keychains, garlands, baby mobiles, or even appliqués on clothes and blankets.
The charm of the Crochet Star – Pattern lies in its simplicity and adaptability. Whether you want a five-pointed star for festive décor or a more whimsical shape for a child’s room, there’s always a creative way to make it your own. Even better, most star patterns are beginner-friendly and can be completed in under 30 minutes, making them excellent projects for last-minute gifts or craft fairs.
In this guide, you’ll learn everything you need to get started. We’ll cover the basic tools and materials, walk through the process of crocheting a star, explore creative variations and project ideas, and answer frequently asked questions about crochet stars. Let’s dive into the magic of handmade stars.
1. Materials and Tools for the Crochet Star – Pattern
Before you begin working on your Crochet Star – Pattern, it’s important to gather the right materials. The best part is that this project is low-cost, beginner-friendly, and can be completed with scrap yarn or leftover supplies.
Start with yarn—just about any type will work. Cotton yarn is recommended for crisp edges and durability, especially if you plan to use the stars as coasters or ornaments. Acrylic yarn can also be used, especially for decorative stars where softness and vibrant colors are important.
The crochet hook you use should match your yarn. Most worsted-weight yarns pair well with a 4mm to 5mm hook. If you want smaller, denser stars, use a slightly smaller hook to tighten the stitch tension and prevent gaps.
A yarn needle or tapestry needle is essential for weaving in ends or attaching stars to other items. This is especially useful if you plan to join multiple stars into a garland or attach them to clothing, bags, or accessories.
You’ll also need a pair of sharp scissors to cut your yarn cleanly at the end of your project. Clean cuts make the finishing process neater and easier to manage.
If you’re using lighter colors or working in a space with limited lighting, consider using a bright, well-lit workspace. Since stars often involve small stitches and precise placement, good lighting ensures your work remains consistent and even.
Optionally, if your star will be purely decorative, you can apply starch or fabric stiffener to help it hold its shape, especially if it’s hanging or part of a wall display. This is particularly helpful for very open, lacy designs.
2. Step-by-Step: How to Crochet a Basic Star
Creating a Crochet Star – Pattern usually involves working in the round and building up the star’s points using increases and chain stitches. The process may look intricate, but it’s surprisingly simple once broken down.
Start with a magic ring or chain 4 and slip stitch to form a loop. This creates the center of your star. Chain 1 or 2 to begin your first round, depending on whether your pattern uses single, half double, or double crochet stitches.
For the first round, crochet several stitches (usually double crochets) into the ring. This will be the star’s center and base for the points. Join with a slip stitch to complete the round.
Next comes the fun part—building the star points. You’ll usually chain a few stitches, work back down with decreasing stitch heights (like treble, double, single), then slip stitch back into the center. Repeat this around the ring to form each point.
Adjust the length of your chains and the type of stitches used to change the shape and sharpness of the star’s points. Longer chains and taller stitches result in more dramatic points, while shorter chains give a rounder, softer look.
Once all points are completed, fasten off and weave in your ends. Use a yarn needle to hide them neatly in the back. If you’re attaching the star to something else, leave a longer tail for sewing.
To finish, block your star if needed. This helps to flatten curled points and define the shape. You can pin it to a towel, spray with water, and let it dry flat—or use a light starch spray for a more permanent hold.
3. Creative Variations and Decorative Ideas
One of the reasons the Crochet Star – Pattern is so loved is because of how easily it can be customized. You’re not limited to one style or shape—you can create an entire universe of starry designs with just a few tweaks.
Change the number of points. While five-pointed stars are the most common, you can make six, seven, or even eight-pointed stars by adjusting the pattern’s repeat. This is great for snowflake-like designs or themed decorations.
Play with color changes. Use variegated yarn for a gradient effect, or alternate colors for each point. You can even work in two layers—make two stars in different colors and stitch them together for a 3D look.
Add texture with stitch variation. Replace basic double crochets with puff stitches, bobbles, or post stitches for added dimension. These create a unique tactile element that stands out visually and physically.
Incorporate beads, buttons, or sequins into your star. This is especially lovely for Christmas decorations or baby mobiles where sparkle adds to the whimsy. Sew them on after the star is finished to avoid tangling during stitching.
Use stars as appliqués on scarves, hats, sweaters, or bags. A small star sewn onto a plain item adds instant charm and a touch of handmade magic. You can also make tiny stars for jewelry or keychains.
Turn your stars into garlands or bunting by stringing them together with a long chain stitch or thin rope. Mix sizes and colors to create an eye-catching decoration for birthdays, holidays, or nursery walls.
4. Practical Uses and Gift Ideas for Crochet Stars
Your completed Crochet Star – Pattern can be more than just a craft—it can become a meaningful gift, home décor item, or functional accessory. The applications are nearly endless and only limited by your imagination.
Create a set of coasters by making larger stars with tight stitches. Use cotton yarn and stiffen them for extra durability. These make great gifts, especially bundled in sets of four with a ribbon.
Attach a loop to your star and turn it into a Christmas ornament. Hang it on your tree, add to gift wrap, or make it part of a stocking stuffer bundle. They’re lightweight and ideal for mailing, too.
Add a small star to a baby mobile or nursery wall hanging. Choose soft pastel yarns and safe, baby-friendly materials. Stars make a calming and dreamy addition to any child’s room.
Use crochet stars as gift tags or reusable decorations. Add a name or date with embroidery for a personalized touch. The recipient can keep the tag as a keepsake long after the gift is unwrapped.
If you sell handmade items, crochet stars are excellent sellers at craft fairs or online shops. They’re quick to make, use minimal materials, and appeal to a wide audience looking for custom décor or gifts.
Combine your stars with other motifs—like hearts, flowers, or moons—to create themed sets or art pieces. Frame a group of stars in a shadow box or mount them on canvas for unique wall décor.
FAQ: Crochet Star – Pattern
Q1: Is the Crochet Star – Pattern suitable for beginners?
Yes! Most crochet star patterns are easy to follow and use basic stitches like chains, single crochet, and double crochet.
Q2: What yarn is best for making crochet stars?
Cotton yarn is ideal for crisp edges and durability. Acrylic yarn also works well for softer, decorative stars.
Q3: How long does it take to crochet a star?
It usually takes 15 to 30 minutes to complete a basic star, depending on the size and complexity of the pattern.
Q4: Can I use this pattern to make a star garland?
Absolutely. Make several stars, connect them with a chain or ribbon, and hang the garland across walls or windows.
Q5: How do I keep my star flat and shaped properly?
Blocking helps maintain shape. Lightly spray the star with water or starch, then pin it flat and let it dry completely.
Q6: Are crochet stars washable?
Yes, especially if made with cotton or machine-washable yarns. Hand washing is safest to preserve the shape.
Conclusion
The Crochet Star – Pattern is a simple yet impactful project that allows you to express creativity while making something beautiful and useful. Whether you use your stars as ornaments, coasters, décor, or gifts, they bring a handmade charm that shines through every stitch.
We hope this guide has helped you feel confident and inspired to start your own crochet star journey. If you tried the pattern or haveany tips or feedback, please leave your sincere opinion and suggestions in the comments below. Let’s keep sharing creativity and handmade joy!