The Crochet star – Pattern is one of the most versatile and enchanting projects a crafter can undertake, offering a perfect blend of simplicity and celestial beauty. Whether you are looking to create festive holiday ornaments, decorative bunting for a nursery, or unique appliqués for blankets and hats, mastering the Crochet star – Pattern opens up a universe of creative possibilities. These five-pointed wonders are not only quick to whip up, making them ideal for using up scrap yarn, but they also provide a satisfying sense of accomplishment for beginners and seasoned experts alike.
When you dive into a Crochet star – Pattern, you are engaging in a rhythmic art form that transforms a simple strand of fiber into a geometric masterpiece. The beauty of the Crochet star – Pattern lies in its adaptability; by simply changing your yarn weight or hook size, you can go from a tiny, delicate star for a greeting card to a large, plush star pillow. This flexibility is why the Crochet star – Pattern remains a staple in the crochet community, consistently trending as a go-to project for personalized handmade gifts and home styling.
Understanding the fundamental structure of a Crochet star – Pattern is essential for achieving that crisp, pointed look that defines a star. Most designs start with a central ring—either a magic circle or a small chain loop—and build outwards using rounds of stitches that increase in height to create the points. In this comprehensive guide, we will explore the nuances of the Crochet star – Pattern, ensuring you have all the tips and tricks needed to produce flawless stars every single time. Get your hooks ready as we explore the magic of celestial crochet.
1. Understanding the Essentials of a Crochet star – Pattern
To begin your journey, you must understand that the Crochet star – Pattern is essentially a mathematical progression of stitches. Most patterns rely on the “magic ring” technique to ensure the center of the star is tight and professional-looking. This initial step is crucial because a loose center can distort the symmetry of your finished Crochet star – Pattern, making it look more like a flower than a star.
Selecting the right materials is the next vital step for a successful Crochet star – Pattern. While you can use any yarn, a mercerized cotton is often recommended for beginners because it offers excellent stitch definition. This clarity allows you to see exactly where to insert your hook, which is vital when forming the sharp peaks and valleys required by a high-quality Crochet star – Pattern.
The hook size you choose will directly impact the “drape” and stiffness of your project. For a Crochet star – Pattern intended as an ornament, using a hook slightly smaller than what the yarn label suggests can help the star hold its shape without needing stiffening agents. This little trick ensures your Crochet star – Pattern remains sturdy even after years of use.
Terminology is another pillar of the Crochet star – Pattern. Depending on where the pattern originates, you might see US or UK terms. For instance, a “double crochet” in the US is a “treble crochet” in the UK. Always check the legend of your Crochet star – Pattern before starting to avoid confusion and ensure your star points are the correct height.
Tension plays a massive role in how your Crochet star – Pattern turns out. If your stitches are too tight, the star might curl inward like a bowl; if they are too loose, the points may look floppy. Practicing a consistent tension is the secret ingredient that elevates a basic Crochet star – Pattern into something truly professional and gift-worthy.
Finally, don’t forget the importance of “blocking” your finished piece. Even the best-executed Crochet star – Pattern can look a bit wonky right off the hook. Pinning your star out and lightly steaming it or using a fabric stiffener will give your Crochet star – Pattern those crisp, sharp edges that make it look like it was bought from a high-end boutique.
2. Step-by-Step Execution of the Crochet star – Pattern
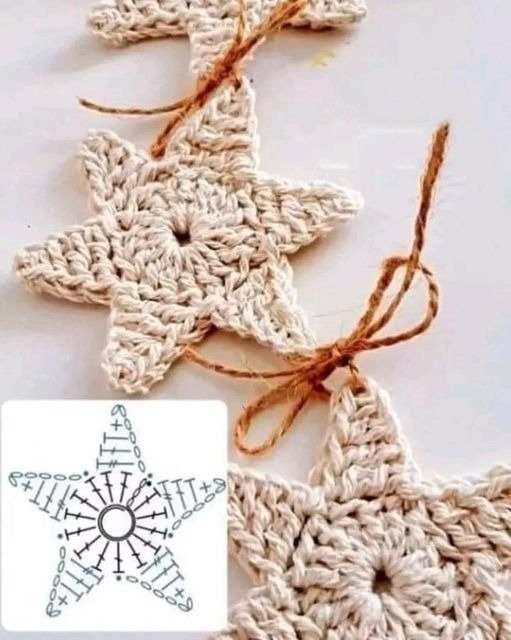
The execution of a Crochet star – Pattern usually begins with a foundation round of stitches, typically single or double crochets, into your center ring. This round acts as the “sun” from which your star points will radiate. In a standard five-point Crochet star – Pattern, you will want a number of stitches in this round that is easily divisible by five to ensure perfect spacing.
Creating the points of the Crochet star – Pattern involves a technique called “graduated stitching.” This means you will use a sequence of stitches that grow in height—starting with a slip stitch, moving to a single crochet, then a half-double, and finally a double or triple crochet at the very tip. This progression is what gives the Crochet star – Pattern its iconic angular silhouette.
One common challenge in the Crochet star – Pattern is making the “valleys” between the points look clean. To achieve this, many patterns utilize a slip stitch or a decrease at the base of the points. This pulls the fabric inward, contrasting against the outward growth of the peaks and defining the Crochet star – Pattern with much more clarity and visual impact.
As you work through the rounds of your Crochet star – Pattern, pay close attention to the “chains” used at the tips of the points. Often, a pattern will call for a “picot stitch” or a small chain-2 space at the apex. This tiny detail is what makes the ends of your Crochet star – Pattern look pointy rather than rounded, adding that professional finish.
Color changes can also be introduced to make your Crochet star – Pattern pop. You can work the center in one color and the points in another, or even use a variegated yarn to create a “galaxy” effect. Because the Crochet star – Pattern is a small project, it is the perfect playground for experimenting with bold color combinations that you might be hesitant to use on larger items.
The final round of a Crochet star – Pattern often involves a decorative edge or a simple round of slip stitches. This helps to reinforce the edges and prevents the star from stretching out over time. When you finish the last stitch of your Crochet star – Pattern, be sure to leave a long tail if you plan on hanging it as an ornament or sewing it onto another project.
3. Creative Applications for Your Crochet star – Pattern
Once you have mastered the basic Crochet star – Pattern, the real fun begins with application. One of the most popular uses is creating a star garland. By connecting multiple stars from your Crochet star – Pattern with a long chain of yarn, you can create beautiful decor for birthday parties, holiday mantels, or even bohemian-style bedroom accents.
Another wonderful use for the Crochet star – Pattern is as a festive gift topper. Instead of using a plastic bow, tie a handmade star onto your gift box. It adds a personal, “slow-fashion” touch to your presents, and the recipient can keep the Crochet star – Pattern creation as a permanent ornament for their own home.
For those who love fashion, the Crochet star – Pattern works beautifully as a patch. You can sew small stars onto the elbows of a cardigan or the pockets of denim jeans. This is a great way to repair small holes in clothing while adding a bit of whimsical flair using your Crochet star – Pattern skills to customize your wardrobe.
In the realm of home textiles, a Crochet star – Pattern can be scaled up to create stunning baby blankets. By using a “star-stitch” or by joining many large stars together, you can create a blanket that isn’t just a square or rectangle. The unique shape resulting from a star-based Crochet star – Pattern makes for a memorable baby shower gift.
Seasonal decorating is where the Crochet star – Pattern truly shines. Think white stars for a “starry night” winter theme, yellow stars for a “twinkle twinkle” nursery theme, or even red, white, and blue stars for patriotic holidays. The Crochet star – Pattern is a year-round tool for the creative home decorator.
Finally, don’t overlook the therapeutic benefits of repeating a Crochet star – Pattern. Because these stars are small and rhythmic, they are perfect “pocket projects” for commuting or waiting in line. Many find that the repetitive nature of the Crochet star – Pattern helps reduce stress and provides a quick hit of creative satisfaction during a busy day.
4. Troubleshooting and Customizing the Crochet star – Pattern
Even with a perfect Crochet star – Pattern, things can sometimes go awry. If your star is curling or “cupping,” it usually means you don’t have enough stitches in your initial rounds or your tension is too tight. To fix this within your Crochet star – Pattern, try using a larger hook or adding a few extra stitches to the foundation to give the points more room to lie flat.
Conversely, if your Crochet star – Pattern looks wavy or ruffled, you likely have too many stitches. This excess fabric has nowhere to go but up, creating a 3D effect that you might not want. In this case, count your stitches carefully to ensure you are following the Crochet star – Pattern counts exactly, or try dropping a hook size to tighten things up.
Customizing the “sharpness” of the points is a great way to make a Crochet star – Pattern your own. If you want very long, thin points, you can add more treble crochets and longer chain spaces at the tips. If you prefer a “chubby” star, keep the stitch heights closer together (e.g., only using single and half-double crochets) throughout your Crochet star – Pattern.
Yarn choice can drastically change the “vibe” of your Crochet star – Pattern. A fuzzy mohair yarn will create a soft, ethereal star that looks like a cloud, while a metallic embroidery thread will produce a tiny, sparkling star perfect for jewelry. Don’t be afraid to deviate from the suggested yarn in the Crochet star – Pattern to achieve a specific look.
Adding embellishments to your Crochet star – Pattern can take it to the next level. Consider sewing a bead or a sequin into the center of the star, or fringing the ends of the points for a more rustic look. These small additions transform a standard Crochet star – Pattern into a piece of mixed-media art that showcases your personal style.
Lastly, document your progress. If you make a tweak to the Crochet star – Pattern that you really like, write it down! Keeping a crochet journal with your modified versions of the Crochet star – Pattern ensures you can replicate your best work in the future and helps you grow as a designer in your own right.
FAQ – Frequently Asked Questions
What is the best yarn for a Crochet star – Pattern?
For the best results, use a medium-weight (worsted) cotton yarn. Cotton provides the stiffness and stitch definition needed for the star to hold its shape. However, for a softer look, acrylic or wool blends also work well with the Crochet star – Pattern.
How do I make my crochet star points sharper?
To get sharper points in your Crochet star – Pattern, ensure you use a “picot” stitch at the very tip or make sure your stitches transition quickly from short to tall. Blocking your finished star with pins is also essential for achieving those crisp edges.
Can a beginner try a Crochet star – Pattern?
Absolutely! The Crochet star – Pattern is a fantastic beginner project because it introduces basic stitches (SC, HDC, DC) and working in the round. It is small enough that mistakes are easily fixed without having to unravel hours of work.
How long does it take to finish one star?
Depending on your speed and the complexity of the Crochet star – Pattern, a single star can take anywhere from 5 to 15 minutes. This makes it an excellent “instant gratification” project.
Do I need to block my crochet stars?
While not strictly necessary, blocking is highly recommended for any Crochet star – Pattern. It flattens the center and pulls the points out, making the star look symmetrical and professional.
Can I scale the Crochet star – Pattern to make a pillow?
Yes! You can use a very thick “blanket yarn” and a large 8mm or 10mm hook with the same Crochet star – Pattern to create a large, plush star-shaped pillow.
Conclusion
In this article, we have explored the wonderful world of the Crochet star – Pattern, covering everything from the essential tools and terminology to advanced customization and troubleshooting.
We learned that the Crochet star – Pattern is not just a craft project, but a versatile design element that can be used for home decor, fashion, and heartfelt gifting. By focusing on tension, stitch height, and the importance of blocking, you can turn a simple ball of yarn into a celestial work of art.