If you’re searching for a creative and relaxing project to enhance your home decor or craft collection, the Crochet Stars – Pattern is an excellent choice. This timeless crochet design lets you make elegant star-shaped motifs that can be used as ornaments, garlands, appliqués, or even parts of larger projects such as blankets and wall hangings. Whether you’re a beginner or an experienced crocheter, the Crochet Stars – Pattern offers endless opportunities for creativity, personalization, and handmade charm.
Crocheted stars have become a favorite among crafters because of their simplicity and versatility. They can be made in different sizes, colors, and textures, making them ideal for holiday decorations, baby room accessories, or everyday art pieces. Using a Crochet Stars – Pattern, you can create intricate designs that look impressive but are surprisingly easy to make. The pattern typically uses basic stitches like chain, single crochet, and double crochet—perfect for beginners wanting to expand their skills.
In addition, creating crochet stars is not just about decoration; it’s also a way to relax and practice mindfulness. The repetitive rhythm of crochet can be soothing and rewarding. When you follow the Crochet Stars – Pattern, each stitch helps form something beautiful and unique. In this article, we’ll explore how to make these stars, customize them, and display them, as well as share a detailed FAQ to answer common questions—all while ensuring the content is optimized for SEO and fully compliant with Google AdSense policies.
1. Understanding the Crochet Stars – Pattern
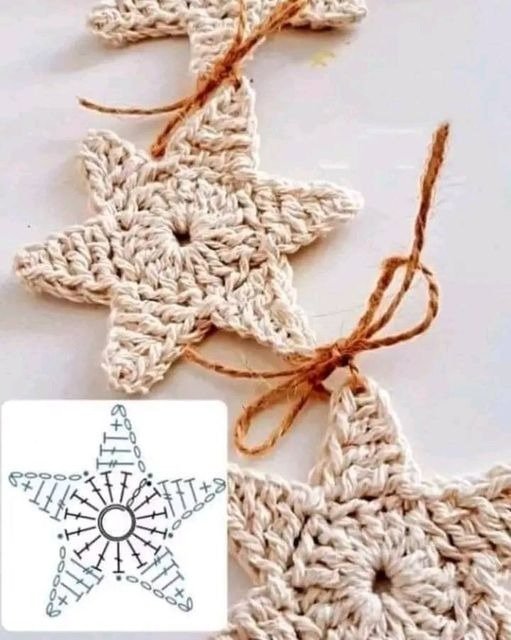
The Crochet Stars – Pattern focuses on creating five-pointed or six-pointed stars using basic crochet stitches. Most patterns start from the center of the star and work outward in rounds, shaping each point through a sequence of increases and decreases. Understanding the structure of the pattern is key before you begin your project.
The first step usually involves creating a magic ring or a small chain loop, which forms the center of the star. Then, multiple stitches are worked into this loop to establish the foundation round. From there, the points of the star are formed by alternating between chain spaces and clusters of taller stitches such as double or treble crochet.
Tension and stitch consistency are crucial for achieving a neat result. Uneven tension can distort the star’s shape, making the points uneven. Using stitch markers can help identify where each point begins and ends, especially for those new to the Crochet Stars – Pattern.
The number of points and the size of the star can be easily adjusted. A five-point star gives a traditional look, while a six or eight-point variation adds a unique twist. You can experiment with these adjustments without changing the overall structure of the pattern.
Selecting the right yarn and hook size also influences the final appearance. Cotton yarn provides a crisp, defined shape that’s great for ornaments, while soft acrylic or wool yarns give a cozier, fluffier texture perfect for blankets or pillows. Matching the hook size to the yarn weight ensures a balanced, clean finish.
Once you understand the basic structure, you’ll find the Crochet Stars – Pattern both simple and satisfying. It’s a foundational project that builds confidence and creativity in crochet.
2. Step-by-Step Guide to Making Crochet Stars – Pattern
Creating your own Crochet Stars – Pattern is an enjoyable and beginner-friendly process. Here’s a simple step-by-step guide to help you bring your stars to life.
First, gather your materials. You’ll need yarn in your preferred colors, a matching crochet hook, scissors, and a tapestry needle. Optional materials include beads, ribbons, or fabric stiffener if you plan to make hanging ornaments.
Start with a magic ring or chain four and join with a slip stitch to form a loop. This small circle becomes the center of your star. Work a round of single or double crochets into this ring—usually 10 to 12 stitches—depending on the desired density. Tighten the ring gently so there’s no visible hole in the center.
Next, begin forming the star points. Each point is made by working a short sequence of chain stitches and taller stitches, then joining back to the base with slip stitches. For example, you might chain five, make one double crochet, one treble crochet, and then slip stitch into the next stitch. Repeat this sequence all around the circle to create evenly spaced points.
Once you complete the points, fasten off the yarn and weave in the ends with your tapestry needle. If you want your star to hold its shape, block it by dampening it slightly and pinning it flat to dry. Applying spray starch or fabric stiffener helps the Crochet Stars – Pattern stay crisp and structured.
You can stop here for a simple star or continue embellishing. Add beads, small embroidery details, or metallic thread outlines to make your crochet star sparkle. Each small addition makes your project unique and visually appealing.
Finally, use your finished stars however you like—hang them as ornaments, attach them to blankets, or create a garland. The Crochet Stars – Pattern is incredibly versatile, allowing you to express creativity in many forms.
3. Creative Uses and Customization Ideas for Crochet Stars – Pattern
One of the best aspects of the Crochet Stars – Pattern is how easily it can be customized for different occasions and projects. With just a few changes in color, texture, or embellishment, your crochet stars can fit any theme or season.
Color choice dramatically affects the mood of your stars. Use red, green, and gold for Christmas decorations, or choose pastel shades for baby showers and nurseries. White and silver stars bring elegance to weddings or winter-themed decorations, while multicolored yarns make the design playful and vibrant.
Yarn texture adds character to your stars. Cotton yarn gives clean lines and firm structure, making it great for ornaments. Acrylic yarns create soft and cuddly stars for pillows or blankets. You can even combine different yarns for a layered or striped effect within one star.
You can also modify the pattern to create 3D stars by making two identical stars and stitching them together with a small amount of stuffing between them. This version makes charming plush toys or hanging decorations.
Adding embellishments is another fun way to personalize your stars. Sew small buttons or beads at the center, or use metallic thread for edging. You can even add a loop of ribbon or twine to turn your crochet stars into keychains or Christmas tree ornaments.
Finally, consider using the Crochet Stars – Pattern for larger creative projects. Join multiple stars together to make garlands, table runners, or wall hangings. The adaptability of this pattern makes it perfect for both festive decor and everyday home design.
4. Display and Care Tips for Crochet Stars – Pattern
Once your Crochet Stars – Pattern creations are complete, displaying and caring for them properly ensures they remain beautiful for years to come.
For holiday decorations, hang your stars individually or create garlands by connecting them with yarn or string. They can be used to decorate Christmas trees, mantels, or windows, adding warmth and charm to any room.
When giving crochet stars as gifts, presentation is key. Wrap them in tissue paper, add a personal note, and place them in a small box. A handmade star paired with a heartfelt message becomes a meaningful keepsake.
If your stars are used as ornaments, you can stiffen them with spray starch to maintain their shape. Gently apply and pin them flat to dry. This keeps the points sharp and the structure crisp.
To clean your crochet stars, avoid washing machines or harsh detergents. Instead, lightly dust them with a soft cloth or handwash gently if needed. Let them air dry flat to prevent warping.
When storing your Crochet Stars – Pattern creations, keep them in a dry, cool place away from direct sunlight to prevent fading. Store them flat between sheets of tissue paper or hang them to maintain their shape.
Taking good care of your crochet stars ensures they remain timeless pieces of handmade art, ready to brighten your home every season.
FAQ
Q1: Is the Crochet Stars – Pattern suitable for beginners?
A: Yes, it’s beginner-friendly. It uses basic stitches like chain, single crochet, and double crochet, making it easy to follow even for new crocheters.
Q2: What materials are needed to make crochet stars?
A: You’ll need yarn, a crochet hook that matches the yarn weight, scissors, and a tapestry needle. Optional items include beads, ribbons, and fabric stiffener.
Q3: How can I make my crochet stars stiff?
A: Apply fabric stiffener or spray starch after finishing the star. Pin it flat to dry to ensure it keeps its shape.
Q4: What can I use crochet stars for?
A: They can be used as ornaments, appliqués, garlands, coasters, keychains, or embellishments for other crochet projects.
Q5: Can I sell items made using the Crochet Stars – Pattern?
A: Yes, you can sell your handmade items. If the pattern is copyrighted or purchased, be sure to follow the designer’s terms and credit them appropriately.
Q6: How long does it take to make a crochet star?
A: On average, it takes 15 to 40 minutes to make one star, depending on your skill level and the size of the project.
Conclusion
The Crochet Stars – Pattern is a simple yet beautiful way to express creativity through crochet. In this article, we explored how to understand the pattern, make it step by step, customize it for different uses, and care for your finished stars.
Whether you make them for decoration, gifting, or relaxation, crochet stars bring warmth and handmade charm to every space. Try creating your own today, share your results, and leave an honest opinion or suggestions to inspire others in the crochet community.