The Crochet Sun – Pattern is one of the most cheerful and rewarding projects any crafter can undertake, bringing a literal burst of sunshine into your home regardless of the weather outside. Whether you are looking to create a cute nursery mobile, a decorative coaster, or a bright embellishment for a summer bag, mastering a Crochet Sun – Pattern allows you to practice essential techniques like working in the round and creating intricate textures. The beauty of this specific design lies in its versatility, as you can easily adjust the size and “heat” of your sun by simply swapping yarn weights or hook sizes to suit your creative vision.
When you dive into a Crochet Sun – Pattern, you aren’t just following a set of instructions; you are engaging in a meditative process that transforms simple cotton yarn and a hook into a symbol of warmth and happiness. For beginners, this project serves as a fantastic introduction to the magic ring and basic stitches, while experienced crocheters can use it as a canvas for experimentation with variegated yarns and complex border designs. This article is designed to guide you through every loop and pull, ensuring your finished piece looks professional, vibrant, and perfectly symmetrical.
Before we start looping our yarn, it is vital to understand that the Crochet Sun – Pattern thrives on tension and color choice. Using a bright, sunny yellow or a deep marigold orange can completely change the vibe of your project, making it either soft and whimsical or bold and energetic. In the following sections, we will break down the essential components of this pattern, focusing on the core terminology and the specific steps required to make your handmade crochet sun stand out. Let’s get our supplies ready and prepare to radiate some serious crafting energy.
1. Understanding the Core of the Crochet Sun – Pattern
The foundation of any successful Crochet Sun – Pattern begins with the center circle, which represents the body of the sun. This part is usually worked in continuous or joined rounds using single crochet or half double crochet stitches to create a solid, flat disk. Ensuring your increases are spaced evenly is the secret to avoiding a “wavy” sun, keeping the surface smooth and professional for your amigurumi or decor projects.
A key term you will encounter is the Magic Ring (or Magic Circle). This is a foundational technique used in the Crochet Sun – Pattern to ensure there is no hole in the middle of your sun’s face. By pulling the yarn tail tight after your first round of stitches, you create a seamless start that looks much cleaner than the traditional “chain and join” method. It provides the structural integrity needed for a high-quality finish.
Another essential element is Stitch Markers. When working on a Crochet Sun – Pattern, especially in continuous rounds, it is incredibly easy to lose track of where a new row begins. Using a marker helps you maintain the correct count for your increases, which is vital for maintaining a perfect geometric circle before you transition into the sunbeams. Accuracy here prevents lopsided rays later on.
The term Increase (Inc) refers to placing two stitches into the same stitch from the previous row. In a Crochet Sun – Pattern, increases are the engine that allows the circle to grow outward while staying flat. If you skip an increase, your sun will start to curl into a bowl shape; if you add too many, it will ruffle. Balance is everything when crafting your solar-themed crochet.
Choosing the right Hook Size is equally important for the Crochet Sun – Pattern. Typically, a 3.5mm (E) or 4.0mm (G) hook works best with medium weight yarn to ensure the stitches are tight enough that any stuffing (if making a 3D sun) doesn’t peek through. A tighter gauge results in a more durable and defined sun pattern that holds its shape over time.
Finally, we must mention Yarn Weight. For a standard Crochet Sun – Pattern, a DK or worsted weight cotton is highly recommended because it offers excellent stitch definition. Cotton yarn doesn’t stretch as much as acrylic, meaning your sunbeams will stay crisp and pointy rather than sagging. This choice ensures your DIY crochet sun remains a bright highlight in your collection for years.
2. Crafting the Radiant Sunbeams and Rays
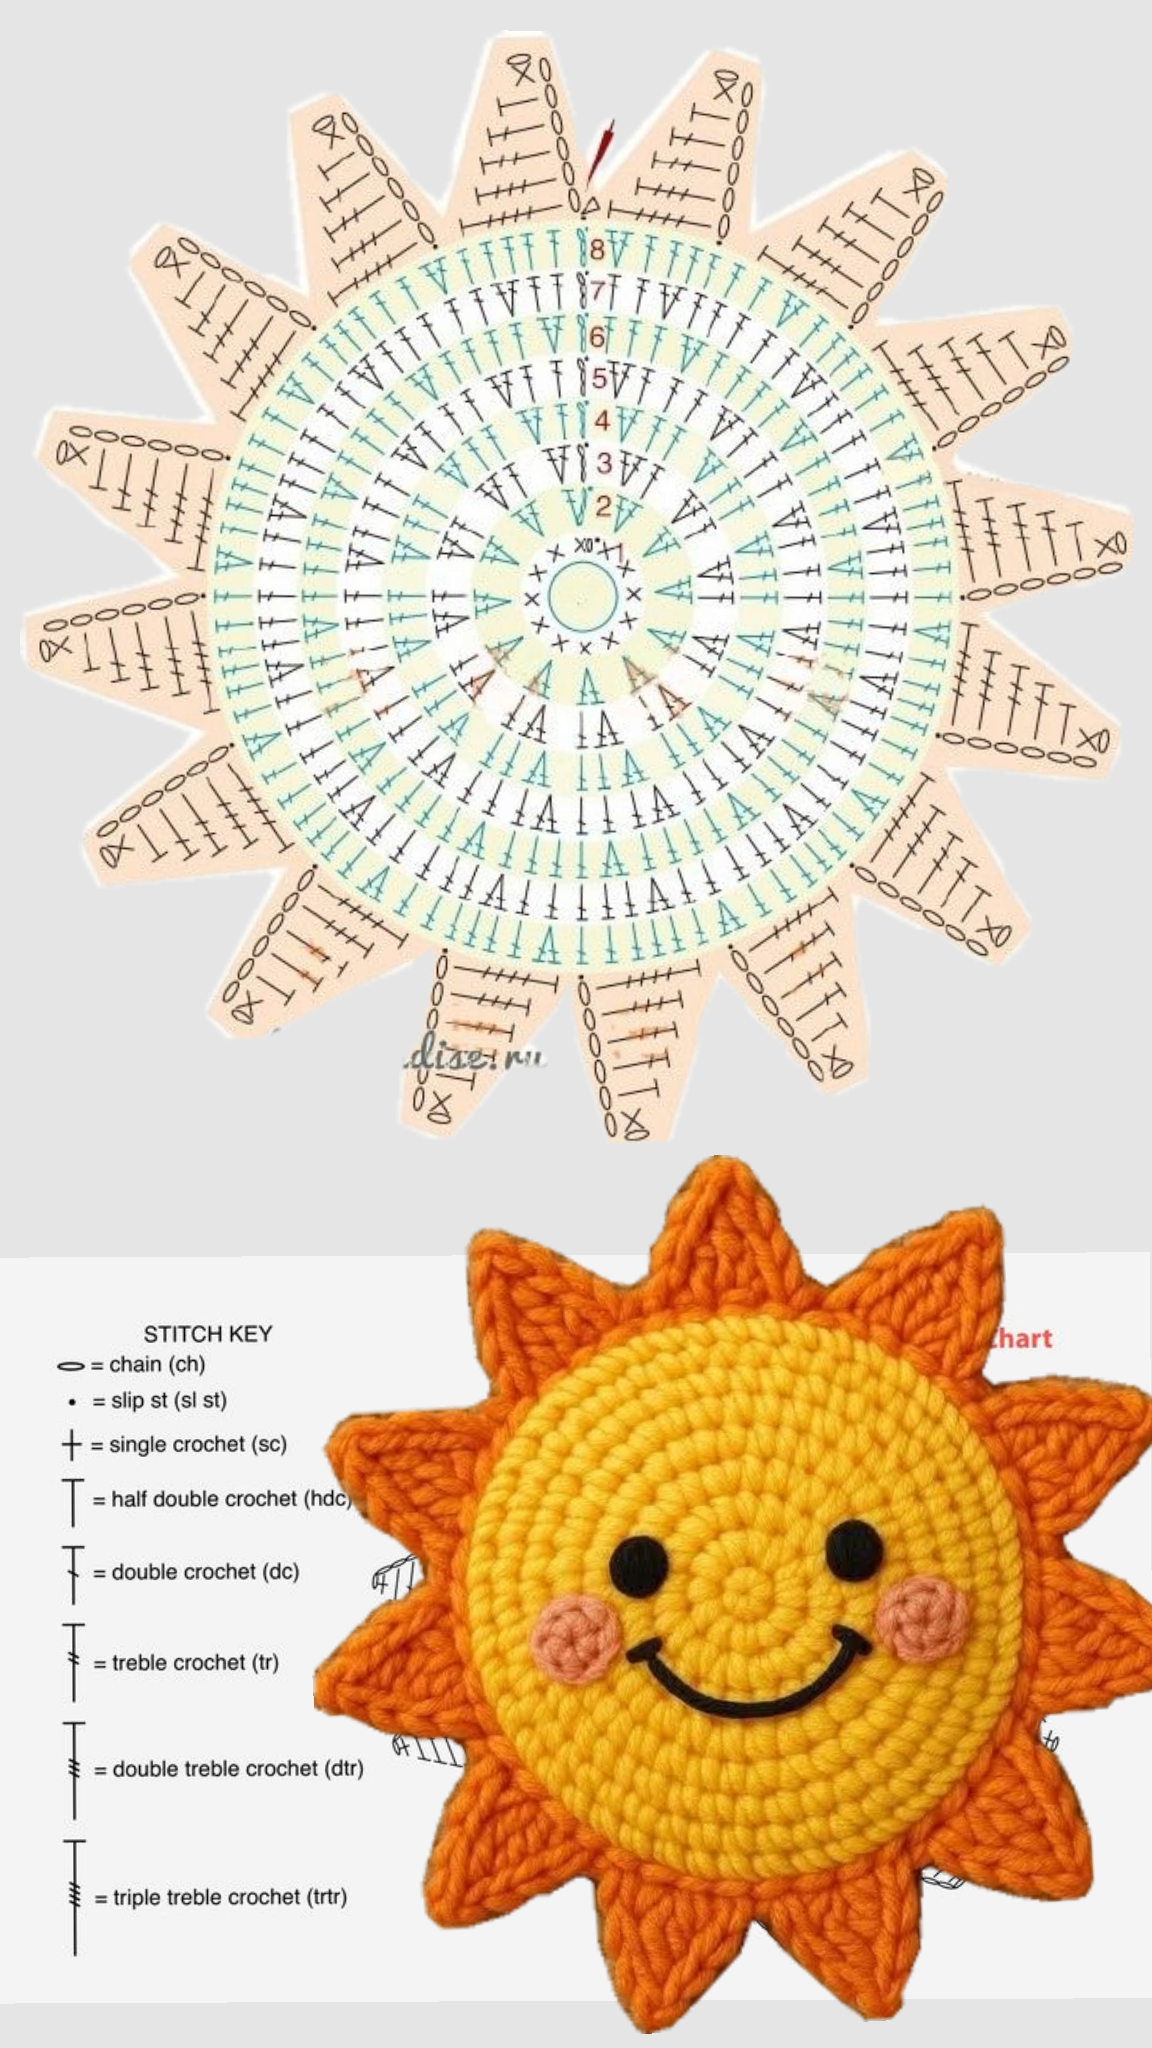
The most defining characteristic of a Crochet Sun – Pattern is the array of rays that extend from the center. These are usually created in the final round by using a combination of chains, slip stitches, and taller stitches like the double crochet or treble crochet. This variation in height is what creates the “pointed” look that makes the sun instantly recognizable.
The Picot Stitch is a term frequently used to create the sharp tips of the rays in a Crochet Sun – Pattern. By chaining three and slip-stitching back into the first chain, you create a small decorative point. This technique adds a level of detail and “sparkle” to your crochet project, making the sun look more intricate and professionally designed.
Another technique involves Chaining and Skipping. To give the rays space to breathe, a Crochet Sun – Pattern might instruct you to chain a certain number and then skip a stitch on the base circle. This creates a “lace” effect that makes the sun feel light and airy. It’s a great way to add visual interest without adding unnecessary bulk to the crochet design.
We also use Front Post Stitches occasionally in advanced versions of the Crochet Sun – Pattern. By working around the post of the stitch instead of into the top loops, you can create raised ridges that mimic the shimmering movement of light. This adds a 3D texture that makes your sun applique pop when attached to blankets or hats.
The term Turning Chain is vital when working on individual rays. If your Crochet Sun – Pattern requires you to work back and forth on a single ray, the turning chain provides the height needed to move to the next row without pulling the edges tight. Mastering this ensures that every ray on your crochet sun is identical in length and width.
Lastly, let’s talk about Fastening Off. Once you complete the final ray of your Crochet Sun – Pattern, you need to secure the yarn properly. A “seamless join” or “invisible finish” is preferred here to hide the knot. This attention to detail is what separates a hobbyist piece from a boutique-quality handmade sun, ensuring the transition from the last ray to the first is totally hidden.
3. Materials and Tools for a Perfect Finish
To execute a high-quality Crochet Sun – Pattern, you need more than just yarn; you need the right Ergonomic Crochet Hook. Crocheting repetitive circles and small rays can be tough on the hands. Using a hook with a comfortable grip allows you to maintain consistent tension throughout the sun pattern, which is crucial for achieving a symmetrical and beautiful result.
The Yarn Needle (or tapestry needle) is your best friend when finishing a Crochet Sun – Pattern. You will have at least two ends to weave in—the starting tail from the magic ring and the final tail. Weaving these in deeply and securely ensures that your crochet art won’t unravel during washing or heavy use, maintaining the sun’s structural integrity.
Polyester Fiberfill is an optional but popular material if you want to turn your Crochet Sun – Pattern into a plushie. By crocheting two identical sun circles and joining them together with a bit of stuffing in the middle, you create a 3D amigurumi sun. This makes the project perfect for baby toys or soft nursery decor items.
Let’s discuss Stitch Definition. This term refers to how clearly you can see each individual loop in your Crochet Sun – Pattern. To get the best definition, you should avoid “fuzzy” yarns like mohair and stick to mercerized cotton. High stitch definition makes the geometric beauty of the sun rays stand out, which is the whole point of this specific design.
Gauge is a term that many beginners overlook, but it matters for the Crochet Sun – Pattern. If your gauge is too loose, the sun will be floppy; if it’s too tight, it may buckle. Checking your gauge against the pattern instructions ensures that your finished crochet sun is exactly the size you intended, whether it’s a small keychain or a large pillow.
Finally, Blocking Tools like foam mats and T-pins can be used to perfect your Crochet Sun – Pattern. After finishing, you can pin the rays out straight and lightly steam them. This process “sets” the stitches, ensuring that the sunbeams stay perfectly pointed and flat, giving your handmade craft a high-end, store-bought appearance.
4. Advanced Customization and Styling Tips
Once you have mastered the basic Crochet Sun – Pattern, you can start exploring Color Graduations. By using a “cake” yarn or manually switching from a dark orange center to a pale yellow edge, you can create a “sunset” or “sunrise” effect. This adds depth and artistic flair to the crochet sun, making it a unique piece of home decor.
The term Surface Crochet refers to adding stitches directly onto the surface of your finished Crochet Sun – Pattern. You can use this to “draw” a happy face on your sun or to add extra swirls of light across the center disk. It’s a fantastic way to personalize your crochet creation without changing the fundamental structure of the pattern.
Bead Integration is another exciting way to level up your Crochet Sun – Pattern. By sliding small gold or clear beads onto your yarn before you start, you can crochet them into the tips of the rays. This makes the sun catch the light literally, creating a shimmering effect that is perfect for window hangers or festive ornaments.
We should also consider Joining Techniques. If you are making multiple pieces from the Crochet Sun – Pattern, you might want to join them to create a “Sun Blanket” or a decorative bunting. Using a join-as-you-go method allows you to connect the suns at the tips of their rays, resulting in a beautiful, celestial-themed lace fabric.
Embroidery is often used alongside a Crochet Sun – Pattern to add fine details. Using a thinner black yarn or embroidery floss, you can give your sun “sleepy eyes” or a “wide smile.” This transforms the geometric shape into a character, which is a staple in the world of amigurumi patterns and children’s gifts.
Finally, think about Stiffening Agents. If you want your Crochet Sun – Pattern to hang perfectly flat as a wall decoration, you can dip it in a mixture of water and craft glue. Once it dries, the sun will be rigid and hold its shape perfectly. This is a pro-tip for anyone using the sun as a permanent home accent or a sturdy Christmas tree topper.
FAQ: Frequently Asked Questions about the Crochet Sun – Pattern
1. What is the best yarn for a Crochet Sun – Pattern?
The best yarn is generally 100% cotton or a cotton-blend. Cotton provides the best stitch definition, which is necessary to make the sun’s rays look sharp and distinct. It also holds its shape better than acrylic, which can be a bit too stretchy for flat motifs.
2. Can a beginner complete a Crochet Sun – Pattern?
Yes! A Crochet Sun – Pattern is an excellent project for beginners. It teaches the fundamentals of working in the round, increasing, and basic decorative stitches. As long as you know how to make a single crochet and a chain, you can follow a basic sun pattern.
3. How do I stop my crochet sun from curling?
Curling usually happens because of incorrect increases or tension that is too tight. Make sure you are following the formula for a flat circle (usually increasing by 6 or 8 stitches every round). If it still curls, try using a larger hook size to loosen the tension.
4. How long does it take to finish a Crochet Sun – Pattern?
A standard small-to-medium Crochet Sun – Pattern can usually be completed in 30 to 60 minutes. This makes it a perfect “palette cleanser” project between larger tasks or a quick handmade gift for friends and family.
5. Can I wash my crochet sun?
If you used cotton or acrylic yarn, yes! It is best to hand wash your crochet items in cool water and lay them flat to dry. This prevents the sun rays from getting distorted in a washing machine, keeping your Crochet Sun – Pattern looking new.
6. How do I make the rays look symmetrical?
The key to symmetrical rays in a Crochet Sun – Pattern is consistent stitch counting. Ensure you have the exact number of stitches in your base circle that the pattern requires before starting the rays. If you are off by even one stitch, the spacing of the rays will look uneven.
Conclusion
In this guide, we have explored the bright and beautiful world of the Crochet Sun – Pattern. We covered everything from the importance of the Magic Ring and proper increases to the advanced techniques of picot stitches and surface crochet. By choosing the right cotton yarn and maintaining steady tension, you can create a radiant piece of art that brings warmth to any space. Remember that the secret to a perfect sun lies in the details—those sharp ray tips and a perfectly flat center make all the difference.
We hope this article inspires you to pick up your hook and start your own Crochet Sun – Pattern today! Whether you are making a small keychain or a large wall hanging, the process is sure to brighten your mood. We would love to hear about your experience with this pattern.