CROCHET SYMBOL CHARTS – Pattern reading is often considered the “universal language” of the fiber arts world, allowing crafters from any country to understand a design regardless of the language the written instructions are in. While many beginners start with long-form written text, mastering the art of the visual diagram opens up a global library of inspiration. These charts provide a birds-eye view of the project, showing exactly where each stitch is placed in relation to the others, which eliminates much of the guesswork associated with complex rows and rounds.
Understanding a CROCHET SYMBOL CHARTS – Pattern is a transformative milestone for any hobbyist looking to level up their skills. Instead of visualizing a wall of text, you begin to see the geometry of the fabric, identifying the flow of increases, decreases, and decorative elements at a single glance. This visual representation is particularly helpful for intricate designs like lace, mandalas, and complex garments where a single misplaced stitch can throw off the entire alignment of the piece.
In this comprehensive guide, we will explore the fundamental logic behind the CROCHET SYMBOL CHARTS – Pattern, breaking down how to identify common icons and follow the directional flow of the work. We will also discuss the technical benefits of using these diagrams for troubleshooting your work and how to combine them with written instructions for a foolproof crafting experience. Whether you are a visual learner or a seasoned pro looking to expand your horizons, mastering these charts is the key to unlocking your full creative potential in the world of crochet.
1. Decoding the Anatomy of CROCHET SYMBOL CHARTS – Pattern Icons
The first step in mastering a CROCHET SYMBOL CHARTS – Pattern is familiarizing yourself with the standard icons used by designers worldwide. Each symbol is designed to look like the physical stitch it represents; for example, a chain stitch is depicted as a small hollow oval, resembling the loop of yarn itself. A single crochet is usually a small “x” or a “+”, signifying the compact and sturdy nature of the stitch.
As you move into taller stitches within a CROCHET SYMBOL CHARTS – Pattern, you will notice a vertical bar with horizontal slashes. These slashes indicate the number of “yarn overs” required for the stitch. A double crochet has one slash, a treble crochet has two, and so on. This logical progression makes it easy to identify the height and complexity of a stitch even if you have never seen that specific pattern before.
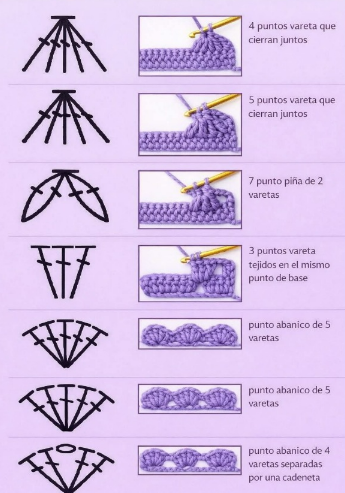
Clusters and “v-stitches” are also clearly represented in a CROCHET SYMBOL CHARTS – Pattern. When you see multiple vertical bars joined at the bottom into a single point, it tells you to work those stitches into the same base loop. If they are joined at the top, it indicates a decrease, where multiple stitches are worked together to form a single closing loop. This visual shorthand is much faster to process than reading “dc3tog” in a written line.
Directionality is another vital component of the CROCHET SYMBOL CHARTS – Pattern. For patterns worked in rows, the chart is usually read from bottom to top, alternating from right-to-left and left-to-right. For projects worked in the round, such as a granny square or a doily, you start at the center and read counter-clockwise. Seeing the stitches laid out in this circular fashion helps you visualize the expansion of the “rounds” more clearly.
Specialty stitches like the “Front Post” or “Back Post” varieties have distinct markers in a CROCHET SYMBOL CHARTS – Pattern. These are usually indicated by a small hook or curve at the bottom of the stitch symbol. This tells the crafter that instead of inserting the hook into the top loops, they must work around the post of the stitch from the previous row, creating the beautiful 3D textures often seen in cables and ribbing.
Finally, legends and keys are your best friends when using a CROCHET SYMBOL CHARTS – Pattern. Every professional designer will provide a symbol key that defines exactly what each icon means within that specific context. Always check the key before starting, as some regional variations may exist, though most modern patterns adhere to the Craft Yarn Council’s standardized set of symbols for consistency across the industry.
2. The Practical Advantages of Visual Mapping in Crochet
One of the biggest benefits of using a CROCHET SYMBOL CHARTS – Pattern is the ability to spot mistakes before they happen. In a written pattern, it is easy to misread a “3” for a “5” or skip a line of text entirely. With a chart, if a row looks lopsided or the symmetry is broken on paper, you immediately know that your physical work should follow that same logic. It acts as a constant blueprint for your project.
For visual learners, a CROCHET SYMBOL CHARTS – Pattern reduces the cognitive load of following instructions. Instead of constantly looking back at a page of text and losing your place, you can simply glance at the diagram to see where your hook needs to go next. Many crafters find that they can memorize a pattern much faster when they can see the “shape” of the repeat rather than a string of abbreviations.
Counting stitches becomes significantly easier with a CROCHET SYMBOL CHARTS – Pattern. You can physically count the symbols on the chart for a specific section and then verify that count on your fabric. This is especially helpful for lace patterns where “chain-3 spaces” and “double crochet clusters” alternate frequently. The chart shows you exactly which space or stitch each new element should be anchored into.
International patterns become accessible when you understand the CROCHET SYMBOL CHARTS – Pattern system. Many incredible designs from Japan, Russia, and Brazil are published only with charts and limited local text. Because the symbols are standardized, a crafter in the United States can easily complete a complex Japanese lace shawl without knowing a single word of the original language, simply by following the visual flow.
Charts also help in understanding the “logic” of increases and decreases in a CROCHET SYMBOL CHARTS – Pattern. For instance, when making a circular hat, the chart will show exactly how the increases are stacked or staggered to create a perfect circle versus a hexagon. This deepens your understanding of crochet architecture, eventually giving you the confidence to modify patterns or even design your own from scratch.
Lastly, a CROCHET SYMBOL CHARTS – Pattern is much more compact than written instructions. A complex motif that might take three pages to describe in words can often fit into a single, well-organized diagram on one page. This makes it much easier to print out or view on a tablet while you work, keeping your crafting space organized and free of bulky binders or multiple printed sheets.
3. How to Combine Charts and Written Text for Success
While some people prefer one or the other, the most successful crafters often use the CROCHET SYMBOL CHARTS – Pattern and written text together as a hybrid system. Use the written instructions for the “setup” rows, which can sometimes be confusing in a diagram, and then switch to the chart for the main body of the work. This dual-verification method ensures that your foundations are solid and your repeats are accurate.
When you encounter a particularly difficult section in a CROCHER SYMBOL CHARTS – Pattern, the written text can provide the “how-to” for specialized techniques. For example, a chart might show a complex cluster stitch, but the written text will explain exactly where to hold your loops or how to pull through the final stitch. The chart tells you “what” to do, while the text explains the “how” in greater detail.
Marking up your CROCHET SYMBOL CHARTS – Pattern is a great way to stay organized. Many crafters use a highlighter to mark off each row or round as it is completed. Since the chart is a 1:1 representation of the fabric, highlighting as you go provides a satisfying sense of progress and prevents you from repeating the same row twice—a common mistake in repetitive lace or blanket patterns.
If you are working from a digital version of a CROCHET SYMBOL CHARTS – Pattern, you can use PDF annotation apps to zoom in on specific sections. This is a game-changer for high-detail work like micro-crochet or intricate thread doilies. Being able to enlarge a specific cluster of symbols allows you to see exactly where the hook enters the stitch, which can be difficult to see on a small, printed page.
For garments, a CROCHET SYMBOL CHARTS – Pattern often includes “schematics” alongside the stitch diagrams. These are simple line drawings showing the dimensions of the finished pieces (sleeves, back, front). By comparing the stitch chart to the schematic, you can better understand how the decorative pattern will drape and fit once the pieces are seamed together, which is vital for professional-looking results.
Don’t be afraid to add your own notes to a CROCHET SYMBOL CHARTS – Pattern. If you find a particular transition tricky, draw a small arrow or write a note next to the symbol. Treating the chart as a working document rather than a static image will help you engage more deeply with the design process and make the project feel more intuitive as you progress through the rows.
4. Troubleshooting and Advanced Chart Reading Tips
If your work doesn’t look like the CROCHET SYMBOL CHARTS – Pattern, the first thing to check is your “turning chain.” Many charts show the turning chain as a series of small ovals at the edge of the row. If the chart shows three chains and you only did two, your edges will be too tight, causing the fabric to curl. The chart is a precise map, so every small oval matters for the final shape.
“Reading your stitches” is a skill that goes hand-in-hand with a CROCHET SYMBOL CHARTS – Pattern. This means looking at your physical crochet work and identifying the “v” at the top and the “post” below. Once you can recognize a double crochet on your hook, you can look at the chart and see the matching symbol. If they don’t look like siblings, you know it’s time to frog back and correct the error.
Watch out for “asymmetric” symbols in a CROCHET SYMBOL CHARTS – Pattern. Sometimes, a symbol might be tilted to indicate a “crossed stitch” or a “cable.” If the vertical bar of a double crochet symbol is leaning to the left or right, it’s a visual cue to skip a stitch and then work back into the skipped space. These subtle shifts in the symbol’s angle carry a lot of information about the final texture.
Gauge is just as important for a CROCHET SYMBOL CHARTS – Pattern as it is for written instructions. Even if you follow the symbols perfectly, using the wrong yarn weight or hook size will result in a project that is the wrong size. Always check if the chart includes a “repeat size” (usually indicated by brackets or a red line). Measure this section on your finished swatch to ensure your tension matches the designer’s intent.
For multi-color designs, a CROCHET SYMBOL CHARTS – Pattern may use colored icons or different shading to represent color changes. This is much clearer than a written pattern saying “change to Color B,” because the chart shows you exactly which stitch the transition should occur on. It allows for more complex, “painterly” crochet designs where colors are woven in and out to create intricate motifs.
Finally, remember that practice makes perfect with any CROCHET SYMBOL CHARTS – Pattern. Start with a small, simple motif like a flower or a basic square. As you get comfortable matching the physical actions of your hands to the visual icons on the paper, move on to larger lace projects. Before long, you’ll find that you prefer the clarity and speed of a chart over the dense paragraphs of traditional written patterns.
FAQ – Frequently Asked Questions
What is the most common symbol in a Crochet Symbol Chart?
The most common symbols are the small oval for a chain stitch, the “x” or “+” for a single crochet, and the “T” with a slash for a double crochet. These form the foundation of almost every design you will encounter in a typical diagram.
Why are some symbols in a chart red or a different color?
In a CROCHET SYMBOL CHARTS – Pattern, colored symbols usually indicate a “pattern repeat.” This helps the crafter see which section of the diagram needs to be repeated across the row or around the circle to reach the desired width or size.
Do I read crochet charts from left to right or right to left?
For flat rows, you typically read the first row from right to left, the second from left to right, and so on. This mimics the actual movement of your hook. For rounds, you almost always read from the center outward in a counter-clockwise direction.
What should I do if my chart doesn’t have a key?
If a CROCHET SYMBOL CHARTS – Pattern lacks a key, you can usually rely on standard industry symbols. However, it is best to look for a similar pattern online to compare icons, or contact the designer to ensure you are interpreting the stitches correctly.
Can I use a chart for Tunisian crochet?
Yes! Tunisian crochet also has its own set of CROCHET SYMBOL CHARTS – Pattern icons. They look slightly different because they account for the “forward pass” and the “return pass,” but the visual logic remains the same as standard crochet.
Are crochet symbols the same in every country?
Mostly, yes. While written terms vary greatly (like the difference between UK and US terms), the CROCHET SYMBOL CHARTS – Pattern icons are largely standardized globally, which is why they are so popular for international designers and publishers.
Conclusion
Mastering the CROCHET SYMBOL CHARTS – Pattern is like gaining a superpower in the world of fiber arts. We have explored how to decode individual icons, the immense benefits of visual mapping, and how to effectively combine charts with written text for a flawless finish. By learning to read these diagrams, you remove the language barriers and “text fatigue” that often come with complex projects.
The visual nature of these charts helps you understand the DNA of your fabric, making you a more confident and skilled crafter. From the tiny chain stitch to the complex relief cables, every symbol is a stepping stone toward a beautiful, handmade masterpiece.