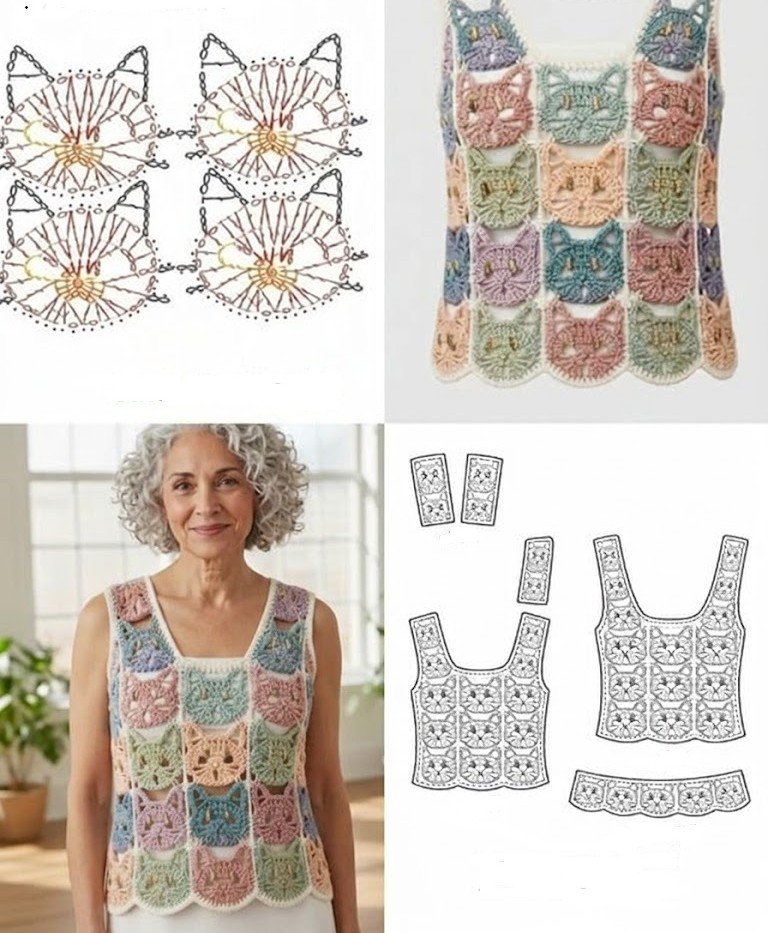
Crochet Top with Kitten – Pattern is one of the most charming and personalized projects you can undertake as a maker, blending the classic art of needlework with a whimsical, feline-inspired aesthetic. This specific Crochet Top with Kitten – Pattern is designed to be both stylish and comfortable, offering a unique way to express your personality through your wardrobe while honing your skills in colorwork and shaping. Whether you are creating this for a summer festival or a cozy layered look, the versatility of a Crochet Top with Kitten – Pattern makes it a standout addition to any handmade collection.
The beauty of a Crochet Top with Kitten – Pattern lies in its ability to be customized to fit any body type or style preference, ranging from cropped fits to longer, flowy silhouettes. When you follow a Crochet Top with Kitten – Pattern, you aren’t just making a piece of clothing; you are crafting a conversation starter that showcases intricate handcrafted details and a love for animals. This guide will walk you through the essential steps, from selecting the right breathable yarn to mastering the tapestry crochet technique required to bring that adorable kitten motif to life.
Starting a Crochet Top with Kitten – Pattern might seem daunting for beginners, but by breaking down the process into manageable sections, anyone can achieve a professional result. It is vital to pay attention to your gauge swatch and the specific stitch counts mentioned in the Crochet Top with Kitten – Pattern to ensure the kitten graphic remains centered and undistorted. In the following sections, we will dive deep into the materials, the technical execution of the kitten design, the assembly of the garment, and the final touches that make your Crochet Top with Kitten – Pattern truly shine.
1. Choosing the Right Materials for Your Crochet Top with Kitten – Pattern
The success of your Crochet Top with Kitten – Pattern starts with selecting a high-quality cotton blend yarn, which provides the necessary stitch definition for the kitten’s face. Using a mercerized cotton is highly recommended because it has a slight sheen and resists pilling, ensuring your kitten motif looks crisp and clear for years.
The weight of the yarn is equally important when following a Crochet Top with Kitten – Pattern, as a DK weight or Sport weight yarn allows for a delicate drape without being too heavy. Choosing the right crochet hook size, typically between 3.5mm and 4.5mm, will help you maintain a tight enough tension so that the kitten graphic doesn’t have large gaps.
Color selection is where your Crochet Top with Kitten – Pattern really comes to life, requiring a high-contrast palette to make the kitten stand out against the background. We suggest using a neutral base color like cream or soft grey, while the kitten can be worked in black, ginger, or calico colors using intarsia crochet methods.
Don’t forget the essential notions like stitch markers, a yarn needle, and sharp scissors, which are crucial for the assembly phase of your Crochet Top with Kitten – Pattern. Stitch markers are particularly helpful for marking the beginning of the kitten chart so you don’t lose your place during complex rows.
The Crochet Top with Kitten – Pattern also requires a good understanding of yarn tension, as consistent pulling ensures the fabric remains even throughout the front and back panels. If your tension is too loose, the kitten might look elongated; if it’s too tight, the top may lack the necessary stretch for a comfortable fit.
Lastly, consider the environmental impact by choosing organic cotton or recycled fibers for your Crochet Top with Kitten – Pattern, making your project eco-friendly. High-quality materials not only make the crocheting process more enjoyable but also ensure that your finished garment feels soft against the skin and holds its shape after washing.
2. Mastering the Kitten Graphic and Tapestry Crochet Techniques
To create the focal point of the Crochet Top with Kitten – Pattern, you will need to learn the basics of tapestry crochet, a technique where you carry multiple colors at once. This method allows you to switch colors mid-row, creating the detailed image of the kitten without having to cut and tie the yarn constantly.
In a Crochet Top with Kitten – Pattern, the kitten design is usually represented by a pixel grid chart, where each square corresponds to a single crochet or half-double crochet stitch. It is essential to read the chart from right to left on right-side rows and left to right on wrong-side rows to maintain the symmetry of the kitten.
When working on the Crochet Top with Kitten – Pattern, the “float” or the yarn being carried should be kept hidden inside the stitches to create a neat, reversible fabric. This colorwork technique is what gives the kitten its defined ears, whiskers, and paws, making the design look like it was woven into the fabric itself.
Another important tip for the Crochet Top with Kitten – Pattern is to always complete the final pull-through of the previous stitch with the new color you are about to use. This seamless color transition ensures that the edges of your kitten graphic are sharp and professional, avoiding any “bleeding” of colors across the design.
While working on the kitten section of the Crochet Top with Kitten – Pattern, take frequent breaks to check your work against the chart to catch any mistakes early. One missed stitch in the colorwork section can shift the entire kitten’s face, so counting your stitches is the secret to a perfect feline silhouette.
For those who want extra detail in their Crochet Top with Kitten – Pattern, you can use embroidery techniques like the duplicate stitch to add small features like eyes or a pink nose later. This adds a 3D effect to the kitten, making your handmade top even more unique and visually appealing to anyone who sees it.
3. Constructing the Front and Back Panels for a Perfect Fit
The structure of the Crochet Top with Kitten – Pattern usually consists of two main rectangular or slightly shaped panels that are joined at the sides and shoulders. The front panel will contain the kitten design, while the back panel is typically worked in a solid color stitch to balance the overall look of the garment.
It is vital to incorporate shaping techniques such as decreases for the armholes and necklines within the Crochet Top with Kitten – Pattern to ensure it sits well on the body. A ribbed hemline using front post and back post double crochet stitches can add a professional finish and provide a bit of “snugness” at the waist.
When following the Crochet Top with Kitten – Pattern, ensure that your front and back panels are the exact same width and length before you begin the joining process. Blocking your finished panels—wetting them and pinning them to shape—is a non-negotiable step for a professional crochet finish, as it relaxes the fibers and evens out the stitches.
Joining the pieces of your Crochet Top with Kitten – Pattern can be done using a slip stitch join or the invisible mattress stitch, depending on your preference for seam visibility. The mattress stitch is often preferred for garments as it creates a flat, sturdy seam that doesn’t add bulk to the sides of your top.
Pay close attention to the shoulder straps in the Crochet Top with Kitten – Pattern, as they need to be strong enough to support the weight of the cotton fabric. You can choose to make wide, comfortable straps or thin “spaghetti” straps depending on the summer fashion trend you want to follow.
The Crochet Top with Kitten – Pattern can also be adapted into a halter neck or a full-length tee by simply adjusting the number of initial chain stitches and rows. This flexibility is why the Crochet Top with Kitten – Pattern is a favorite among DIY fashion enthusiasts who love to experiment with different lengths and styles.
4. Final Touches and Caring for Your Handcrafted Crochet Top
Once the main body of your Crochet Top with Kitten – Pattern is assembled, it’s time to add the finishing touches that elevate the piece from “homemade” to “handmade boutique.” Adding a scalloped border or a simple single crochet edging around the neckline and armholes will give the garment a clean, polished appearance.
Weaving in the ends is a tedious but necessary part of finishing the Crochet Top with Kitten – Pattern, especially after all the color changes in the kitten motif. Use a sharp tapestry needle to weave the tails securely into the back of the stitches, ensuring they won’t pop out after the first few wears or washes.
To ensure the longevity of your Crochet Top with Kitten – Pattern, it is best to hand wash the garment in cool water with a mild detergent designed for delicate fibers. Avoid wringing the top; instead, roll it in a towel to remove excess moisture and lay it flat to dry to prevent the crochet stitches from stretching.
Proper storage is also key for maintaining the shape of your Crochet Top with Kitten – Pattern; always fold it neatly rather than hanging it on a hanger. Hanging a crocheted garment can cause the weight of the yarn to pull the stitches downward over time, resulting in a distorted fit that loses its original charm.
If you find that the kitten’s face in your Crochet Top with Kitten – Pattern looks a bit flat after washing, a light steaming can help “plump” the stitches back up. Just be careful not to touch the iron directly to the yarn, as high heat can melt synthetic fibers or flatten the natural texture of the cotton.
The final result of your hard work on the Crochet Top with Kitten – Pattern is a one-of-a-kind wearable piece of art that reflects your skill and creativity. Sharing your progress on social media using hashtags like #CrochetKittenTop or #ModernCrochet is a great way to connect with the community and inspire others to start their own journey.
FAQ – Frequently Asked Questions
1. Is this Crochet Top with Kitten – Pattern suitable for absolute beginners?
While a total beginner might find the colorwork challenging, the Crochet Top with Kitten – Pattern is perfect for an “advanced beginner.” If you know basic stitches like the single and double crochet, you can learn the tapestry technique as you go. We recommend practicing the kitten chart on a small swatch first.
2. What type of yarn is best for a summer Crochet Top with Kitten – Pattern?
For a summer-friendly version of the Crochet Top with Kitten – Pattern, always opt for 100% cotton or a bamboo blend. These fibers are breathable and wick moisture away from the skin, making them much more comfortable than acrylic in hot weather.
3. How do I adjust the size of the Crochet Top with Kitten – Pattern?
To adjust the size, you can change your hook size or add/subtract an even number of stitches to the side panels of the Crochet Top with Kitten – Pattern. However, make sure the kitten graphic remains centered by adding the same number of stitches to both the left and right sides of the chart.
4. Can I use a different animal instead of a kitten in this pattern?
Absolutely! Once you understand the grid system used in the Crochet Top with Kitten – Pattern, you can swap the kitten chart for a puppy, a flower, or any other pixel art design. Just ensure the new design fits within the same stitch count as the original kitten.
5. How long does it typically take to complete a Crochet Top with Kitten – Pattern?
An intermediate crocheter can usually finish a Crochet Top with Kitten – Pattern in about 10 to 15 hours. The kitten motif requires the most focus and time, while the back panel and straps usually work up quite quickly.
6. Will the kitten motif disappear if I use variegated yarn?
It is highly recommended to use solid colors for the kitten portion of the Crochet Top with Kitten – Pattern. Variegated yarn can “camouflage” the stitches, making the kitten’s features hard to see. Save the variegated yarn for the back panel or the borders!
Conclusion
In this article, we explored the wonderful world of creating a Crochet Top with Kitten – Pattern, covering everything from the initial material selection to the complex colorwork techniques and final assembly. We learned that using high-quality cotton yarn and mastering tapestry crochet are the keys to a successful project.
By following the structured steps of creating panels, blocking, and finishing with professional borders, you can create a garment that is both durable and stylish. This project is a fantastic way to combine your technical skills with your personal love for animals, resulting in a piece of clothing that is truly unique.