Crochet Turtle Coaster – Pattern is a fun and creative way to add a personal touch to your home decor.
Not only does it serve a practical purpose by protecting your furniture, but it also adds a charming element to your table settings.
Whether you are a seasoned crocheter or just starting, this pattern is easy to follow and allows for creativity in choosing colors.
In this article, we will break down how to make a beautiful crochet turtle coaster, its steps, and provide tips to make the process smoother.
Learning how to crochet a turtle coaster can be a rewarding experience, especially when you see the finished product. The beauty of crochet is in the process, as well as in the result. You’ll be able to showcase your crafting skills while using the coaster for daily purposes. The design is not only cute but also functional and offers a creative twist on a classic item. This project is ideal for all skill levels, and with a little patience, you will master the turtle coaster pattern.
In the following sections, we will guide you through each step of creating the crochet turtle coaster. You will learn everything from choosing the right materials to following the pattern effectively. This tutorial includes all the details you need to get started and ensures that you will end up with a fantastic final product.
1. Materials Needed for the Crochet Turtle Coaster – Pattern
To begin creating your Crochet Turtle Coaster – Pattern, you’ll need to gather a few essential materials. First, choose a yarn that is easy to work with and suitable for coasters. Typically, cotton yarn is a great choice due to its durability and absorbency. You’ll also need a crochet hook, a stitch marker, and some stuffing for the turtle’s body if you prefer a slightly raised effect.
The yarn should be in a variety of colors, depending on how you want your turtle to look. You’ll need green for the turtle’s shell, a contrasting color for the body, and a color for the eyes. The most common hook sizes for this project range from 3.5mm to 4mm, but you can adjust based on the thickness of your yarn. Make sure to select yarn that is suitable for your hook size to ensure a smooth, even texture.
You can also use additional accessories like safety eyes if you want to make the turtle’s face more defined. These are optional but will give the coaster a more lifelike appearance. Lastly, you will need scissors to cut your yarn once you’re finished.
2. Understanding the Crochet Turtle Coaster Pattern
Before jumping into crocheting, it’s important to understand the pattern itself. The Crochet Turtle Coaster – Pattern follows a simple and easy-to-understand set of instructions. Start by creating a magic ring, which is a common technique in crochet. From there, you’ll work in the round, making increasing stitches until you have a flat, circular shape for the turtle’s shell.
As you move forward, the body of the turtle is made separately and attached to the shell. The steps include basic stitches such as single crochet (sc) and slip stitch (sl st). These stitches will be combined to create the distinct turtle shape, including the legs, head, and tail. Be mindful of your stitch counts to keep everything proportional.
Once the turtle’s body and shell are completed, you can sew them together, stuffing the body lightly if you want it to be a bit plumper. The eyes are then added at the front of the turtle’s head for extra character. The beauty of this pattern is its flexibility—you can easily customize the size and colors to suit your personal preferences.
3. Step-by-Step Crochet Turtle Coaster – Pattern Instructions
Now that you have your materials ready and an understanding of the pattern, it’s time to begin crocheting your Crochet Turtle Coaster – Pattern. Start by following these easy-to-follow instructions.
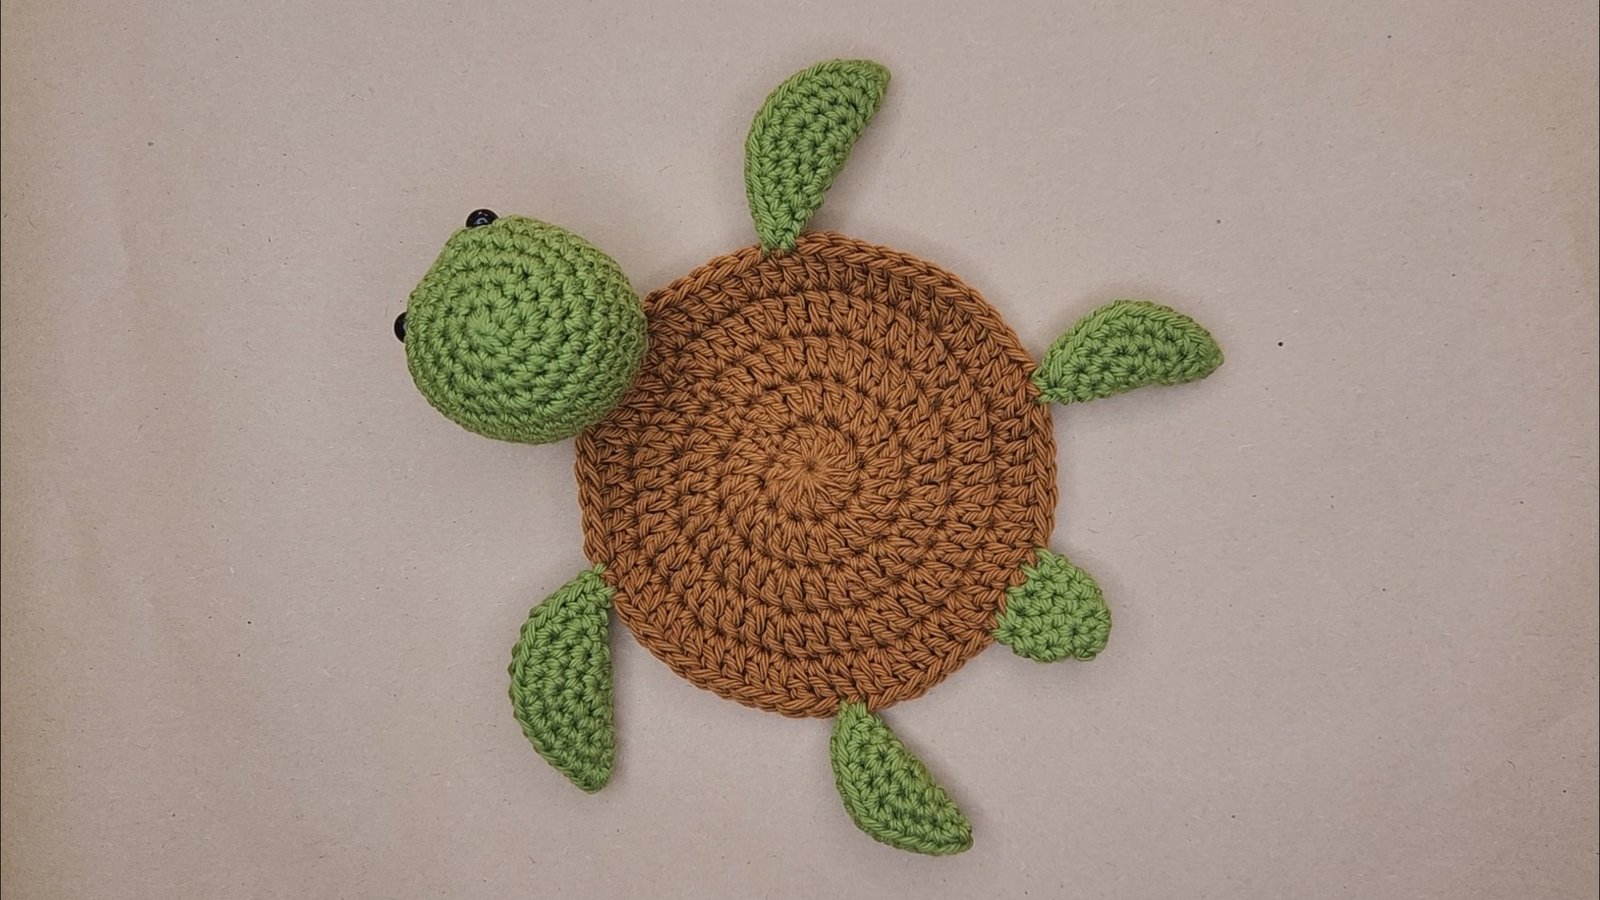
- Make the Turtle’s Shell: Begin with a magic ring and crochet 6 single crochets (sc) into it. Pull the yarn to close the ring. Then, increase each stitch by adding two sc stitches into each previous stitch. Continue working in rounds, increasing gradually until you achieve the desired size for the turtle’s shell.
- Create the Body: Once the shell is complete, you’ll create the turtle’s body. Using the same yarn color, work in a smaller circle. Make a smaller ring, and then add 1 or 2 rows of single crochet to create a solid body that fits neatly underneath the shell.
- Add the Legs, Tail, and Head: The turtle’s legs are made by crocheting four small circles, which are then attached to the body. For the tail, crochet a small triangle or oval shape and sew it to the back of the turtle. The head is created in the same manner but is slightly smaller.
- Stuff the Turtle (Optional): If you want a raised effect, lightly stuff the body with fiberfill before sewing it together. This will give your turtle coaster a 3D effect, making it stand out on your table.
- Sew the Pieces Together: Once all the components are crocheted, stitch the head, legs, and tail to the shell. Be sure to sew tightly to secure the pieces and ensure your coaster holds its shape.
- Add the Eyes: Finally, add eyes to the turtle’s head. You can either use safety eyes for a clean, professional look, or crochet small black circles for a DIY approach. Attach them securely so they don’t come loose with use.
4. Tips for Customizing Your Crochet Turtle Coaster – Pattern
Customization is key to making your Crochet Turtle Coaster – Pattern unique. Here are a few tips for adding your own twist to this project:
- Color Variations: While green is the classic choice for the turtle’s shell, feel free to experiment with different color combinations. You can use earthy tones for a more natural look or go bold with vibrant hues for a fun, playful effect.
- Size Adjustments: If you’d like to make a larger or smaller coaster, simply adjust the number of rounds for the shell and body. Adding or reducing stitches will allow you to modify the coaster to suit your needs.
- Texture Variations: You can change the texture of the coaster by trying out different stitch patterns, such as the half-double crochet or double crochet. This will give your turtle a different appearance and feel.
- Add Fun Details: Incorporate other elements such as flowers, a small scarf, or patterns on the turtle’s shell. These details will make your coaster stand out and add extra charm.
- Use Different Yarn Types: Instead of using traditional cotton yarn, try working with variegated or textured yarn to add depth to your design. The choices are endless, and you can experiment with various effects.
- Personalize with Embroidery: If you enjoy embroidery, try adding extra designs, like little stitches for a smile or additional pattern details, around the turtle’s body or shell.
FAQ: Common Questions About Crochet Turtle Coaster – Pattern
Q: How long does it take to crochet a turtle coaster?
A: The time it takes to crochet a turtle coaster depends on your skill level and the size of the coaster. On average, it may take between 2 to 4 hours to complete one coaster.
Q: Can I make the crochet turtle coaster without a pattern?
A: While you can certainly try to freehand the design, following a pattern will help guide you and ensure that the turtle coaster turns out as expected. If you’re new to crochet, it’s recommended to follow a pattern.
Q: What are the best types of yarn for crochet coasters?
A: Cotton yarn is the best choice for crochet coasters because it’s durable, absorbent, and easy to work with. However, you can also use acrylic yarn if you prefer a softer feel.
Q: Can I wash the crochet turtle coaster?
A: Yes, crochet coasters made from cotton yarn are washable. You can hand wash or machine wash them on a gentle cycle. Be sure to let them air dry to maintain their shape.
Q: Can I make a bigger turtle coaster?
A: Yes! To make a larger coaster, simply increase the number of rounds in the shell and adjust the body accordingly.
Q: How do I keep the coaster flat?
A: To prevent the coaster from curling, ensure you’re working with even tension throughout the project. Blocking your coaster after finishing can also help it stay flat.
Conclusion
In this article, we’ve covered everything you need to know about creating a Crochet Turtle Coaster – Pattern. From gathering materials to step-by-step instructions and tips for customization, this guide has provided a comprehensive look at this fun and functional crochet project. Whether you’re a beginner or an experienced crocheter, this pattern is a great way to add a personalized touch to your home decor.
We hope you enjoyed learning how to make this cute and creative coaster. We’d love to hear your thoughts and suggestions—feel free to leave a comment with your feedback or any additional ideas for this project!