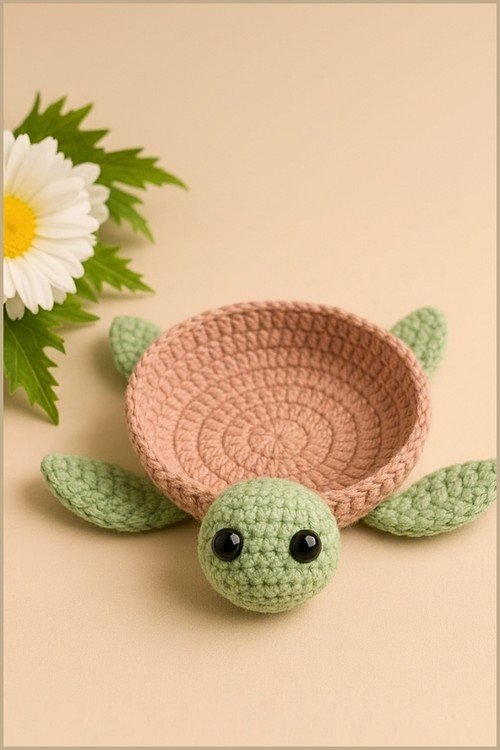
Crochet Turtle Coaster – Pattern is one of the most charming projects you can undertake if you are looking to combine functionality with an adorable aesthetic for your home decor. These little protectors are not just practical for keeping your surfaces safe from moisture and heat; they bring a whimsical, coastal vibe to any coffee table or dining set. Creating a crochet turtle coaster is a fantastic way to practice working in the round while experimenting with different textures to mimic a real turtle shell.
If you are a fan of ocean-themed crafts, this Crochet Turtle Coaster – Pattern will quickly become your favorite “scrap buster” project. Because they require such a small amount of yarn, you can easily dive into your stash and pull out various shades of green, brown, or even variegated blues to make a diverse set of sea creatures. The joy of this specific pattern lies in its versatility, allowing you to customize the size and color to match your personal kitchen style or to create a personalized gift set for a friend.
Working on a Crochet Turtle Coaster – Pattern is also a deeply relaxing experience that helps improve your stitch consistency. As you move through the increases to form the body and the small attachments for the head and flippers, you will see how simple geometric shapes come together to form a recognizable animal. This tutorial is designed to guide you through every loop and pull, ensuring that your finished crochet turtle coaster looks professional, high-quality, and absolutely delightful to use during your morning tea.
1. Materials Needed for the Crochet Turtle Coaster – Pattern
To begin your Crochet Turtle Coaster – Pattern, you will need to gather high-quality cotton yarn. Cotton is the preferred choice for any crochet coaster because it is highly absorbent and heat-resistant, unlike acrylic which can melt or slide. Look for a medium weight (worsted) yarn to ensure your turtle pattern has enough structure to lay flat on the table.
You will also need a crochet hook, typically sized between 3.5mm and 4.5mm depending on your tension. If you want a tighter, sturdier Crochet Turtle Coaster – Pattern, choose a smaller hook than the yarn label recommends. This prevents gaps in the stitches where liquid could seep through to your furniture.
Don’t forget a pair of sharp scissors and a tapestry needle for weaving in your ends. Since a crochet turtle coaster involves changing yarn for the head and limbs, you will have several tails to hide. A clean finish is essential for making your pattern look polished and professional for sale or gifting.
Stitch markers are incredibly helpful when working on the circular shell of the Crochet Turtle Coaster – Pattern. Since you will be working in continuous rounds to avoid a visible seam, marking the first stitch of each row ensures your increases stay symmetrical. This helps maintain the perfect round shape of the turtle’s back.
For the eyes, you can use safety eyes or simply embroider them with a bit of black thread. If you are making these for a household with small children or pets, embroidered eyes are much safer. They add a handmade touch to your Crochet Turtle Coaster – Pattern without being a choking hazard.
Lastly, having a measuring tape nearby is useful to check the diameter of your shell. A standard crochet coaster should be about 4 to 5 inches wide. This size ensures that even large mugs fit comfortably on the back of your finished Crochet Turtle Coaster – Pattern project.
2. Understanding the Shell and Body Construction
The “shell” is the central part of the Crochet Turtle Coaster – Pattern and is usually worked in a flat circle. You start with a magic ring, which allows you to pull the center tight so there is no hole in the middle of your coaster. This is the foundation of a sturdy and effective crochet turtle.
Within the Crochet Turtle Coaster – Pattern, you will use double crochet or half double crochet stitches to create the shell texture. These stitches provide a bit of height and a beautiful “ribbed” look that naturally mimics the segments of a real sea turtle. Consistency in your tension is key here to keep the coaster flat.
To keep the shell from curling like a bowl, the Crochet Turtle Coaster – Pattern relies on a specific sequence of increases. Usually, this means placing two stitches into one stitch from the previous row at regular intervals. Following these mathematical increases ensures your crochet coaster remains a perfect circle.
Some variations of the Crochet Turtle Coaster – Pattern include a “border” row using a crab stitch or a simple slip stitch. This gives the shell a defined edge and adds a bit of extra weight. A defined edge makes the crochet turtle look more realistic and helps it sit flush against the table surface.
Color changes are a great way to make your Crochet Turtle Coaster – Pattern pop. You might use a dark forest green for the main shell and a lighter lime green for the final round. These subtle shifts in tone enhance the SEO-friendly visual appeal of your finished craft and make the crochet pattern stand out.
Once the shell is complete, you will have a solid base for your Crochet Turtle Coaster – Pattern. The body is essentially the canvas upon which you will later attach the extremities. Make sure to fasten off securely, leaving a long tail if you plan to sew the other parts directly onto this crochet base.
3. Crafting the Head and Flippers
The head of the Crochet Turtle Coaster – Pattern is usually a small, stuffed sphere or a flat semi-circle depending on your preference. For a functional coaster, a flatter head is often better so it doesn’t tip over. You will use single crochet stitches to keep the fabric dense and sturdy for this part of the pattern.
Flippers are the most iconic part of the Crochet Turtle Coaster – Pattern. You will typically make four of them—two slightly larger ones for the front and two smaller ones for the back. These are often worked as small tear-drop shapes that are easily sewn onto the underside of the shell.
When following the Crochet Turtle Coaster – Pattern, it is important to space the flippers evenly. If they are placed too close together, your turtle might look lopsided. A good rule of thumb is to use your stitch markers to map out the placement before you pick up your sewing needle.
Sewing the parts together requires a whip stitch or an invisible stitch. In this Crochet Turtle Coaster – Pattern, you want the attachment points to be strong but hidden. Because coasters are handled frequently, a secure join ensures the head won’t wobble or detach after a few uses.
Adding a tiny tail is a subtle detail that completes the Crochet Turtle Coaster – Pattern. A simple chain of three or four stitches, followed by a few slip stitches, creates a perfect little point. It’s these small details that make a crochet project go from basic to extraordinary.
After all pieces are attached, your Crochet Turtle Coaster – Pattern is nearly ready. Take a moment to inspect the symmetry from the top down. If everything looks balanced, you have successfully navigated the most technical part of this handmade crochet tutorial and created a beautiful piece of art.
4. Care Tips and Finishing Touches
To ensure your Crochet Turtle Coaster – Pattern lasts for years, proper care is essential. Since these items will likely encounter coffee or tea spills, they need to be washable. Because we recommended 100% cotton yarn, you can usually hand wash them in cool water with a mild detergent.
After washing your crochet turtle coaster, it is best to reshape and lay flat to dry. Avoid using a dryer, as high heat can cause the cotton fibers to shrink or lose their shape. Blocking your pattern items by pinning them to a foam board while damp can help them maintain their perfect circular shell.
If you find that your Crochet Turtle Coaster – Pattern is a bit too floppy, you can use a light fabric stiffener spray. This is particularly useful if you used a looser stitch or a thinner yarn. A stiffened coaster provides a more stable surface for heavy glasses and preserves the turtle’s shape.
For those looking to sell items made from this Crochet Turtle Coaster – Pattern, consider adding a small cork backing. Gluing a thin layer of cork to the bottom of the shell prevents any moisture from reaching the wood and adds a professional, high-end feel to your crochet work.
You can also experiment with different embellishments on the shell. Using a surface slip stitch to create a “hexagonal” pattern on the back can make the Crochet Turtle Coaster – Pattern look even more realistic. Just ensure any added texture doesn’t make the surface too uneven for a cup.
Finally, enjoy the process of making many! A set of four or six coasters makes a wonderful gift. You can tie them together with a piece of twine or a ribbon, including a small note about the Crochet Turtle Coaster – Pattern you used. It’s a rewarding project that combines creativity with everyday utility.
FAQ – Frequently Asked Questions
What is the best yarn for a Crochet Turtle Coaster – Pattern?
The best choice is definitely mercerized cotton or standard worsted weight cotton. Cotton absorbs the condensation from cold drinks and doesn’t melt under hot mugs, making it the most functional choice for any crochet coaster pattern.
Is this Crochet Turtle Coaster – Pattern beginner-friendly?
Yes! As long as you know the basic stitches like single crochet, double crochet, and how to increase, you can easily complete this project. The most “difficult” part is sewing the small pieces together, but with patience, any beginner can do it.
How long does it take to make one turtle coaster?
For an intermediate crocheter, a single Crochet Turtle Coaster – Pattern takes about 30 to 45 minutes. It is a very fast project, making it ideal for craft fairs or last-minute gifts.
Can I use a different hook size for this pattern?
You can, but keep in mind that a larger hook will result in a larger, looser coaster. For a Crochet Turtle Coaster – Pattern, a smaller hook is usually better to create a dense fabric that protects your furniture effectively.
How do I prevent the coaster from curling up?
Curling usually happens if your tension is too tight or if you missed an increase. Make sure to follow the count in the Crochet Turtle Coaster – Pattern carefully and try to keep your stitches relaxed but consistent.
Can I sell the items I make from this pattern?
Most designers allow you to sell finished products made from their Crochet Turtle Coaster – Pattern, though it is always polite to credit the source of the design. It is a very popular item on platforms like Etsy!
Conclusion
In this article, we explored the wonderful world of the Crochet Turtle Coaster – Pattern, covering everything from the essential cotton materials to the detailed construction of the shell, head, and flippers.
We learned that using the right SEO-optimized techniques in your crafting, such as choosing durable yarn and mastering the magic ring, results in a professional-grade home accessory. This project is a perfect blend of artistic expression and practical use, offering a fun way to brighten up your living space or give a thoughtful, handmade gift.