Finding a high-quality Crochet wall Organizer – Pattern is the first step toward transforming a cluttered room into a beautifully curated space that reflects your personal style. In today’s fast-paced world, finding functional yet aesthetic storage solutions can be a challenge, but handmade fiber arts offer a unique way to combine utility with home decor. This article is designed to guide you through the process of selecting, creating, and perfecting a piece that will help you manage your everyday essentials while adding a touch of cozy texture to your walls.
The beauty of a Crochet wall Organizer – Pattern lies in its incredible versatility, allowing you to customize the size, color, and number of pockets to fit your specific needs. Whether you are looking to store remote controls in the living room, mail in the entryway, or art supplies in a studio, the structural integrity of your stitches will ensure that your organizer remains durable for years to come. In this comprehensive tutorial, we will dive deep into the technical aspects of construction, ensuring that even those new to the craft can achieve a professional and polished result.
Mastering the Crochet wall Organizer – Pattern requires a balance of creative vision and technical precision, making it an ideal project for those who want to practice structural crochet. Throughout the following sections, we will explore the best materials to use, the most effective stitches for heavy-duty support, and how to optimize your workspace for maximum efficiency. Our goal is to provide you with a detailed roadmap that adheres to the highest standards of quality, helping you create a functional masterpiece while following the best practices for handmade home organization.
1. Selecting the Right Materials for Your Crochet wall Organizer – Pattern
When you begin working on a Crochet wall Organizer – Pattern, the choice of yarn is the most critical decision you will make for the project’s longevity. Unlike a garment that needs to be soft and flowy, a wall organizer requires a stiff, sturdy fiber that won’t stretch excessively under the weight of its contents. Mercerized cotton, tapestry yarn, or even recycled t-shirt yarn are excellent choices because they offer the structural rigidity needed to hold heavy items like scissors or tablets.
The weight of the yarn will directly influence the final dimensions and the “heft” of your Crochet wall Organizer – Pattern. Using a bulky weight yarn or a super bulky yarn can help you finish the project quickly while providing a modern, chunky aesthetic that is very popular in current interior design trends. If you prefer a more delicate or intricate look, you can use worsted weight yarn but consider doubling the strands to ensure the pockets don’t sag over time.
Selecting the appropriate crochet hook size is equally important when following a Crochet wall Organizer – Pattern. To achieve a dense, “fabric-like” consistency, it is often recommended to use a hook that is slightly smaller than what the yarn label suggests. This creates a tight stitch tension that prevents small items from slipping through the gaps in your work, ensuring that your organizer is as functional as it is beautiful.
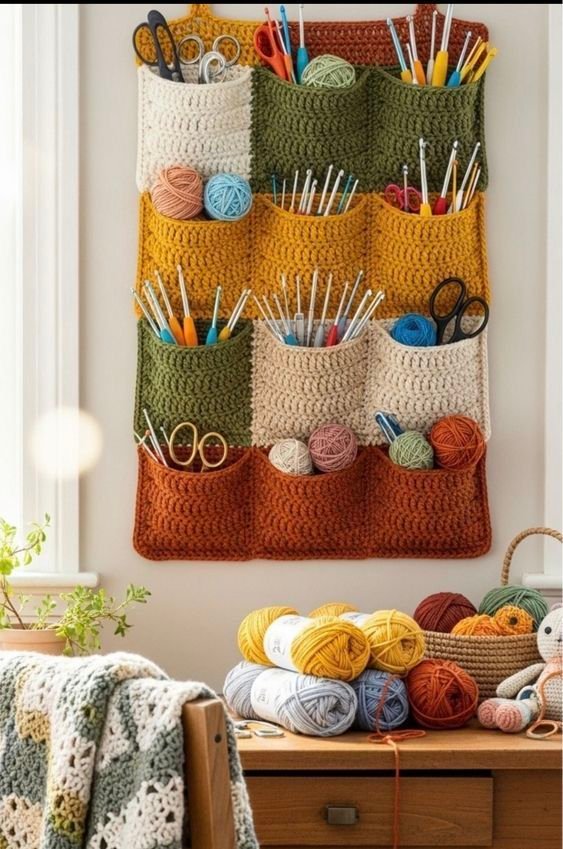
Support structures are a hidden secret to a successful Crochet wall Organizer – Pattern. Many professional makers choose to incorporate a wooden dowel, a bamboo rod, or even a sturdy branch at the top of the piece to provide a solid hanging point. This prevents the top edge of your crochet work from warping or pulling into a triangle shape once you begin filling the pockets with your household belongings.
Color psychology plays a significant role in how your Crochet wall Organizer – Pattern integrates into your home. Neutral tones like beige, cream, or slate grey allow the texture of the stitches to stand out and complement almost any color scheme. However, if you want the organizer to be a focal point, don’t be afraid to use bold, contrasting colors or a gradient effect to make the piece pop against a plain wall.
Finally, consider the environmental impact of your materials when choosing your Crochet wall Organizer – Pattern supplies. Using organic cotton or recycled fibers not only benefits the planet but often provides a unique, rustic texture that adds character to the finished piece. Investing in high-quality materials ensures that your hard work results in a durable heirloom rather than a temporary storage fix.
2. Essential Stitches and Techniques for a Durable Crochet wall Organizer – Pattern
The foundation of any robust Crochet wall Organizer – Pattern is the single crochet stitch (sc). Because this stitch is short and compact, it creates a very stable fabric that resists stretching, which is exactly what you need for a wall-mounted item. By working in the back loops only (blo), you can also create a ribbed effect that adds a modern architectural feel to the main panel of your organizer.
For those looking to add a bit of decorative flair to their Crochet wall Organizer – Pattern, the waistcoat stitch (also known as the center single crochet) is a fantastic option. This stitch looks very similar to a knit stitch and creates an incredibly thick, reinforced fabric. It is particularly useful for the base of the pockets, where the most pressure will be applied by the items you choose to store inside.
The Crochet wall Organizer – Pattern often involves joining different pieces of fabric, so mastering the slip stitch join or the invisible seam is crucial. When attaching pockets to the main back panel, you want a connection that is strong enough to handle weight but neat enough to be nearly invisible. Placing your stitches through both layers of fabric with a consistent tension will ensure the pockets remain securely fastened.
To add visual interest to the edges of your Crochet wall Organizer – Pattern, you might consider a crab stitch border (reverse single crochet). This creates a cord-like, finished edge that prevents the sides of your work from curling. It adds a professional “boutique” look to the organizer and provides extra reinforcement to the perimeter of the piece, helping it maintain its rectangular shape.
If your Crochet wall Organizer – Pattern features larger sections, you can use the moss stitch (a combination of single crochet and chain stitches). This stitch offers a beautiful “woven” appearance while still being relatively dense. It is a great choice for the main body of the organizer if you want a piece that looks sophisticated and high-end without being overly complicated to execute.
Advanced crafters might want to experiment with tapestry crochet within their Crochet wall Organizer – Pattern. This technique allows you to carry multiple colors of yarn and create geometric patterns or even words like “MAIL” or “TOOLS” directly into the fabric. This level of customization makes your organizer a truly bespoke item that serves as both a tool and a piece of custom wall art.
3. Customizing the Layout of Your Crochet wall Organizer – Pattern
One of the greatest advantages of using a Crochet wall Organizer – Pattern is the ability to tailor the layout to your specific needs. Before you start, measure the items you plan to store, such as a specific notebook or a set of crochet hooks. You can then adjust the width and height of each pocket in the pattern to ensure a perfect fit, preventing items from falling out or being too cramped.
Modular design is a popular way to approach a Crochet wall Organizer – Pattern. Instead of making one large piece, you can create several smaller squares or rectangles and join them together like a puzzle. This “mix and match” style allows you to grow your organizer over time as your storage needs change, making it a flexible solution for a growing family or a changing hobby.
Incorporating different pocket depths into your Crochet wall Organizer – Pattern can significantly increase its utility. Deep pockets are perfect for taller items like rulers or knitting needles, while shallow, wide pockets are better suited for keys, lip balm, or small electronics. Planning these variations in the design phase will make the final product much more intuitive to use on a daily basis.
Adding closures to your Crochet wall Organizer – Pattern can provide extra security for valuable items. You can easily integrate crochet buttonholes, wooden toggles, or even magnetic snaps into the pocket flaps. This is especially useful if the organizer is hanging in a high-traffic area where items might accidentally be bumped or shifted.
The hanging mechanism of your Crochet wall Organizer – Pattern is just as important as the pockets themselves. Beyond the standard wooden dowel, you could use crochet loops or metal rings to hang the piece from decorative hooks. Ensuring that these loops are reinforced with extra stitches will prevent them from fraying or breaking under the weight of a fully loaded organizer.
Don’t overlook the potential for multimedia elements in your Crochet wall Organizer – Pattern. Adding a corkboard backing to one section or attaching small metal clips to the bottom edge for hanging keys can turn a simple crochet project into a full-scale command center. Combining yarn with other materials creates a contemporary look that bridges the gap between traditional craft and modern utility.
4. Finishing Touches and Maintenance for Your Crochet wall Organizer – Pattern
Once the main stitching of your Crochet wall Organizer – Pattern is complete, blocking the piece is an essential step that shouldn’t be skipped. Blocking involves pinning the organizer to the correct dimensions and lightly steaming it or misting it with water. This process relaxes the fibers and ensures that all the edges are perfectly straight and the pockets sit flat against the back panel.
For an even more professional finish, consider adding a fabric lining to the pockets of your Crochet wall Organizer – Pattern. A simple cotton lining prevents the crochet stitches from stretching over time and provides an extra layer of protection for delicate items. You can use a contrasting fabric pattern to add a hidden “pop” of color every time you reach into a pocket.
When it comes to SEO optimization for sharing your project online, make sure to use descriptive titles and alt-text for your photos. Phrases like DIY crochet organization or boho wall hanging tutorial will help other enthusiasts find your specific Crochet wall Organizer – Pattern. Sharing your process on social media and using relevant hashtags can also build a community around your creative work.
Proper care is vital to keeping your Crochet wall Organizer – Pattern looking brand new. Since these items are hung on the wall, they can collect dust over time. A light vacuuming with a brush attachment or a gentle spot cleaning with a damp cloth is usually sufficient. Avoid machine washing unless you have used a very durable synthetic yarn that won’t lose its shape in the dryer.
If you are creating the Crochet wall Organizer – Pattern as a gift, consider adding a personalized leather label or a small embroidered monogram. These small details elevate the project and make it feel like a high-end artisanal product. It shows the recipient the care and attention to detail that went into every single stitch of their new organization tool.
Finally, remember that a Crochet wall Organizer – Pattern is a living project. As you use it, you might find you need an extra loop for scissors or a smaller pocket for a pen. The beauty of crochet is that you can always go back and “surface crochet” new features onto the existing piece. This adaptability ensures that your organizer remains a useful part of your home for many years to come.
FAQ – Frequently Asked Questions
What is the best way to hang a Crochet wall Organizer – Pattern so it stays straight?
The most effective method is to use a wooden dowel or a sturdy rod at the top. You can either crochet around the rod as you work the final row or create loops that slide onto the rod. This distributes the weight evenly across the entire width of the piece, preventing it from sagging in the middle.
Can I make a Crochet wall Organizer – Pattern if I only know basic stitches?
Absolutely! This project is actually perfect for beginners because it mostly uses basic geometric shapes like squares and rectangles. If you can make a flat dishcloth, you can make a wall organizer. The challenge lies in the assembly, but with a bit of patience, anyone can master it.
How do I prevent the pockets from sagging when they are full?
To prevent sagging, use a smaller hook to create a tighter fabric and choose a non-stretchy yarn like cotton or hemp. Additionally, you can sew the pockets slightly tighter than the back panel, or add a thin piece of plastic canvas inside the pocket to provide extra internal structure.
How long does it take to complete a standard Crochet wall Organizer – Pattern?
The timeline depends on the size and complexity of your design. A small, three-pocket organizer can often be finished in a weekend, while a large, full-wall command center might take 10 to 15 hours of active crochet time. Using a bulkier yarn will significantly speed up the process.
Is it better to crochet the pockets separately or as part of the main piece?
Most people find it easier to crochet the pockets separately and then sew them onto the back panel. This allows for more flexibility in the layout and makes the individual pieces easier to manage. However, some advanced patterns use a “fold-up” method where the entire piece is worked in one long strip.
What items are too heavy for a Crochet wall Organizer – Pattern?
While a well-made organizer is quite strong, very heavy items like large glass jars or heavy metal tools might cause the yarn to stretch over time. It is best suited for medium-weight items like electronics, stationery, yarn supplies, and lightweight household accessories.
Conclusion
Creating a Crochet wall Organizer – Pattern is a fantastic way to merge your love for crafting with a practical need for home organization. Throughout this article, we have explored the importance of choosing high-quality, durable fibers, mastering dense stitch patterns, and customizing your layout to fit your unique lifestyle.
We also discussed the essential finishing steps like blocking and lining that separate an amateur project from a professional-grade home accessory. By following these steps, you now have the knowledge to build a beautiful, functional piece of wall art that will keep your space tidy and your essentials within reach.