If you’re searching for a fun and colorful crochet project that screams summer vibes, look no further than this Crochet watermelon bag – pattern. Whether you’re heading to a picnic, beach day, or just want to brighten up your everyday look, this adorable accessory is both functional and eye-catching. The bold red, green, and black seed accents instantly add a pop of personality to any outfit.
The Crochet watermelon bag – pattern is beginner-friendly and perfect for those who enjoy making practical pieces with a playful twist. You can crochet one in a weekend and customize the size, strap, or color style to make it your own. Plus, it’s a great way to use up yarn scraps or try out new color combinations without committing to a large project.
In this article, you’ll find a complete guide to making your own Crochet watermelon bag – pattern, from choosing yarn and tools to shaping the bag and adding decorative touches. You’ll also discover creative tips for customizing your bag, ways to use or gift it, and answers to common questions about this pattern. Let’s get started on this juicy and creative journey!
1. Materials and Supplies for Your Watermelon Bag
The success of your Crochet watermelon bag – pattern starts with choosing the right materials. Since this bag relies heavily on color and structure, your yarn and hook selection will play a key role in the final result.
For the best texture and durability, go with worsted-weight cotton yarn. Cotton holds shape well, is breathable, and gives a nice firm structure to the bag. You’ll need red for the flesh of the watermelon, green for the rind, white for the separating stripe, and black for the seeds.
A 4.0 mm or 4.5 mm crochet hook is ideal for this yarn weight. Using a smaller hook will give you tighter stitches, which are important for a bag that carries items without sagging or stretching out over time.
You’ll also need scissors, a yarn needle for weaving in ends, and optionally, stitch markers if you’re working in the round. If you want your bag to close at the top, a magnetic snap or zipper can be added for extra security.
Some crafters also prefer to line their bags. A simple cotton fabric lining can make your Crochet watermelon bag – pattern even more professional and prevent small items from poking through the stitches.
If you’re adding a strap, you can crochet one or use a pre-made leather or canvas strap. A detachable strap is also a great option if you want to switch styles or turn your watermelon into a clutch.
With these basic supplies, you’re ready to bring your watermelon bag to life, stitch by juicy stitch.
2. Step-by-Step Construction of the Watermelon Bag
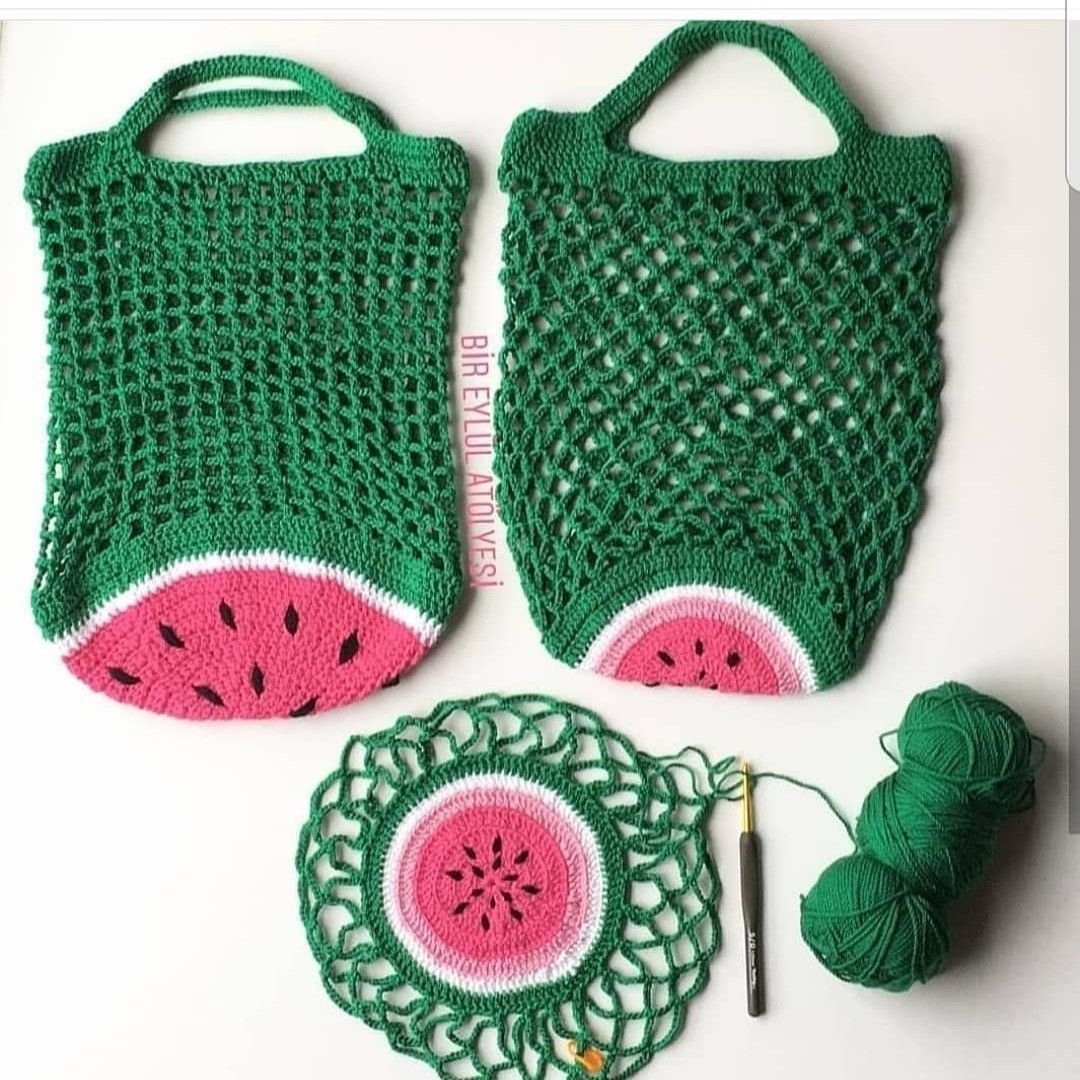
Now that your materials are ready, it’s time to crochet your Crochet watermelon bag – pattern. The classic watermelon shape is typically a half-circle, mimicking a sliced watermelon, but you can also go with a full circle or rectangular bag with watermelon colors.
Start by making a magic ring and working double crochet stitches in the round using red yarn. Continue increasing evenly to form a half-circle or full circle, depending on the shape you’ve chosen for your bag. This will be the main body of the bag—the red watermelon flesh.
Once the red portion is large enough, switch to white yarn for one or two rows to represent the watermelon’s inner rind. This clean stripe gives the bag a realistic and cute contrast.
Next, use green yarn to crochet the final rows of the body. For extra detail, you can add a textured stitch like the front post double crochet (FPDC) to give the rind a ribbed, realistic look. This adds depth and structure to the bottom edge.
To add black seeds, embroider them with a yarn needle or surface crochet technique. You can place the seeds randomly or evenly for a neater appearance. Make sure they’re secure so they don’t snag or come loose over time.
Once both sides are complete, sew or crochet them together along the edges, leaving the top open. If you’re adding a zipper or snap, now is the time to install it. Don’t forget to attach your strap or handles based on your desired bag style.
With your bag shape done and all the finishing touches added, your Crochet watermelon bag – pattern is now complete and ready to carry or gift.
3. Customization and Styling Ideas
One of the best parts of working with the Crochet watermelon bag – pattern is how creative you can get with customization. From colors to sizes to embellishments, the options are endless for making this design your own.
You can go bold with traditional red, white, and green, or mix it up with pink watermelon flesh for a softer, more whimsical look. Some crocheters even try yellow or orange tones to mimic different melon varieties.
Try making a mini version of the bag as a coin purse or small clutch. It’s great for carrying just your essentials and works perfectly as a party accessory or a kid’s bag.
Another creative idea is to add a pocket on the back or inside the bag for keys or cards. This adds extra functionality to your Crochet watermelon bag – pattern without complicating the design.
Consider making matching accessories like a watermelon keychain, scrunchie, or small wallet. A full watermelon-themed set makes a thoughtful handmade gift or product bundle if you’re selling your creations.
Add tassels, pom-poms, or a little charm to the zipper or strap to give your bag extra flair. These tiny details can transform your design from cute to unforgettable.
If you’re lining your bag, choose a fabric that complements the colors or adds a playful surprise inside. Polka dots, tropical prints, or watermelon-patterned fabric are all great options.
4. Practical Uses and Gifting Ideas
The Crochet watermelon bag – pattern is not only fun to make—it’s also incredibly useful in real life. Whether you’re making one for yourself or someone else, it’s a functional item that can brighten up any day.
Use your bag as a summer accessory for the beach, pool, or farmer’s market. Its lightweight design makes it perfect for carrying your phone, wallet, sunscreen, or small snacks.
This bag also makes a fantastic gift. Handmade items show care and creativity, and a watermelon-themed piece is especially great for birthdays, baby showers, or end-of-year teacher gifts.
Kids love this design too! Make a smaller version for a child to carry their toys, snacks, or crayons. Adjust the strap length to make it comfortable for little shoulders.
Selling your handmade items? The Crochet watermelon bag – pattern is eye-catching and seasonal, making it ideal for summer craft fairs, Etsy listings, or pop-up shops.
Offer customization options like initials, different fruit styles (such as lemon or kiwi), or varied shapes. This can make your product line more versatile and help it stand out in a competitive handmade market.
Whether for fashion, fun, or gifting, this bag is a statement piece that combines whimsy with function—and it’s sure to draw compliments wherever it goes.
FAQ – Frequently Asked Questions
Q1: Is the Crochet watermelon bag – pattern beginner-friendly?
A: Yes! The pattern uses basic stitches like double crochet and single crochet. Even beginners can complete it with a bit of patience and creativity.
Q2: What type of yarn is best for this project?
A: Worsted-weight cotton yarn is ideal because it’s sturdy, washable, and holds its shape well—especially important for bags.
Q3: Can I wash the finished watermelon bag?
A: Yes, hand washing is recommended. If lined, be sure your lining material is also washable. Lay flat to dry to keep its shape.
Q4: How long does it take to make this bag?
A: On average, 4–6 hours depending on your speed and skill level. It’s a quick project that can be done over a weekend.
Q5: Can I change the size of the bag?
A: Absolutely. Just continue increasing for a larger size or stop early for a smaller one. Adjust the strap length to match.
Q6: Is it okay to sell bags made from this pattern?
A: Yes, as long as the pattern is your own or you have permission from the designer if using someone else’s. Handmade versions are very popular at markets and online.
Conclusion
The Crochet watermelon bag – pattern is a joyful, functional, and rewarding project that’s sure to become one of your go-to summer makes. It’s fun to crochet, easy to customize, and perfect for personal use, gifting, or selling.
In this article, we walked through choosing your materials, crafting the bag from start to finish, customizing it to suit your style, and exploring creative ways to use or share your finished piece. Whether you’re new to crochet or a seasoned crafter, this pattern offers a satisfying way to express your creativity.
We’d love to hear your thoughts! If you’ve made your own Crochet watermelon bag, please leave a sincere opinion or suggestion in the comments. Share your color choices, any tips you discovered, or how you used your bag. Your feedback helps grow and inspire the crochet community.