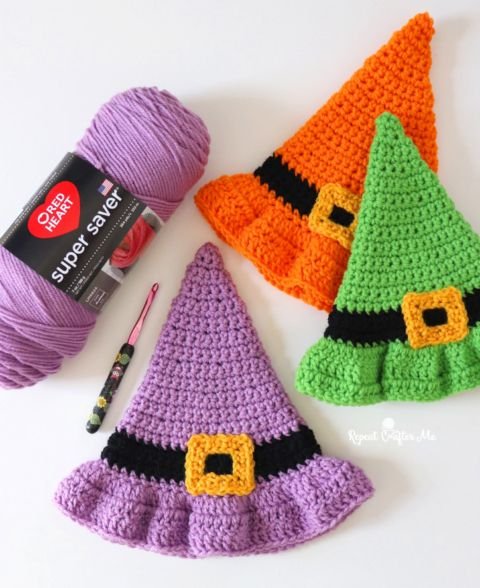
Crafting a crochet witch hat- pattern is a magical way to bring creativity and fun into your crochet projects. Whether you’re making it for Halloween, a themed costume party, or simply as a whimsical accessory, this pattern offers endless possibilities. The crochet witch hat- pattern is versatile, stylish, and can be customized to suit both children and adults, allowing you to play with colors, textures, and embellishments. Creating something by hand adds that special touch that store-bought accessories just can’t match.
The beauty of the crochet witch hat- pattern lies in its simplicity and adaptability. It’s an ideal project for beginners who want to practice working in the round and shaping, yet it can be elevated with intricate stitches or details for advanced crocheters. You can craft a classic black witch hat for a traditional look or experiment with vibrant hues, sparkly yarns, or multicolored stripes for a more modern, playful twist. The possibilities are only limited by your imagination.
In this guide, you’ll learn everything about the crochet witch hat- pattern—from understanding the structure and materials to personalizing your hat with flair. Each section is optimized for SEO and written in a clear, friendly tone to provide valuable and unique content. By the end, you’ll have all the knowledge you need to create your own enchanting crochet witch hat that’s perfect for any occasion.
1. Understanding the Crochet Witch Hat- Pattern
The first step to mastering the crochet witch hat- pattern is understanding its structure and purpose. Traditionally, a witch hat features a tall, conical crown and a wide, circular brim. The shape is iconic, making it instantly recognizable and fun to create. The crochet witch hat- pattern follows this same principle, but it allows for flexibility in design depending on the desired size and style.
A standard crochet witch hat- pattern starts from the tip of the cone and gradually increases in stitch count to form the main body. Once the desired height is reached, the pattern transitions into the brim, where you’ll increase further to create a flared edge. This shape works beautifully with different yarn weights, though thicker yarns will make the hat sturdier and more structured.
The best part about this pattern is how customizable it is. You can adjust the height of the cone for a dramatic or subtle look, vary the brim width for a cute or mysterious appearance, and even add accessories like ribbons, appliqués, or small crochet stars to make your hat stand out. Understanding the crochet witch hat- pattern helps you visualize the process and adapt it to your skill level and preferences.
Beginners will find the crochet witch hat- pattern an excellent opportunity to practice increases, shaping, and maintaining consistent tension. Meanwhile, experienced crocheters can use textured stitches, color changes, or even experiment with wire reinforcement to make the brim stiff and hold its shape perfectly.
The pattern’s adaptability also means it’s suitable for various uses. Beyond Halloween costumes, a crochet witch hat- pattern can be modified into everyday accessories, small decorative pieces, or even tiny hats for dolls and pets. Its simplicity and charm make it one of the most popular crochet designs in the seasonal craft world.
Finally, before you start, it’s helpful to read the full pattern and understand each section’s role in creating the final piece. This preparation ensures a smoother workflow and reduces the chance of mistakes. The more you familiarize yourself with the structure, the easier it becomes to bring your witch hat vision to life.
2. Materials, Tools, and Preparation for the Crochet Witch Hat- Pattern
Before diving into your crochet witch hat- pattern, gathering the right materials and tools is crucial. The yarn you choose will determine the hat’s overall look and structure. For a classic witch hat, black worsted-weight yarn is the go-to option. Acrylic yarn is a popular choice because it’s affordable, easy to work with, and holds its shape well. If you want a softer finish, cotton or wool blends also work beautifully.
The recommended hook size for most crochet witch hat- patterns is between 4mm and 5mm, depending on your yarn’s thickness. A smaller hook creates a tighter fabric, making the hat stiffer, while a larger hook results in a looser, drapier effect. If you prefer your hat to stand upright, consider using a smaller hook or incorporating wire around the brim for added support.
In addition to yarn and a crochet hook, you’ll need a few accessories: a yarn needle for weaving in ends, stitch markers to keep track of increases, scissors, and optionally, thin floral wire or interfacing to reinforce the brim. Some crafters even line the inside with felt or stiff fabric for added durability. Preparation is key—having all your tools at hand will make the process much smoother.
It’s also important to measure the intended wearer’s head circumference before starting your crochet witch hat- pattern. This ensures that the hat fits comfortably without slipping off or feeling too tight. Most patterns include measurements for children, teens, and adults, but you can easily adjust your stitch count to make a perfect fit.
Color is another exciting part of preparation. While black is traditional, don’t hesitate to experiment with other shades. Deep purples, midnight blues, emerald greens, or even glittery yarns can give your crochet witch hat- pattern a unique and enchanting touch. Pairing contrasting colors for the brim and band creates a striking effect that’s visually appealing and festive.
Lastly, take the time to read through your pattern before beginning. Familiarizing yourself with the stitch abbreviations, increase sequences, and construction steps will save time and frustration later. Organize your yarns, test your hook size with a quick swatch, and you’re ready to begin your magical crochet adventure.
3. Step-by-Step Creation of the Crochet Witch Hat- Pattern
Now it’s time to start creating your crochet witch hat- pattern. Begin at the top of the cone with a small magic ring or chain loop. Work a few single or half-double crochet stitches into the ring, then gradually increase the stitch count each round to form the conical shape. Use stitch markers to mark the start of each round so you can keep track easily.
As you work downward, the cone will grow taller, forming the hat’s iconic pointed shape. The crochet witch hat- pattern usually involves consistent increases every few rows to ensure a smooth and even expansion. Continue until the cone reaches your desired height—some prefer tall, dramatic hats, while others go for shorter, playful versions.
Once the cone is complete, it’s time to create the brim. Start by adding an increase round to widen the base, then continue expanding evenly. The brim’s width depends on personal preference—narrow for a subtle look, wide for a bold statement. To prevent curling, alternate between single and double crochet stitches or add a row of slip stitches at the edge for stability.
If you want the brim to be firm and structured, you can crochet over a thin wire or use a row of slip stitches to give it extra stiffness. This technique is common in crochet witch hat- patterns for costume use, as it helps the hat hold its shape even after hours of wear.
Decorating your witch hat is where your creativity can shine. Add a contrasting band around the base of the cone using a different color yarn. You can also attach a crocheted buckle, small flowers, stars, or even tiny pumpkins for a festive touch. Each decoration adds character and transforms your basic crochet witch hat- pattern into a one-of-a-kind accessory.
Finally, weave in all loose ends carefully and try on your finished hat. Adjust the shape of the brim and cone as needed. If desired, lightly steam or block the hat to set the stitches and smooth out any wrinkles. Your handcrafted witch hat is now ready to cast its crochet magic!
4. Customizing and Styling the Crochet Witch Hat- Pattern
The crochet witch hat- pattern is endlessly customizable, making it a great project for expressing your personality. You can modify the height of the cone, change the brim’s size, or incorporate special stitches like shells or puff stitches for texture. This flexibility makes the pattern perfect for any occasion, from spooky Halloween nights to whimsical photo shoots.
Experimenting with colors is one of the most enjoyable ways to personalize your hat. Try a classic black base with a bright orange band for Halloween, or a deep purple hat with gold accents for a more elegant look. You can even make mini hats in different colors as decorations or party favors. The crochet witch hat- pattern can be scaled down or enlarged effortlessly.
Adding embellishments takes your project to the next level. Sew on crochet flowers, attach a bow, or weave in metallic thread for a sparkling effect. You could even create a themed set—like a winter witch with snowflake details or a garden witch with floral accents. These little touches make your hat truly special.
For a more structured finish, line your witch hat with felt or fabric. This not only helps it keep its shape but also adds comfort when wearing. If you’re using your crochet witch hat- pattern for costumes, this technique ensures your hat looks polished and professional.
You can also pair your hat with other crochet accessories like a matching cape, wand, or scarf to complete your costume. Coordinating colors and styles helps create a cohesive, eye-catching look.
Finally, consider sharing your finished work on social media or craft platforms. Tag your project with crochet witch hat- pattern to connect with other crochet lovers, gain inspiration, and inspire others to start their own creations.
FAQ
Q: What is a crochet witch hat pattern?
A: A crochet witch hat- pattern is a step-by-step guide for crocheting a hat with a pointed crown and wide brim, inspired by the traditional witch’s hat design.
Q: Is the crochet witch hat- pattern suitable for beginners?
A: Yes. Many versions are beginner-friendly, using simple stitches like single crochet and easy increases.
Q: What kind of yarn works best for this pattern?
A: Medium-weight acrylic yarn is ideal for structure, but cotton or wool blends can also work depending on your desired texture.
Q: How can I make my hat brim stiffer?
A: Crochet over thin wire or use a smaller hook size to tighten the stitches. You can also block or starch the brim after finishing.
Q: Can I resize the witch hat for kids or dolls?
A: Absolutely. Adjust the number of increase rounds in the cone and brim sections to achieve the size you need.
Q: Can I add decorations to my crochet witch hat?
A: Yes! Add ribbons, flowers, buckles, or other appliqués to customize your crochet witch hat- pattern and make it unique.
Conclusion
In this guide, we explored the wonderful world of the crochet witch hat- pattern—from understanding its structure and materials to crafting and customizing it with your own creative flair. Making your own witch hat is a rewarding experience that combines skill, imagination, and fun.
Now that you have the knowledge, it’s time to pick up your hook, choose your yarn, and bring your magical creation to life. Share your honest opinions and suggestions below—I’d love to hear how your crochet witch hat turned out and what creative touches you added to make it uniquely yours!