If you’ve ever wanted a creative and practical crochet project, the Crochet zipper case – Pattern is a perfect choice. Not only is it functional, but it also lets you show off your crafting skills while making something truly useful. Whether you need a pouch for pens, makeup, crochet hooks, or even your phone, this pattern offers endless flexibility and customization.
The beauty of the Crochet zipper case – Pattern is in its simplicity. With just basic crochet stitches and a few materials, you can create a sleek, durable case that’s uniquely yours. It’s a great project for beginners looking to grow their skills and for advanced crocheters who enjoy adding personal touches to everyday items.
In this article, we’ll guide you through everything you need to know—from the tools and yarn selection to stitching tips and creative customization ideas. We’ll also include answers to the most frequently asked questions and finish with a summary of everything you’ve learned about the Crochet zipper case – Pattern.
1. Understanding the Crochet Zipper Case – Pattern
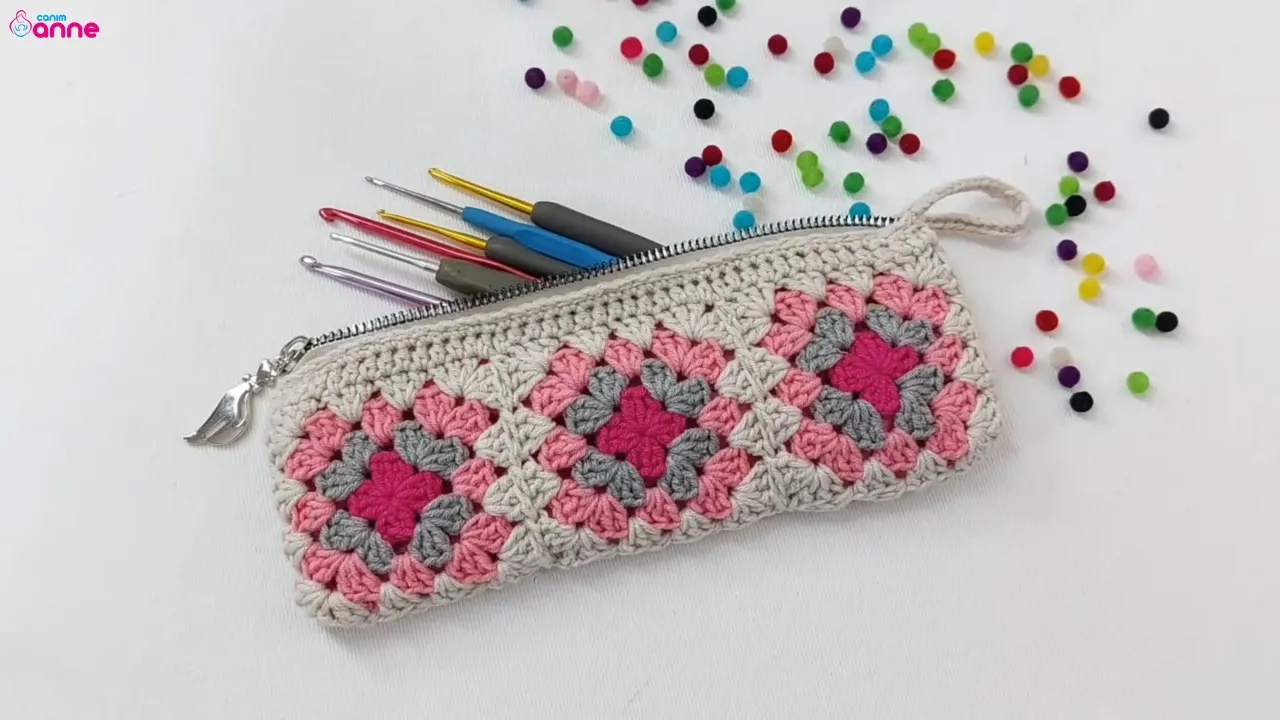
The Crochet zipper case – Pattern is typically a small to medium-sized rectangular or square pouch made using various crochet stitches and finished with a sewn-in zipper. Its simplicity makes it a favorite among both hobbyists and professional crocheters.
This type of case is not just about aesthetics—it’s about function too. With the added zipper, the pouch is ideal for keeping small items safe and organized. It can serve as a pencil case, a mini makeup bag, or even a tech accessory pouch for chargers and earbuds.
The construction usually begins with a flat crochet panel or two panels stitched together. Once the body is complete, a zipper is sewn in either by hand or using a sewing machine. Depending on the pattern, a lining may also be added for durability and structure.
The most commonly used stitches for this pattern are single crochet and half double crochet. These stitches create a tight weave that gives the case a more solid feel, preventing smaller items from slipping through. The tight stitch also offers better support for the zipper.
One of the reasons this pattern is so popular is its adaptability. You can scale the case up or down based on your needs. Want a wallet? Make it smaller. Need something for your crochet tools? Just increase the number of rows and stitches.
The Crochet zipper case – Pattern also allows for experimenting with colorwork, texture, and embellishments like appliqués, surface crochet, or embroidery. You can truly make it your own, both in size and in style.
2. Materials and Tools Needed for the Project
To get started with the Crochet zipper case – Pattern, you’ll only need a few basic supplies. Many of these are common in a crocheter’s toolkit, making this a budget-friendly and beginner-accessible project.
First and foremost, you’ll need yarn. For most zipper cases, worsted weight cotton yarn is preferred. Cotton is durable, holds its shape well, and has a clean finish. If you’re aiming for a more luxurious case, you can experiment with bamboo or linen blends.
Next is your crochet hook. A 4.0 mm or 4.5 mm hook works well with worsted weight yarn. Check your yarn label for the recommended hook size, and adjust if needed to get a tighter or looser stitch depending on your preference.
You’ll also need a zipper—the size depends on the width of your case. Typically, a 6-inch or 9-inch zipper is ideal for small to medium cases. Choose a zipper color that complements or contrasts nicely with your yarn for a personalized look.
Other essentials include scissors for cutting yarn and a yarn needle for weaving in ends. If you’re adding a fabric lining, have a sewing needle and thread on hand or a sewing machine if you want a neater finish.
For those who want extra stability in their cases, consider using interfacing between the crochet and fabric lining. This helps the case maintain its shape and adds a professional touch.
Lastly, a measuring tape is useful for keeping your dimensions accurate, especially if you’re creating a case for a specific item like a tablet or phone.
3. Step-by-Step Guide to Making a Crochet Zipper Case
Creating a Crochet zipper case – Pattern is straightforward, but it does require a little attention to detail—especially when it comes to measuring and attaching the zipper. Here’s a simple guide to get you started.
Begin by crocheting a rectangle that will form the front and back of your case. The size is entirely up to you. For a standard case, you might make a piece that is 9 inches wide by 5 inches tall. Use single crochet rows to keep the fabric tight and dense.
Once you’ve reached your desired size, fasten off the yarn and make a second identical panel. Alternatively, you can create one long panel and fold it in half if you’d like to avoid seaming one side.
Next, line up the two panels (or fold your single piece) and sew the sides and bottom using a whip stitch or mattress stitch. This creates the basic pouch. Make sure your edges are aligned to avoid puckering or uneven sides.
Now comes the zipper. Pin the zipper in place along the top opening, making sure it’s centered and sits flat. Using a yarn needle and thread, hand sew the zipper to the crochet fabric, or use a sewing machine with a zipper foot if your fabric is not too thick.
If you’re adding a fabric lining, cut your fabric to match the size of your crochet panels. Sew the lining pieces together, then insert it into the pouch before attaching the zipper. Secure the lining to the inside edges with a few discreet stitches.
To finish, weave in all yarn ends, clean up any loose threads, and test the zipper. Your Crochet zipper case is now complete and ready for use or gifting.
4. Customizing Your Crochet Zipper Case
The Crochet zipper case – Pattern offers endless room for customization. Whether you’re making it for personal use or as a gift, a few tweaks can turn a simple project into something truly special.
Start by playing with color combinations. Use stripes, gradients, or block colors to make your case stand out. You can also incorporate variegated yarn for a colorful surprise without needing to change skeins.
Add texture by switching up your stitches. Instead of only using single crochet, try moss stitch, waistcoat stitch, or even a popcorn stitch section to give the case a unique surface. Just keep in mind that the zipper area needs a stable edge.
Consider including small details like tassels, buttons, or even a keyring loop. These not only add charm but also functionality, especially if you want the case to double as a key pouch or wallet.
Another way to personalize your project is by adding initials or words with surface crochet or embroidery. This is perfect for gifting, as you can monogram the pouch or add a short name or message.
Try changing the shape. Although rectangular is standard, you can design a square or even a triangular pouch with a little pattern adjustment. This allows for a wide variety of uses and aesthetics.
Lastly, consider using your case as part of a matching set. Create a coordinated makeup pouch, pencil case, and coin purse using the same yarn and stitch style for a beautiful, cohesive collection.
FAQ – Frequently Asked Questions about Crochet Zipper Case – Pattern
Q1: Is the Crochet zipper case – Pattern suitable for beginners?
Yes, it’s great for beginners. As long as you know basic stitches like single crochet, you can complete this project with minimal difficulty.
Q2: What type of yarn should I use?
Cotton yarn is recommended for its durability and clean finish. It helps the case maintain structure and is easy to clean.
Q3: How do I attach the zipper to crochet?
You can attach the zipper by hand sewing using a yarn or tapestry needle, or with a sewing machine if the fabric isn’t too thick.
Q4: Can I add a lining to the case?
Yes, adding a lining is optional but highly recommended for durability. Use cotton fabric and sew it to the inside before attaching the zipper.
Q5: How long does it take to complete a zipper case?
Depending on your speed and experience, it can take anywhere from 2 to 4 hours to complete a standard-sized zipper case.
Q6: Can I sell the crochet zipper cases I make from this pattern?
Yes, as long as you’ve created the design or have permission from the pattern creator, you’re free to sell your handmade items.
Conclusion
The Crochet zipper case – Pattern is a fun, rewarding, and practical project that combines creativity with function. With just a few materials and some basic crochet skills, you can make a stylish accessory that’s fully customizable and perfect for everyday use.
From understanding the construction to customizing the final look, you now have the tools to create something both beautiful and useful. Whether you’re making it for yourself, a friend, or even to sell, the possibilities are wide open.
We’d love to know what you think! Please leave your honest opinion and suggestions below. Your feedback helps us create even better guides and patterns for crochet lovers around the world. Happy crocheting!