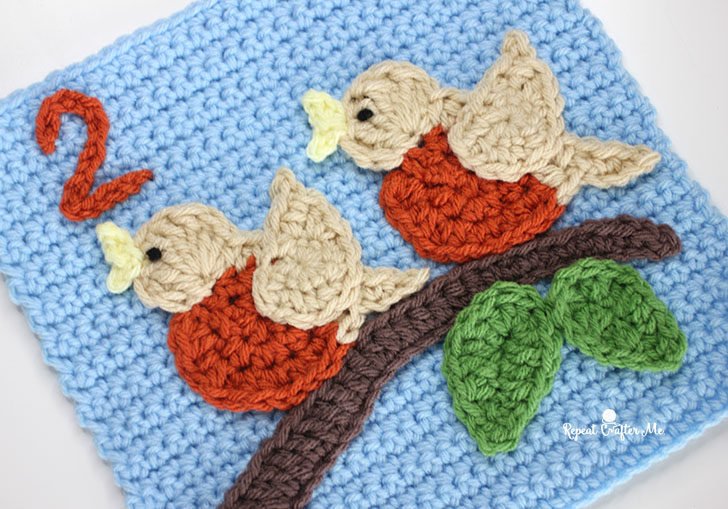
Creating a crocheted bird square – pattern is a delightful project for both beginners and experienced crocheters. This pattern combines the charm of birds with the versatility of square motifs, making it perfect for blankets, pillows, or decorative projects. A crocheted bird square – pattern allows you to play with colors, textures, and designs while creating a unique handmade piece.
The appeal of a crocheted bird square – pattern lies in its adaptability. You can make a single square to embellish an accessory or combine multiple squares to form a large, eye-catching blanket. This pattern provides a fun way to practice basic crochet stitches while also giving you the opportunity to add intricate details like wings, beaks, and tails for a playful bird design.
In this article, you will learn everything you need to successfully complete a crocheted bird square – pattern. We will cover materials, step-by-step instructions, creative uses, and tips for perfecting your technique. By following this guide, you will gain the confidence to make charming bird squares that are perfect for gifts or home décor.
1. Materials Needed for a Crocheted Bird Square – Pattern
Before starting your crocheted bird square – pattern, gather all the necessary materials. Using the correct tools ensures your project turns out neat and professional-looking.
The most important material is yarn. Cotton and acrylic yarn are recommended because they hold shape well and offer a wide range of colors. Use one color for the background square and several contrasting colors for the bird design to make it stand out.
You will also need a crochet hook. The size should match the yarn weight, which is usually indicated on the yarn label. A hook size between 4 mm and 5 mm is ideal for most medium-weight yarns. Choosing the right hook ensures even stitches and a balanced square.
Scissors and a tapestry needle are essential for cutting yarn and weaving in ends. Proper finishing of your crochet work gives your bird square a polished look.
Optional tools include stitch markers, which help you keep track of corners and rows. Buttons or beads can also be added to enhance the bird design and add texture.
Lastly, a well-lit, comfortable workspace is crucial. Crocheting in a bright area with enough space makes your work easier and reduces hand strain. With these materials ready, you’re set to begin creating your beautiful bird square.
2. Step-by-Step Instructions for a Crocheted Bird Square – Pattern
Making a crocheted bird square – pattern is easy when broken down into clear steps. Start with the square base, then add the bird details.
First, create a foundation chain according to your desired square size, typically 20-25 stitches for a medium square. Join the chain into a loop with a slip stitch to start the first round.
Next, crochet the first round using single crochet stitches to form a solid base. Ensure your stitches are even to maintain a neat square shape.
For subsequent rounds, use double crochet stitches and work extra stitches in the corners to keep the square flat. Repeat for 3-4 rounds until the base reaches the desired size.
Now, create the bird design. Start with the body using a contrasting color, crocheting a small circle or oval shape and attaching it to the center of the square. Use single crochet stitches for smaller birds and double crochet for larger designs.
Add details like wings, tail, and beak using small stitched shapes or embroidery techniques. Secure each piece carefully with a tapestry needle to prevent unraveling. Add embroidered eyes or small beads for a charming finishing touch.
Finally, weave in all loose ends and block the square if needed. Blocking ensures that your square lays flat and the bird design appears symmetrical and polished. Your crocheted bird square – pattern is now complete and ready for use in your projects.
3. Creative Uses for Your Crocheted Bird Square
Once you’ve completed a crocheted bird square – pattern, there are many creative ways to use it. These squares are versatile, functional, and decorative.
One popular option is blankets or throws. Combine multiple bird squares in different colors and designs to create a whimsical and cozy blanket. Each square can feature a unique bird for a playful effect.
You can also use your squares for cushion covers. Attach a single square to a pillow form or combine multiple squares to create a patchwork cushion with a charming bird theme.
Another idea is to make appliqués for bags, scarves, or hats. A single bird square can be sewn onto accessories, adding a personal and playful touch.
Crocheted bird squares also work well as wall art. Frame individual squares or stitch several together to create a vibrant tapestry for a nursery or living space.
These squares can be used in educational activities for children. The colorful bird designs are engaging and can be part of learning games, story mats, or interactive play areas.
Finally, gifts and crafts are a perfect way to use bird squares. Handmade squares make thoughtful presents for birthdays, baby showers, or holidays, showcasing your creativity and skill.
4. Tips for Perfecting Your Crocheted Bird Square Technique
Even a simple crocheted bird square – pattern can benefit from some expert tips to enhance its appearance and durability.
First, maintain consistent tension throughout the square. Uneven tension can cause your square to warp and the bird design to look distorted. Practice ensures uniform stitches.
Second, choose contrasting yarn colors carefully. The bird should stand out against the background without clashing. Soft complementary shades often work best.
Third, refine your embroidery skills. Small details like eyes, beaks, and wings require precision. Using fine yarn or embroidery thread helps achieve clean and detailed designs.
Fourth, use stitch markers to track corners and rounds. This is especially useful when making multiple squares to ensure consistency in size and shape.
Fifth, experiment with square sizes. Larger squares work well for blankets, while smaller squares can be used for appliqués or ornaments. Adjust the foundation chain and number of rounds accordingly.
Finally, store your squares properly. Keep them flat and in a dry place to prevent stretching or damage, especially if you plan to assemble multiple squares later.
FAQ About Crocheted Bird Square – Pattern
1. Is the crocheted bird square – pattern suitable for beginners?
Yes! The pattern uses basic crochet stitches like chain, single crochet, and double crochet, with simple embroidery for bird details.
2. What yarn is best for a bird square?
Cotton or acrylic yarn works best, holding shape well and offering many colors for creative designs.
3. How long does it take to make one square?
It generally takes 30-60 minutes, depending on the square size and your skill level.
4. Can I make blankets with these squares?
Absolutely! Multiple squares can be joined to create blankets, throws, or afghans with a playful bird theme.
5. How do I secure the bird features?
Use a tapestry needle and matching yarn to sew pieces like wings, tail, and eyes securely.
6. Can I wash crocheted bird squares?
Yes, cotton and acrylic yarns are generally washable. Always follow care instructions on the yarn label.
Conclusion
Creating a crocheted bird square – pattern is an enjoyable and rewarding project. You’ve learned the materials needed, step-by-step instructions, creative uses, and tips to perfect your technique. With practice, you can make multiple bird squares for blankets, pillows, wall art, and more.
Now it’s your turn! Make your own crocheted bird squares, experiment with colors and designs, and share your results. Leave your honest opinion and suggestions below — your feedback helps inspire others and improve future guides. Happy crocheting!