Crocheted bookmark – Pattern projects are charming, useful, and accessible to crocheters of all skill levels. Right from the first line, it’s essential to highlight that a crocheted bookmark – Pattern is a fully family-friendly craft activity that fits within Google AdSense guidelines. These bookmarks are not only practical but also offer a creative way to personalize your reading experience. Whether you love gifting handmade items or simply enjoy adding unique touches to your favorite books, a crocheted bookmark is an ideal small project.
Creating a crocheted bookmark – Pattern is a wonderful opportunity to practice basic stitches while designing something lightweight, delicate, and easy to carry. These bookmarks typically use fine yarns or threads and a small hook, which results in a slim and elegant finish perfect for keeping your pages marked without damaging the spine. Because the size is small, these projects work up quickly, making them excellent for beginners or for seasoned crocheters who want a short, relaxing project between larger ones.
Another great advantage of making a crocheted bookmark – Pattern is the vast amount of creative freedom available. Bookmarks can be floral, geometric, lacy, themed, or even shaped like items such as hearts, leaves, feathers, or stars. With endless design possibilities, each bookmark becomes a work of art. Plus, they are fantastic gifts for students, teachers, librarians, or any book lover. Now, let’s explore everything you need to know to create your own crocheted bookmark from start to finish.
1. Understanding the Basics of a Crocheted Bookmark (H2)
A crocheted bookmark – Pattern relies on a simple but effective foundation: it needs to be thin, lightweight, and flat. Unlike other crochet projects such as scarves or bags, a bookmark must not be bulky. This is why most patterns recommend using cotton thread or lightweight yarns to achieve a delicate and elegant finish.
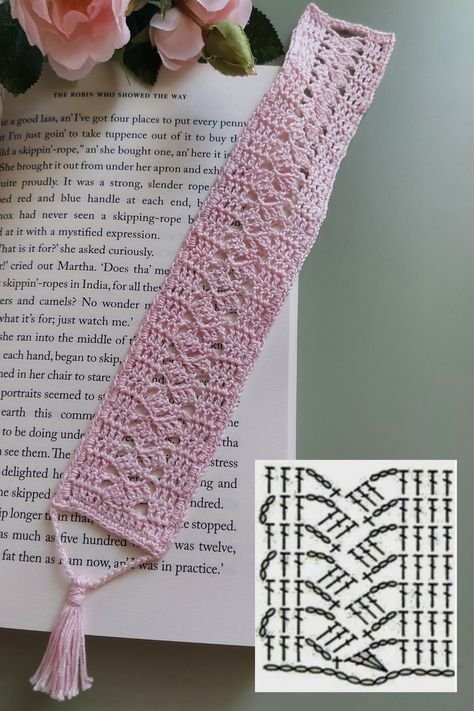
The basic structure of a crocheted bookmark typically includes a long vertical strip, sometimes with decorative edges. Lace stitches, picots, chains, or shells are often incorporated to add visual interest without adding too much thickness. This combination ensures the bookmark remains practical and beautiful.
Many bookmarks include a small motif at one end. This could be a flower, leaf, or geometric shape that hangs outside the book, making it easier to locate your page. These motifs can be crocheted separately and attached afterward, giving you the chance to mix and match designs.
Some crocheted bookmark – Pattern designs include tassels or braided endings. These elements are optional, but they add personality and make the bookmark feel more complete. They also help the bookmark stay securely between the pages.
The key to creating an effective bookmark is maintaining consistent tension. This ensures the strip stays flat and prevents curling. Using a blocking technique after finishing your work also helps set the shape permanently, giving it a polished, professional look.
Finally, a crocheted bookmark provides a great opportunity to experiment with colors. Pastels, neutrals, or bright tones all work beautifully. You can match the bookmark to a book genre, create themed sets, or design bookmarks based on seasons or holidays.
2. Materials and Tools Needed for the Bookmark (H2)
Creating a crocheted bookmark – Pattern requires only a few basic materials. The most important material is yarn or thread. Many crocheters choose cotton crochet thread because it produces a clean, defined stitch and keeps the bookmark thin and lightweight. However, light fingering or sport-weight yarn also works well.
Your crochet hook should match the thread or yarn weight. For fine thread, hooks between 1.25 mm and 2.5 mm are typical. For lightweight yarns, hooks between 3.0 mm and 4.0 mm are ideal. Using the correct hook ensures the bookmark remains delicate rather than bulky.
A yarn needle is necessary for weaving in ends. Because bookmarks are handled frequently and slide between pages, securing ends neatly is crucial to durability. A small pair of scissors is also needed to trim excess thread cleanly.
Optional materials include stitch markers, which can help beginners keep track of stitch repeats, especially when working with lacy or patterned stitches. Markers are not required but can make the process smoother and more accurate.
Blocking tools such as pins, foam boards, and spray bottles are very helpful for bookmarks. Once the piece is finished, blocking it will flatten the stitches, sharpen the edges, and ensure the bookmark looks elegant. This step is highly recommended for lace or open-stitch designs.
Finally, embellishments such as beads, tassels, or small appliqués can be added. These decorative pieces should be lightweight to avoid damaging the book. They offer a personal touch and help you customize your crocheted bookmark – Pattern fully.
3. Step-by-Step Guide to Crafting Your Bookmark (H2)
To start your crocheted bookmark – Pattern, begin with a foundation chain that determines the length of the bookmark. Most bookmarks range from 15 to 20 cm, but you can customize this depending on preference. Foundation chains should be tight and even to avoid curling later.
Next, choose the stitch pattern you want for the main body. Popular choices include single crochet for a clean look, double crochet for flexibility, or lace stitches for an elegant, open design. Follow your chosen pattern row by row, keeping your tension consistent.
If your design includes decorative edges, these are typically added after completing the main body. You can crochet along the sides with picots, shells, or scalloped edging. This adds visual appeal and makes the bookmark look more refined.
Motifs such as flowers or hearts can be added once the main body is finished. These motifs are usually crocheted separately. After completing them, sew or attach them securely to one end of the bookmark. This creates a charming finish and adds personality.
If you wish to include a tassel, create one using leftover thread or yarn. Wrap the thread around your fingers several times, tie it at the top, cut the ends, and attach it to the bookmark. Tassels give movement and elegance, making the piece stand out.
Once all pieces are assembled, block the bookmark. Pin it flat onto a foam board and mist it lightly with water. Allow it to dry completely before unpinning. This step ensures your crocheted bookmark – Pattern stays straight, neat, and ready for use.
4. Creative Ideas to Personalize Your Bookmark (H2)
One of the best aspects of working with a crocheted bookmark – Pattern is how customizable it is. You can match each bookmark to a theme, color palette, or special occasion. For example, floral bookmarks suit springtime themes, while star or snowflake motifs are perfect for winter.
Experimenting with color is an easy way to make each bookmark unique. Use gradients, stripes, or contrasting tones to create a striking effect. Monochromatic bookmarks can be elegant, while bold colors create a fun and vibrant result.
Adding textures through different stitch combinations can also enhance your design. Lace stitches like fans, pineapples, or picots give an intricate and delicate appearance, while denser stitches provide a modern, minimalist look.
You can personalize bookmarks as gifts. For instance, embroider an initial or name onto the bookmark to make it meaningful and memorable. This is a thoughtful idea for birthdays, holidays, or teacher appreciation gifts.
Themed bookmarks are also popular. You can create a set inspired by nature—leaves, flowers, vines—or literary themes such as quills, scrolls, or miniature book shapes. Creativity knows no limits with this pattern.
Finally, pairing your bookmark with a book as a gift set is a beautiful idea. Handmade bookmarks enhance the reading experience and show thoughtfulness. They are small but meaningful creations, and each crocheted bookmark – Pattern can be tailored to match a book genre or mood.
FAQ – Crocheted Bookmark
1. Is a crocheted bookmark suitable for beginners?
Yes, a crocheted bookmark – Pattern is perfect for beginners due to its small size and simple stitch options.
2. What yarn should I use for bookmarks?
Cotton thread or lightweight yarn works best because it creates a flat and durable finish.
3. Will the bookmark damage my book pages?
No, as long as it’s lightweight and flat, it will be gentle on pages.
4. How do I keep my bookmark from curling?
Consistent tension and proper blocking will keep the bookmark flat.
5. Can I wash my crocheted bookmark?
Yes, most cotton bookmarks can be hand-washed. Always follow the yarn care instructions.
6. Can I add beads or tassels?
Yes, just keep embellishments lightweight to avoid damaging the book.
Conclusion
In this article, we explored how to create a beautiful and functional crocheted bookmark – Pattern, from understanding the basics and gathering materials to following step-by-step instructions and customizing your design.
Crocheted bookmarks are quick, creative, and meaningful projects that make perfect gifts or personal accessories. I hope this guide inspires you to start your own bookmark collection.