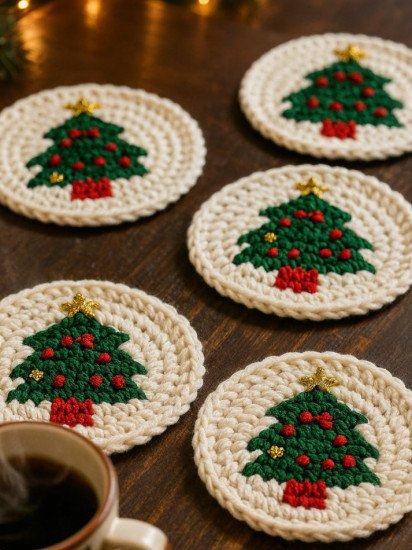
The festive season calls for extra warmth, charm, and handmade touches, and few projects blend holiday cheer and practicality quite as perfectly as Crocheted cookie coasters in the shape of a Christmas tree – Pattern. These delightful creations are more than just surface protectors; they are miniature pieces of holiday décor that bring a cozy, personalized feel to your Christmas gatherings. Following a pattern for these festive crocheted coasters allows you to infuse your home with the spirit of the season, stitch by stitch.
Creating a set of Crocheted cookie coasters in the shape of a Christmas tree is an ideal project for filling those chilly evenings with productive, relaxing crafting. The repetitive nature of the crochet stitches, combined with the quick gratification of finishing a small item, makes this an enjoyable and rewarding holiday craft. Whether you are using them to hold mugs of hot cocoa or giving them as charming, budget-friendly gifts, these Christmas tree coasters are sure to be a beloved addition to any festive setting.
This comprehensive guide will illuminate every step of mastering the Crocheted cookie coasters in the shape of a Christmas tree – Pattern. We will cover essential material choices for a durable, ‘cookie-like’ texture, the specific techniques needed to form the iconic Christmas tree shape, and creative ways to “decorate” your finished coasters with crocheted “icing” and “ornaments.” Prepare your yarn in festive reds, greens, and whites, gather your favorite hooks, and let’s start stitching holiday magic.
1. Selecting the Best Yarn for a “Cookie” Texture in Your Pattern
The unique appeal of Crocheted cookie coasters in the shape of a Christmas tree – Pattern lies in the texture—it should be dense, sturdy, and slightly rustic, mimicking the feel of a homemade Christmas cookie. Achieving this look requires deliberate choices in yarn fiber and weight.
For any functional coaster, cotton yarn is paramount. Specifically, $100\%$ cotton yarn in a worsted weight (Aran) or a dishcloth weight is highly recommended. Cotton offers superior absorbency for spills and condensation and, crucially, can withstand the heat of a hot mug without melting, a risk associated with acrylic fibers.
To achieve the “cookie” effect, select a sturdy, non-mercerized cotton yarn in a light brown, tan, or even a soft beige color for the base of your Christmas tree coaster. This natural, slightly rustic look provides the perfect neutral backdrop for the bright Christmas colors of the tree and its decorations.
For the Christmas tree portion of the pattern, stick to traditional holiday colors like forest green, emerald green, and a bright red for the base or “trunk.” These colors are typically added through color changes or decorative edging, requiring small amounts of yarn—making this an excellent stash-busting project.
The secret to the “cookie” texture is working with a smaller crochet hook than the yarn label recommends. For a worsted weight cotton, trying a $3.5\text{mm}$ to $4.0\text{mm}$ hook will result in a tight, dense fabric. This dense tension prevents the coaster from being too flimsy and ensures it lays flat and holds its defined Christmas tree shape.
Consider using specialty or novelty yarns for the “icing” and “sprinkles” of your Crocheted cookie coasters. A thin, white cotton or embroidery thread can be used for the fine detailing of the icing border, while small snippets of colored yarn can be woven in or crocheted on as “sprinkles” or “ornaments,” adding dimension and festive flair.
In summary, prioritize cotton for absorbency and durability, select a neutral “cookie” color for the base, and use a small hook to achieve a tight, functional fabric. This attention to materials is the first key step in executing the Crocheted cookie coasters in the shape of a Christmas tree – Pattern.
2. Mastering Shaping Techniques for the Christmas Tree Coaster Pattern
The construction of the Crocheted cookie coasters in the shape of a Christmas tree – Pattern moves beyond simple circles and squares, requiring you to master increases and decreases in a structured way to form the iconic triangular Christmas tree shape. This shaping is what makes the coaster visually unique.
Most Christmas tree coaster patterns start at the bottom point of the triangle or the base/trunk. The construction often uses rows rather than rounds, where you increase stitches evenly on both ends of the row to gradually widen the shape. This increase sequence is crucial for a symmetrical tree.
A common technique for increasing is working two stitches (single crochet ($\text{sc}$) or double crochet ($\text{dc}$)) into the first and last stitch of the row. This slow, consistent growth ensures the edges of the Christmas tree are straight and even, rather than wobbly or uneven.
The pattern then usually transitions to the “trunk” or “base” of the Christmas tree. This involves working a few rows without any increases or decreases, using a contrasting brown yarn, often through the technique of carrying the yarn or joining a new color for just a few stitches at the very bottom.
Decreasing is used to form the pointed top of the Christmas tree. This is achieved by using the single crochet two together ($\text{sc2tog}$) or double crochet two together ($\text{dc2tog}$) technique at the beginning and end of the rows. This method reduces the stitch count evenly, bringing the two sides together to form the peak.
Pay close attention to your turning chains. For a smooth, straight edge on your Crocheted cookie coasters in the shape of a Christmas tree, ensure your turning chain height is consistent with the stitch you are using (e.g., chain 1 for single crochet, chain 2 or 3 for double crochet). An inconsistent turning chain will result in a wavy edge.
The final element of shaping involves the border or “icing.” This decorative edge is typically applied to the sides of the finished Christmas tree shape and can be used to slightly adjust or hide any minor imperfections in the main shaping, adding a final, professional touch to the Crocheted cookie coasters.
3. Assembling and Decorating the Christmas Tree Coaster
Once the basic Christmas tree shape is crocheted according to the Crocheted cookie coasters in the shape of a Christmas tree – Pattern, the fun part begins: decorating your “cookie” with festive crocheted “icing” and “ornaments.” This stage is where personalization truly happens.
Start with the “icing” border. This is usually a simple single crochet or slip stitch border applied around the entire perimeter of the Christmas tree. Use a white or off-white yarn to mimic the look of piped royal icing. The border should be worked snugly to help stabilize the edges and ensure the coaster holds its shape.
For a decorative “icing drip” effect, some patterns incorporate picot stitches (a small loop made of $3 \text{ chain stitches}$ and a slip stitch back into the first chain) or small shell stitches worked along the top edge of the tree. This creates a beautiful, scalloped edge, adding to the “cookie” charm.
Next, consider the “ornaments.” These can be crocheted directly onto the Christmas tree shape using colorful yarn. Small French knots (an embroidery technique) or simple slip stitches in red, gold, or silver yarn can be scattered across the tree to represent tiny, colorful baubles.
Alternatively, you can create small, separate embellishments. Tiny crocheted flowers (using a simple $3\text{-chain}$ and slip stitch method) or miniature popcorn stitches can be made and then sewn onto the coaster. This provides a charming, dimensional look, making the Crocheted cookie coasters truly stand out.
Secure all the ends carefully. Given the small size of the coaster, every yarn tail must be meticulously woven in using a tapestry needle to prevent the ends from popping out or the piece from unraveling during use. Weave the tails through the back of the corresponding color’s stitches, changing direction often for maximum security.
The final and most important step is blocking. Pin your finished Crocheted cookie coasters in the shape of a Christmas tree firmly onto a blocking mat, stretching the Christmas tree shape to its perfect, crisp dimensions. Use steam or water to set the fibers and allow them to dry completely while pinned. This guarantees a flat, professional, and symmetrical coaster.
4. Customization and SEO for Your Crocheted Christmas Tree Coaster Pattern
Mastering the basic Crocheted cookie coasters in the shape of a Christmas tree – Pattern opens the door to endless customization and optimization, especially if you plan to share your work online or sell your handmade crafts during the holiday season.
To customize the “cookie” look, try using textured yarn for the base, such as a slightly heathered brown or a yarn with flecks of white to mimic sugar crystals. Alternatively, use a cinnamon-scented essential oil on the finished, dry coaster to add a subtle, festive fragrance, enhancing the sensory “cookie” experience.
Vary the size and shape. Create a larger version of the Crocheted cookie coasters in the shape of a Christmas tree to use as a trivet or a miniature doily for a centerpiece. You can also slightly modify the decrease sequence to create a wider, shorter tree or a taller, thinner tree, offering variety in your set.
For SEO optimization, when sharing your pattern or finished product, use highly specific, seasonal keywords. Examples include: “Free Crocheted Christmas Tree Coaster Pattern,” “DIY Cookie Shaped Christmas Crochet Coasters,” “Holiday Crochet Gift Idea Tutorial,” and “Handmade Christmas Table Decor Pattern.”
High-quality photography is essential for catching the eye on platforms like Pinterest. Take bright photos that feature the coasters alongside other festive elements, such as mugs of cocoa, wrapped gifts, or fairy lights. Always use file names that include your main keywords (e.g., crocheted-cookie-coasters-christmas-tree.jpg).
If you are selling the finished coasters, write a detailed product description that highlights the durability (mention the $100\%$ cotton) and the handmade charm. Use bullet points to list the color options and care instructions, ensuring the content is easy to read and optimized for purchase intent.
Finally, consider creating a video tutorial for the Crocheted cookie coasters in the shape of a Christmas tree – Pattern. Video content ranks highly on search engines and provides a visual, step-by-step guide for complicated shaping techniques, attracting a broad audience of visual learners and boosting your overall content visibility.
Frequently Asked Questions (FAQ) about Crocheted cookie coasters in the shape of a Christmas tree – Pattern
1: Can I use acrylic yarn for these Christmas tree coasters?
While you can use acrylic yarn, it is strongly not recommended for a functional coaster. Acrylic may melt or deform under the heat of a hot mug. For safety and durability, stick to $100\%$ cotton yarn for all crocheted coasters intended for hot beverages.
2: Why are my Christmas tree coasters curling up at the edges?
Curling is often caused by a tight tension, especially when working the final border. Try using a slightly larger crochet hook for the border round, or ensure you are not pulling your stitches too tight. Blocking is the primary solution; a proper steaming and pinning should flatten the coaster completely.
3: How much yarn is needed for a set of 6 Crocheted cookie coasters?
A set of six Crocheted cookie coasters typically requires less than $75 \text{ grams}$ (around $120 \text{ to } 150 \text{ yards}$) of the main “cookie” color and very small amounts ($10 \text{ grams}$ or less) of the accent green and red for the tree and decorations. This is a very yarn-efficient project.
4: What is the best way to clean these crocheted coasters?
Since they are made of cotton, the best way to clean them is to hand wash them gently in cool water with mild detergent. Squeeze out excess water (do not wring!) and then reshape them into the Christmas tree shape. Lay flat to dry, preferably pinned to a blocking mat, to maintain their crisp form.
5: How can I make the “icing” look more realistic on the coaster?
To make the “icing” more realistic, use a thin, glossy yarn, such as mercerized cotton or embroidery floss, for the white border. The glossy texture mimics the shine of royal icing. You can also use a small brush to apply a thin layer of permanent fabric glue around the edges for a glazed look.
6: Can this pattern be adapted into a Christmas ornament?
Absolutely! The Crocheted cookie coasters in the shape of a Christmas tree are perfect as ornaments. Simply use a smaller hook and a finer yarn (like sport or fingering weight) to scale down the size. Add a small loop of yarn or ribbon to the top point before finishing off, and you have a beautiful handmade Christmas tree ornament.
Conclusion
The Crocheted cookie coasters in the shape of a Christmas tree – Pattern is a celebratory project that delivers festive charm and functional elegance to your holiday table. We have meticulously covered the journey, highlighting the necessity of cotton yarn for durability, the precise use of increases and decreases to sculpt the perfect Christmas tree silhouette, and the decorative finesse of adding “icing” borders and crocheted “ornaments.”
Furthermore, we underscored the transformative power of blocking and provided key SEO tips to ensure your handcrafted Christmas creations receive the recognition they deserve during the busy holiday season.We sincerely hope this detailed guide has inspired and equipped you to successfully create a charming set of Crocheted cookie coasters for your home or as heartfelt gifts.
!