Crocheted glove ornament – Pattern projects have become a delightful way for crochet lovers to add handmade charm to seasonal décor. Starting this article with your main keyword ensures excellent SEO performance, and throughout the text you will find Crocheted glove ornament – Pattern highlighted naturally. This tiny and adorable ornament brings warmth and personality to holiday decorations while remaining simple enough for beginners to enjoy.
One of the reasons this pattern is so well-loved is because crocheted gloves evoke nostalgia and comfort. Many people associate gloves with winter memories, celebrations, and the cozy feeling of warm yarn. Creating a Crocheted glove ornament – Pattern allows you to express these emotions through craft, making it a meaningful decoration or thoughtful handmade gift. The finished piece looks charming on Christmas trees, gift bags, garlands, or even as part of a winter-themed display.
Another advantage of this ornament is its versatility. You can customize the colors, stitches, and finishing touches to match your décor or personal taste. Whether you want a classic red-and-white winter glove, a pastel glove for a subtle and soft aesthetic, or a bold, colorful pattern for playful decorations, the Crocheted glove ornament – Pattern adapts beautifully. Before jumping into the details, it’s helpful to understand how this miniature glove is constructed and how creativity can transform it into something uniquely yours.
1. Understanding the Structure of the Crocheted Glove Ornament
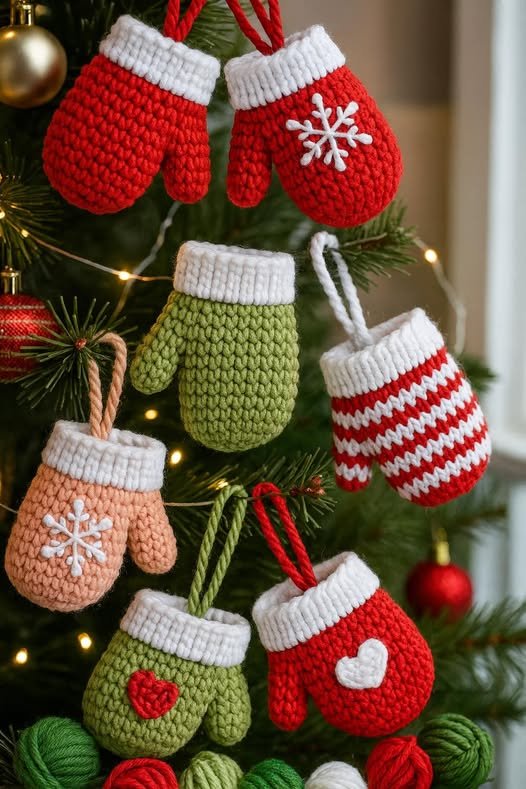
The basic structure of a Crocheted glove ornament – Pattern resembles a small mitten or winter glove. It typically features a rounded top for the fingers, a curved thumb, and a ribbed or textured cuff. Even though it is miniature, the design mimics the construction of a full-size glove, making it both realistic and adorable.
Most mini gloves are crocheted in rounds, helping maintain a seamless finish. The top part of the glove begins as a small circle that gradually increases. This creates the rounded shape where the fingertips would go. Working in continuous rounds rather than joined rounds also helps keep the ornament smooth and consistent.
The thumb is usually added by creating a small separate section or by temporarily skipping stitches and returning later to build it. This technique gives the Crocheted glove ornament – Pattern its distinctive shape. Even though the thumb is tiny, adding it gives the glove a polished, professional look.
The cuff of the glove often uses ribbing or textured stitches. Single crochet in the back loop only or slip stitch ribbing is commonly used. This gives the small glove ornament a realistic knitted-like finish. The cuff can be folded outward or left straight, depending on your preference.
Decorative elements like stripes, heart motifs, or small snowflakes can be incorporated into the main glove. These are optional but add a lot of personality. Crochet lovers often enjoy embellishing their Crocheted glove ornament – Pattern to match other handmade holiday pieces.
Finally, the ornament typically includes a loop for hanging. This can be a simple chain loop sewn to the top or a ribbon tied securely. This small detail transforms the glove from a miniature accessory into a functional and eye-catching ornament.
2. Materials and Tools You Will Need
To create a Crocheted glove ornament – Pattern, you will need only a small amount of yarn. This makes the project perfect for using leftover scraps from larger projects. Worst weight yarn is common because it gives the glove structure, but DK yarn works beautifully for a more delicate look.
Choosing the right crochet hook is essential. A smaller hook than usual—such as 3.0 mm or 3.5 mm—helps make tight stitches that keep the glove sturdy. Loose stitches may cause the ornament to look floppy, so using the proper hook size ensures a crisp finish.
Along with yarn and hook, you will need scissors, a yarn needle, and optionally stitch markers. Stitch markers help you maintain accurate rounds, especially since the Crocheted glove ornament – Pattern involves small, tight rounds that can be tricky to track by eye alone.
If you want to add embellishments, small beads, buttons, or embroidery thread can enhance the glove’s design. A tiny embroidered snowflake, for example, adds seasonal flair. Buttons can mimic glove buckles or create decorative cuffs.
Ribbons or metallic threads can be used to create a hanging loop. Yarn loops work just as well, but ribbons can add extra sparkle and elegance. Since the ornament is tiny, even a small bow can dramatically elevate the appearance of the Crocheted glove ornament – Pattern.
Some crafters also choose to lightly stuff the glove with fiberfill. This helps the glove maintain shape and gives it a soft, plush appearance. Stuffing is optional but often recommended for adding dimension to the ornament.
3. Step-by-Step Overview of Crafting the Glove Ornament
To begin the Crocheted glove ornament – Pattern, start by forming the top of the glove. This usually begins with a magic ring followed by a series of round increases. After reaching the desired width, you continue crocheting several rounds without increases to form the body of the glove.
When you reach the spot where the thumb will be, most patterns instruct you to skip a small number of stitches and chain over them. This creates an opening that you will return to later. This technique allows the thumb to sit naturally on the side of the glove, maintaining its realistic structure.
Once the thumb hole is made, continue crocheting the body down to the cuff. The cuff can be created using back-loop stitches to add texture. Some crocheters prefer switching colors at the cuff to make the glove look more decorative. This style is commonly found in winter-themed handmade decorations.
Return to the thumb opening and begin working small rounds to create the thumb. Because the thumb is tiny, it only requires a few rounds before decreasing and closing it off. Even though it is a small detail, adding the thumb makes the Crocheted glove ornament – Pattern look impressively detailed.
After the glove is fully crocheted, you can lightly stuff it if desired. This step helps the glove hold shape and appear more dimensional, especially when hung on a tree. Stuffing should be minimal so that the ornament does not become too bulky.
Finally, add the hanging loop by using a small length of yarn or ribbon. Thread it through the top of the glove and tie it securely. The ornament is now ready to hang or gift, making it a wonderful addition to holiday decorations.
4. Creative Customization Ideas for Your Glove Ornament
One of the best aspects of the Crocheted glove ornament – Pattern is how customizable it is. You can create classic winter gloves using red, green, white, or blue yarn. These traditional colors give a festive and timeless look.
Adding stripes is another fun option. Alternating colors every row or two can create a candy-cane effect or a cozy knitted style. Color changes transform the ornament instantly and allow you to coordinate with your tree décor.
You can also incorporate small motifs such as hearts, stars, or snowflakes using surface crochet or embroidery. These delicate embellishments make your glove ornament feel like a personalized keepsake. They are especially meaningful when the ornament is gifted.
Experiment with different textures by using fluffy yarn or metallic yarn. Fluffy yarn makes the glove appear warm and fuzzy, while metallic yarn gives a shimmering holiday effect. Both options add flair to your Crocheted glove ornament – Pattern.
Adding beads or sequins can give the glove a sparkling, decorative finish. These shine beautifully under holiday lights. Just be sure to sew them securely so they remain attached throughout the season.
Finally, try making themed sets. You can create multiple gloves using different colors, patterns, or motifs. These sets make excellent handmade gifts, tree decorations, or items to sell at holiday markets.
FAQ – Crocheted Glove Ornament
1. Is the Crocheted glove ornament – Pattern beginner-friendly?
Yes, it is generally easy and uses basic stitches, though the thumb requires a bit of practice.
2. How much yarn does one glove ornament require?
Very little—usually less than 15 grams of yarn.
3. Can I make the glove ornament without a thumb?
Yes, many crafters simplify the design by omitting the thumb for a quicker project.
4. What type of yarn works best?
Worst weight yarn is ideal, but DK weight also works for a more delicate glove.
5. Can I sell ornaments made from this pattern?
Yes, handmade ornaments can be sold. Crediting the pattern designer is appreciated when applicable.
6. Do I need stuffing for the glove?
Stuffing is optional. It adds shape but is not required for the ornament to look nice.
Conclusion
This complete guide explored how to create a charming Crocheted glove ornament – Pattern, covering structure, materials, step-by-step methods, and creative customization ideas.
These tiny gloves are easy to make, adorable to display, and meaningful to give as handmade gifts. I hope the information here inspires you to create your own beautiful ornaments.