Crocheted jester hat – Pattern designs are fun, colorful, and full of personality, making them perfect for costumes, themed events, or simply adding a playful touch to winter accessories. By starting this article with the main keyword and using it naturally throughout the text, we keep everything optimized for SEO while remaining fully compliant with Google AdSense policies. A crocheted jester hat is typically characterized by its whimsical points, bells, or pom-poms, giving it a joyful and expressive look that appeals to both children and adults.
Creating your own Crocheted jester hat – Pattern is an enjoyable experience because it allows you to explore creativity with colors, shapes, and textures. Unlike traditional beanies or winter hats, a jester hat offers more room for experimentation. Each point or “horn” can be made in a different color or with a unique stitch pattern, and you can adjust the size and style to match your personal preferences. This flexibility makes jester hat projects especially exciting for those who love imaginative crochet work.
Another appealing aspect of crocheting this hat is the opportunity to customize it for holidays, parties, or theatrical events. For example, you can make a Christmas version with red and green colors, a carnival-inspired hat with bright multi-color points, or a subtle pastel version for a baby costume. With a Crocheted jester hat – Pattern, the possibilities truly are endless, and the project remains simple enough for confident beginners while still being enjoyable for advanced crocheters.
1. Getting to Know the Structure of a Crocheted Jester Hat (H2)
A Crocheted jester hat – Pattern typically consists of a base hat shape and multiple playful points attached around the crown. The base is usually crocheted similarly to a standard beanie, starting from the top of the head and working downward in rounds. This round-based construction helps create a snug but comfortable fit that adapts well to different head sizes.
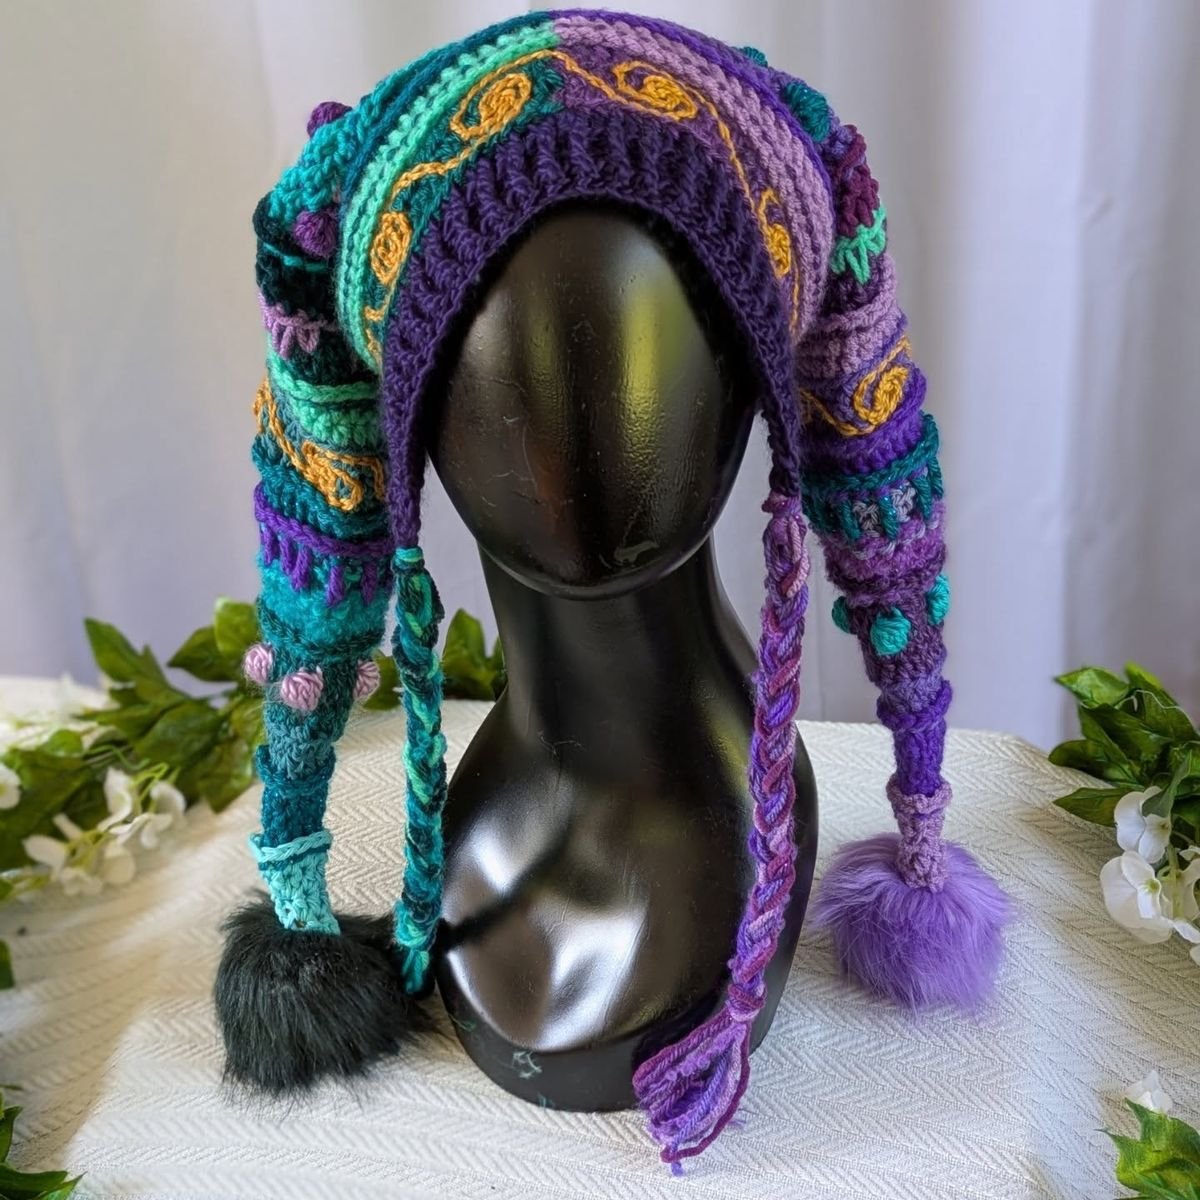
The jester points are the highlight of the design. They can vary in number—some hats include three long points, while others feature four, five, or even more for a more dramatic effect. Each point is usually crocheted separately as a tapered tube or triangle and then sewn or crocheted onto the base of the hat. The points can be stuffed lightly or left hollow for a floppy, whimsical look.
One important element in many Crocheted jester hat – Pattern designs is the addition of embellishments such as pom-poms, bells, or crochet balls at the end of each point. These add charm and movement to the hat, making it even more eye-catching. If you choose to add bells, ensure they are securely attached for safety, especially when making hats for children.
The structure of the hat also depends on your chosen stitch pattern. Simple stitches like single crochet create a dense and warm hat, while half double crochet or double crochet adds more stretch and a slightly looser texture. The points may include color changes or stripes for added visual interest.
Another structural consideration is the band or brim of the hat. Many crocheters like to finish the bottom with ribbing to ensure a snug fit. Ribbing can be worked using front and back post stitches or slip stitches to create elasticity. This helps the Crocheted jester hat – Pattern stay comfortably in place when worn.
Understanding the structure makes it easier to customize the hat. Once you know how the base and points come together, you can adjust length, width, number of points, and decoration ideas freely. This versatility is part of what makes jester hats so fun to create.
2. Materials and Tools You Will Need (H2)
Making a Crocheted jester hat – Pattern begins with choosing the right materials. Yarn selection is especially important for ensuring the hat holds its shape while remaining comfortable to wear. Medium-weight (worsted) yarn is an excellent choice because it provides enough structure for the jester points without being too heavy. Acrylic yarn is popular for its durability and wide range of colors, but cotton and wool blends can also be used depending on the desired feel.
The hook size typically ranges from 4.0 mm to 5.5 mm, depending on the yarn thickness and the tightness of your tension. Be sure to check your pattern’s gauge instructions to ensure the hat fits correctly. A properly matched gauge is essential because hats rely heavily on accurate sizing.
You will also need a yarn needle for sewing the points to the hat base and weaving in all the ends. Jester hats often involve multiple colors, which means there may be several yarn tails to secure. A sturdy yarn needle ensures clean, strong finishing.
Stitch markers are also useful for keeping track of round beginnings or increases. When working on the Crocheted jester hat – Pattern, especially during the top-down construction, markers help maintain symmetry and prevent mistakes.
If you plan to add pom-poms or bells, you will need additional accessories like a pom-pom maker or crafting bells. Pom-poms can be made from yarn scraps and add softness to the ends of the points, while bells add a charming musical touch.
Finally, scissors are essential for trimming ends, and a stuffing material—such as polyester fiberfill—may be needed if you want the jester points to stand upright. Without stuffing, the points will flop naturally, giving the hat a more playful appearance.
3. Step-by-Step Instructions to Create Your Jester Hat (H2)
The first step in your Crocheted jester hat – Pattern is creating the base. Begin with a magic ring and work several rounds of increases until the diameter matches the required head circumference. Once the crown is wide enough, continue working evenly to build the body of the hat to your desired length.
After finishing the hat base, it’s time to make the jester points. Each point begins with a small number of stitches at the tip and gradually increases or decreases depending on the desired shape. Some crocheters prefer long, narrow points, while others create shorter, triangular ones. You can also switch colors during the rounds to create stripes or alternating segments.
Once you finish each point, you can lightly stuff it if you want it to stand upright. If you prefer flexible points that hang down naturally, skip the stuffing step. This gives the Crocheted jester hat – Pattern a softer, more whimsical appearance.
Attach the points evenly around the hat’s crown using a yarn needle. Make sure they are spaced equally to keep the hat balanced. Secure the seams tightly to ensure durability, especially if the hat will be worn by children or used as part of active costumes.
Next, add any embellishments you want, such as pom-poms or bells. Pom-poms can be sewn directly onto the tip of each point, while bells should be attached firmly with several stitches for safety. These additions enhance the playful feel of the jester hat.
Finally, finish the hat by adding ribbing around the brim. This step makes the hat more comfortable and gives it a polished, wearable look. Ribbing also ensures the Crocheted jester hat – Pattern stays securely in place during use.
4. Fun Customization Ideas for Your Jester Hat (H2)
Customization is one of the most enjoyable parts of creating a Crocheted jester hat – Pattern. You can experiment with various color combinations to match holidays, costumes, or personal preferences. Bold, contrasting colors create a dramatic carnival-style look, while softer pastels are perfect for baby-themed versions.
Stitch patterns also offer creative ways to personalize the hat. You can create each point with a different stitch texture, such as bobbles, ridges, or lace. This adds depth and makes the hat visually unique. Mixing textures works especially well for adult-sized jester hats intended for events or artistic performances.
Adding accessories like beads or sequins is another option. These embellishments can be sewn onto the points or the body of the hat to create sparkle and character. Just be careful when adding small decorations to hats meant for children—safety always comes first.
You can also adjust the length and shape of the points. Long, curved points create a more dramatic effect, while short, triangular ones give the hat a classic jester look. You can even combine multiple shapes in one Crocheted jester hat – Pattern for a more eclectic design.
Another fun customization idea is to add earflaps to the hat. This transforms the jester hat into a warmer winter accessory while maintaining its playful aesthetic. Earflaps can be finished with braided ties, tassels, or crocheted cords.
Finally, consider creating matching jester-themed accessories like scarves, mittens, or a decorative collar. These extra touches make the hat part of a complete, creative costume or outfit.
FAQ – Crocheted Jester Hat
1. Is a jester hat difficult to crochet?
Not at all! Most Crocheted jester hat – Pattern designs are simple enough for confident beginners.
2. Can I make the hat in different sizes?
Yes, adjusting gauge and stitch count allows you to make baby, child, or adult sizes.
3. Should the jester points be stuffed?
Stuffing is optional. Stuff them for upright points or leave them empty for floppy ones.
4. What yarn works best?
Worsted-weight acrylic yarn is ideal for structure and color variety.
5. Can I wash a crocheted jester hat?
Yes, but follow your yarn label instructions—most acrylic yarns are machine washable.
6. Can I add bells safely?
Yes, as long as they are stitched securely and not used on items for very young children.
Conclusion
In this article, we explored how to create a Crocheted jester hat – Pattern, from understanding its structure to choosing materials, following step-by-step instructions, and adding creative customizations.
This playful hat design is a joy to make and offers endless ways to express your imagination.