If you love small, charming crochet projects that bring warmth and creativity to your day, the Crocheted Pumpkin Keychain – Pattern is an absolute must-try. This delightful crochet pattern captures the cozy essence of fall in a tiny, adorable pumpkin form. Whether you’re decorating your bag, gifting handmade items, or celebrating autumn in a unique way, this crochet pumpkin keychain is a perfect choice.
The Crocheted Pumpkin Keychain – Pattern is beginner-friendly and doesn’t take long to make. It’s the kind of project you can finish in less than an hour while using only small amounts of yarn — making it ideal for leftover scraps. Despite its simplicity, the result looks detailed, textured, and professional. Plus, the finished keychain makes a wonderful handmade gift for friends, teachers, or family members during the fall season or Halloween time.
In this article, you’ll learn everything about how to make a Crocheted Pumpkin Keychain – Pattern, including what materials you need, the step-by-step process, and creative ideas to customize your design. Whether you’re a crochet beginner or a seasoned crafter, this guide will help you create a little pumpkin that spreads seasonal cheer wherever it goes.
1. Why You’ll Love the Crocheted Pumpkin Keychain – Pattern
The Crocheted Pumpkin Keychain – Pattern is one of those small yet satisfying projects that instantly brings joy. It’s not only cute and practical but also incredibly versatile. You can use it as a keychain, a bag charm, or even a decorative piece for your workspace or car. It’s a small accessory that makes a big impact.
One of the reasons crocheters love this pattern is that it’s a perfect project for practicing amigurumi techniques. If you’ve always wanted to try crocheting small, stuffed shapes but didn’t know where to start, this little pumpkin offers the ideal introduction. You’ll learn how to crochet in the round, shape your piece, and stuff it evenly for a clean, polished result.
Another wonderful thing about the Crocheted Pumpkin Keychain – Pattern is that it’s quick and easy to make. You don’t need hours or days to complete it — even beginners can finish one in less than an hour. That makes it a great option for craft fairs, gifts, or last-minute fall decorations.
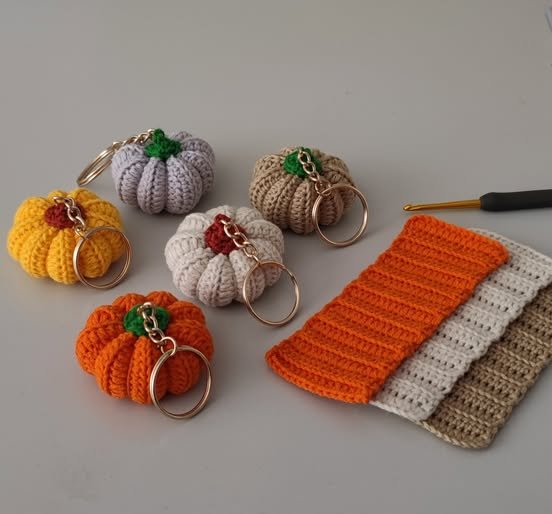
The pattern is also customizable. You can make your pumpkins in traditional orange, or get creative with pastel tones, metallic yarns, or bold colors for a modern twist. Add small details like a green leaf, brown stem, or even a tiny smiling face to give your pumpkin more personality.
Additionally, the materials for this project are minimal and inexpensive. All you need is yarn, a crochet hook, stuffing, and a key ring. It’s a budget-friendly craft that produces impressive results without requiring any complicated tools.
Lastly, making the Crocheted Pumpkin Keychain – Pattern is relaxing and rewarding. The repetitive stitches and soft yarn create a soothing rhythm, allowing you to unwind while making something beautiful and practical. It’s a small piece of autumn happiness you can carry wherever you go.
2. Materials Needed for the Crocheted Pumpkin Keychain – Pattern
Before starting your Crocheted Pumpkin Keychain – Pattern, gather all the materials you’ll need to make your mini pumpkin. The best part? You’ll likely already have most of them in your crochet kit.
First, choose your yarn. For a classic pumpkin look, use orange yarn for the body, green for the leaf or vine, and brown for the stem. Cotton yarn is the best choice for this project because it holds its shape well, is easy to work with, and gives a crisp, neat finish. However, you can also use acrylic yarn if you prefer a softer texture.
Next, select a crochet hook that matches your yarn weight. A hook size between 2.5 mm and 3.5 mm usually works best for small keychain projects. Using a slightly smaller hook than recommended on the yarn label helps ensure your stitches are tight enough to prevent stuffing from showing through.
You’ll also need fiberfill stuffing to give your pumpkin a plump, 3D shape. Be careful not to overstuff — just add enough to create firmness without distorting the stitches.
A yarn needle will come in handy for sewing the ends and shaping the pumpkin after stuffing. Scissors are, of course, essential for cutting yarn neatly.
Lastly, don’t forget the metal key ring or lobster clasp. You can find these in craft stores or online, and they attach easily to your finished pumpkin using a small loop of yarn or a chain stitch strap. With these few supplies, you’ll be all set to make your charming Crocheted Pumpkin Keychain – Pattern.
3. Step-by-Step Guide to Making the Crocheted Pumpkin Keychain – Pattern
Now let’s create your adorable Crocheted Pumpkin Keychain – Pattern step by step. Even if you’re new to crochet, these directions will help you make a perfectly shaped pumpkin every time.
Start with a magic ring using your orange yarn. Crochet six single crochets into the ring and pull it tight. This forms the base of your pumpkin. Continue working in rounds, increasing your stitch count gradually — for example, two single crochets in each stitch for round two, then alternating increases in round three until you reach the desired width of your pumpkin.
Once your pumpkin is wide enough, continue crocheting several rounds without increasing to build height. This forms the body. When it’s tall enough, begin decreasing your stitches symmetrically to close the top, leaving a small opening for stuffing.
Lightly fill the pumpkin with fiberfill stuffing, then finish closing it completely. Weave the yarn through the top stitches and pull tight to shape the pumpkin. To give it that classic segmented pumpkin look, thread a long piece of yarn through the top and bottom several times, pulling gently to create the ridges around the sides.
Next, use brown yarn to crochet a small stem. You can make it by chaining four stitches and slip-stitching back or creating a short tube shape. Attach it securely to the top of your pumpkin. Add a small green leaf or vine if you’d like — just a simple chain with a few single crochets will do.
Finally, attach your metal key ring. Crochet a small loop using orange or green yarn, then connect it firmly to the top of your pumpkin. Now your Crocheted Pumpkin Keychain – Pattern is complete and ready to brighten up your keys, bags, or even gift boxes.
4. Creative Variations for the Crocheted Pumpkin Keychain – Pattern
The Crocheted Pumpkin Keychain – Pattern is wonderfully versatile. Once you’ve mastered the basic version, you can experiment with different variations to suit your style, the season, or your intended recipient.
For a festive fall look, stick to traditional autumn shades like burnt orange, mustard yellow, and deep green. If you want a Halloween-inspired design, use black yarn to embroider a tiny jack-o’-lantern face onto your pumpkin. It’s a fun way to celebrate the spooky season without being too complicated.
You can also create pastel pumpkins for a softer, modern aesthetic. Try light pink, cream, mint, or lavender yarn — these make adorable year-round accessories and gifts. Add a little sparkle by using metallic or glittery yarn for the stem or vine.
If you enjoy making mini amigurumi, turn your Crocheted Pumpkin Keychain – Pattern into a character. Add safety eyes, a smiling mouth, and tiny blushed cheeks to give your pumpkin a cute personality. These “kawaii” style pumpkins are always a hit with kids and collectors alike.
Another creative option is to crochet a set of pumpkins in different sizes and colors. Attach them all to one key ring for a more playful, layered look. You can even make a matching set of pumpkin earrings or charms to go with your keychain.
Finally, if you sell handmade crafts, consider offering these crocheted pumpkin keychains at local markets or online. They’re small, lightweight, and quick to make, which means you can create several in a day and offer them at an affordable price — a great way to share your crochet skills with others.
FAQ About the Crocheted Pumpkin Keychain – Pattern
1. Is the Crocheted Pumpkin Keychain – Pattern suitable for beginners?
Yes! It uses simple stitches like single crochet and basic shaping, making it perfect for those new to crochet.
2. How long does it take to make one pumpkin keychain?
On average, about 30 to 60 minutes, depending on your crochet speed and level of detail.
3. What kind of yarn works best for this pattern?
Cotton yarn is recommended because it holds shape well, but acrylic yarn also works fine for a softer finish.
4. Can I wash my crocheted keychain?
Yes, you can gently hand wash it with mild soap and air dry, especially if it’s made from cotton.
5. How do I attach the key ring securely?
Use a sturdy yarn loop or chain stitch strap, and make sure it’s fastened tightly to the pumpkin’s top.
6. Can I sell items made with this pattern?
Yes, as long as you’ve made them yourself and not copied another designer’s copyrighted version.
Conclusion
The Crocheted Pumpkin Keychain – Pattern is a fun, fast, and fulfilling project that brings the spirit of autumn to life in the palm of your hand. It’s an easy way to practice crochet techniques while creating something adorable and useful.
From simple orange pumpkins to creative pastel or Halloween-inspired versions, the design possibilities are endless. Whether you make them for yourself, as thoughtful gifts, or as handmade items to sell, these mini crochet pumpkins will always bring smiles.
Now that you’ve learned how to make your own Crocheted Pumpkin Keychain – Pattern, it’s time to grab your hook and start crafting! Don’t forget to share your honest opinions, creative suggestions, or new pattern ideas below — your feedback helps inspire other crafters and keeps the crochet community growing with joy and creativity.