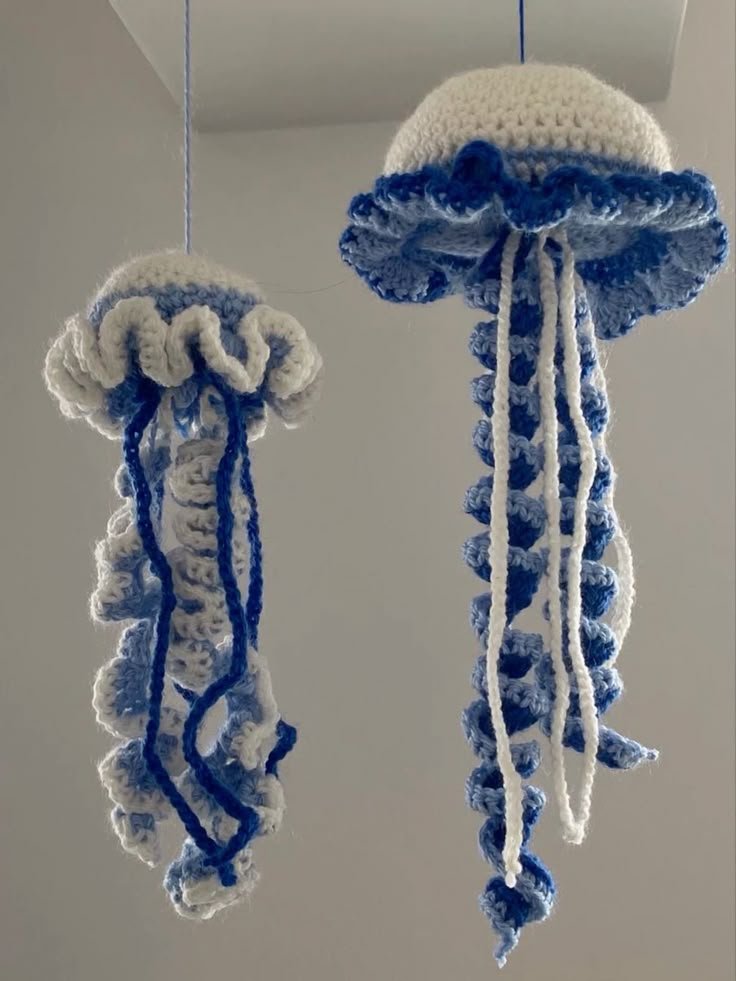
Crocheting a large jellyfish – Pattern is one of the most rewarding underwater-themed projects a fiber artist can undertake, offering a perfect blend of sculptural design and whimsical movement. When you decide to start crocheting a large jellyfish, you are not just making a simple toy; you are creating a statement piece of home decor or a comforting “lovey” for a child that mimics the soothing motion of the ocean. This large jellyfish pattern is particularly popular because it allows for immense creativity in the tentacles, where you can experiment with spirals, curls, and various textures to bring your aquatic creature to life.
Whether you are an experienced maker or an enthusiastic beginner, following a Crochet jellyfish – Pattern requires a bit of patience and a love for “amigurumi” techniques, which involves crocheting in the round to create 3D shapes. The beauty of Crocheting a large jellyfish lies in its impressive scale, which makes the finished product feel substantial and professional. Unlike smaller versions, a large-scale crochet pattern gives you more surface area to play with color gradients, embroidery details for the face, and even the addition of internal lights or rattles to make the jellyfish interactive and unique.
To successfully master Crocheting a large jellyfish – Pattern, you must focus on the structural integrity of the “bell” (the top part) and the fluidity of the “oral arms” and tentacles hanging below. Using the right materials is crucial for ensuring that your giant jellyfish maintains its dome shape without sagging under the weight of the long, curly appendages. Throughout this guide, we will break down the essential steps, from selecting the softest chenille yarn to the final assembly of the tentacles, ensuring that your journey into the deep sea of crochet patterns is smooth, enjoyable, and leads to a stunning finished masterpiece.
1. Selecting Materials for Crocheting a Large Jellyfish – Pattern
When you begin Crocheting a large jellyfish – Pattern, the yarn you choose will dictate the final personality and feel of your sea creature. Many crafters prefer using a super bulky velvet yarn or chenille-style yarn because these materials create a plush, huggable texture that hides small stitch imperfections. Because this is a large pattern, using a thicker yarn also helps the project grow quickly, allowing you to finish your giant crochet jellyfish in a fraction of the time it would take with standard cotton.
The hook size is equally important when working on this Crocheting a large jellyfish – Pattern. Generally, you should use a hook that is slightly smaller than what the yarn label suggests to ensure your stitches are tight enough to keep the polyester stuffing from peeking through. A tight tension is the hallmark of a high-quality amigurumi pattern, especially when creating a dome as large as the one required for a jellyfish. If your stitches are too loose, the bell might lose its rounded shape and look deflated.
Safety eyes are a popular choice for adding a cute expression to your large jellyfish, but for very large projects, you might consider crocheted eyes or felt cutouts. Since a large jellyfish pattern can result in a toy that is quite heavy, ensuring that the eyes are securely fastened or embroidered is vital for longevity. If you are gifting this to a baby, always opt for embroidered features to avoid any choking hazards associated with plastic parts.
The internal structure of your Crocheting a large jellyfish – Pattern needs a significant amount of high-quality fiberfill stuffing. Because the bell of a large jellyfish is wide, you may want to insert a circular piece of plastic canvas or a fabric “pouch” for the stuffing at the bottom to prevent it from sagging over time. This extra step ensures that your handmade jellyfish remains looking brand new even after years of display or play.
Don’t forget the importance of stitch markers when working through the rounds of your large jellyfish pattern. In the world of crochet amigurumi, it is incredibly easy to lose your place during the increase rounds of a wide circle. A simple piece of contrasting scrap yarn or a plastic clip will save you hours of frustration by marking the start of each new row in your crochet project.
Lastly, consider your color palette before you start Crocheting a large jellyfish – Pattern. Variegated yarns can mimic the bioluminescence of real deep-sea creatures, while soft pastels are perfect for a nursery-themed ocean crochet project. Choosing two or three coordinating shades—one for the top of the bell and others for the varying styles of tentacles—will give your large jellyfish a professional, layered look that stands out.
2. Mastering the Dome Shape of the Large Jellyfish Pattern
The foundation of Crocheting a large jellyfish – Pattern is the “bell,” which is essentially a large, half-sphere created using magic ring increases. You begin with a small circle and gradually add stitches in a mathematical sequence (like 6, 12, 18, 24) to expand the diameter smoothly. Mastering this increasing technique is the most important part of the pattern, as it creates the smooth, non-lumpy surface that characterizes a beautiful crochet jellyfish.
Once you reach the desired diameter for your large jellyfish, you will perform several rounds of “even” stitches—meaning one single crochet in each stitch from the previous row. These rounds add depth to the bell, transforming your flat circle into a deep bowl shape. In a large jellyfish pattern, these rounds are the perfect time to “zone out” and enjoy the rhythmic flow of the hook, as there is no counting required for the increases.
Texture can be added to the bell of your Crocheting a large jellyfish – Pattern by using the front loop only (FLO) technique on certain rounds. This creates a small ridge that mimics the natural segments found on real jellyfish in the wild. If you want a more whimsical look, you can also incorporate bobble stitches or popcorn stitches near the bottom edge of the dome to give your crochet creature extra tactile interest.
The bottom plate of the jellyfish is a separate flat circle that will eventually be joined to the bell. When Crocheting a large jellyfish – Pattern, this bottom piece is usually slightly smaller than the widest part of the dome to create a “tucked-in” look. This is also the surface where you will later attach all the tentacles, so keeping the stitches clean and easy to identify is essential for the assembly phase.
As you reach the end of the bell section, you might want to add a decorative “ruffle” or scalloped edge. This is achieved by working multiple stitches, such as half-double crochets or double crochets, into a single stitch around the perimeter. This ruffle adds a layer of feminine charm to the Crocheting a large jellyfish – Pattern and hides the seam where the top and bottom pieces meet.
Before closing the dome, ensure you have stuffed your large jellyfish firmly but not to the point where the stitches stretch and show gaps. A well-stuffed crochet bell should feel like a firm pillow. If you are making a weighted jellyfish, this is also the moment to add a small bag of poly-pellets at the base to give the jellyfish a satisfying weight and help it sit upright on a shelf.
3. Creating Spirals and Tentacles for the Jellyfish
The most fun part of Crocheting a large jellyfish – Pattern is undoubtedly the tentacles, as they provide the movement and “wow” factor. To create the classic curly crochet spiral, you simply chain a long string and then work three or four single crochets into every single chain stitch. This forced overcrowding of stitches causes the piece to twist automatically into a perfect corkscrew, which looks magical on a large jellyfish.
For a large jellyfish pattern, you should aim for a variety of tentacle lengths and thicknesses to create a realistic, layered effect. I recommend making at least three different styles: the thick corkscrew spirals, thin “straight” dangling chains, and perhaps a few wider “ribbon” tentacles. Mixing these styles ensures that your Crocheting a large jellyfish project doesn’t look flat or repetitive when viewed from different angles.
The “oral arms” are the thicker, frilly parts that hang from the center of the jellyfish. In your Crocheting a large jellyfish – Pattern, these are often made by crocheting a wide strip and adding a heavy ruffle to the edges. Because these sit in the middle of the tentacle cluster, they provide a core of volume that makes the jellyfish look much more substantial and “high-end.”
Attaching the tentacles is a process that requires a tapestry needle and a bit of planning. Instead of attaching them all to the center, spread them out across the bottom plate of your large jellyfish. Placing the longest tentacles in the middle and the shorter, curlier ones around the edges creates a beautiful “waterfall” effect that enhances the visual design of the pattern.
Color play is essential during this stage of Crocheting a large jellyfish – Pattern. You can use a gradient yarn (ombre) for the tentacles so they transition from dark to light, or use a completely different color for the spirals to make them stand out against the main body. This is where your creative crochet skills really shine, as no two jellyfish will ever look exactly the same.
Durability is key for the tentacles of a large jellyfish pattern. Since people (especially kids) love to pull on the curls, make sure you double-knot your yarn tails on the inside of the bottom plate before you sew the jellyfish shut. A securely attached tentacle ensures that your Crocheting a large jellyfish masterpiece remains intact for years of snuggling and display.
4. Final Assembly and SEO Tips for Crochet Projects
The final step in Crocheting a large jellyfish – Pattern is joining the top dome to the bottom plate. Most patterns suggest using a slip stitch join or a whipstitch with a yarn needle. As you close the gap, make sure all your tentacle “roots” are tucked neatly inside. This final seam is what transforms the individual pieces into a cohesive, professional large crochet jellyfish.
Once the assembly is done, it’s time to “groom” your jellyfish. Pull on each spiral to define the curls and ensure the stuffing is distributed evenly throughout the bell. If your Crocheting a large jellyfish – Pattern looks a little lopsided, you can gently massage the fiberfill into place through the stitches. This attention to detail is what separates a beginner project from a boutique-quality crochet item.
If you are a blogger or seller, taking high-quality photos of your large jellyfish is the best way to optimize your content for SEO. Use natural lighting and a clean background to show off the texture of the yarn stitches. Including keywords like “DIY Large Jellyfish” or “Amigurumi Sea Creature Pattern” in your image alt-text helps your Crocheting a large jellyfish – Pattern rank higher in search engines.
Using social media to share your progress is also a great SEO strategy for crafters. Posting “Work in Progress” (WIP) shots of your large jellyfish pattern on platforms like Instagram or Pinterest creates anticipation. Always link back to your main article or shop, using the primary keyword Crocheting a large jellyfish – Pattern in your captions to drive organic traffic.
For those looking to sell their finished work, consider the “unboxing” experience. Wrapping your large jellyfish in tissue paper with a small “handmade with love” tag adds value. Mentioning in your online listing that you followed a specialized crochet pattern also builds trust with potential customers who appreciate the effort that goes into large-scale amigurumi.
Finally, always keep a copy of your notes on the specific yarn brands and hook sizes you used. If you decide to make another large jellyfish in the future, having your personal modifications to the original pattern will make the process much faster. Crocheting a large jellyfish – Pattern is a journey of color and texture that gets easier and more rewarding every time you pick up your hook.
FAQ – Frequently Asked Questions
1. How much yarn do I need for Crocheting a large jellyfish – Pattern?
For a truly large jellyfish, you will likely need 2 to 3 skeins (about 300-400 meters) of bulky yarn. The tentacles consume a surprising amount of yarn because the spirals require you to work many stitches into a single chain.
2. Can I use scrap yarn for this large jellyfish pattern?
Yes! A “scrap-ghan” style jellyfish is a wonderful way to use up leftover yarn. You can make each tentacle a different color, which gives the Crocheting a large jellyfish project a fun, bohemian look.
3. How do I make the tentacles extra curly?
The secret to the corkscrew effect is the number of stitches. If you put 2 stitches in each chain, it will be a loose wave. If you put 4 stitches in each chain, it will be a tight, bouncy spiral.
4. Is Crocheting a large jellyfish – Pattern suitable for children?
Yes, but safety is paramount. Use embroidered eyes instead of plastic safety eyes if the toy is for a child under three. Also, ensure all tentacles are sewn on very tightly to prevent them from being pulled off.
5. How long does it take to finish a large jellyfish?
Depending on your speed, a large-scale crochet jellyfish typically takes between 6 to 10 hours. The bell is fast, but the many tentacles can be time-consuming to complete.
6. Can I add lights to my crochet jellyfish?
Absolutely! You can place battery-operated LED fairy lights inside the bell before you sew it shut. Just make sure the battery pack is accessible or use a light string that stays cool to the touch.
Conclusion
In this article, we have dived deep into the art of Crocheting a large jellyfish – Pattern, covering everything from the best velvet yarns to the technical details of creating the perfect spiral tentacles.
We learned that the secret to a professional-looking jellyfish lies in tight tension, variety in tentacle design, and the careful assembly of the bell and bottom plate. By following these steps, you can create a stunning, oversized sea creature that brings a touch of oceanic magic into any room.