The Cross Crochet – Pattern is one of the most visually striking techniques you can add to your fiber arts repertoire, offering a unique texture that stands out in any project. Whether you are looking to create a breathable summer garment or a sturdy home decor item, mastering this specific stitch pattern allows you to elevate your work from simple to professional. In this guide, we will explore everything you need to know to execute this beautiful design with precision and style.
Learning the Cross Crochet – Pattern requires a bit of patience at first, but once you find your rhythm, the process becomes incredibly meditative. The beauty of this crochet technique lies in the way the stitches lean over one another, creating a “X” shape that adds structural integrity and a sophisticated aesthetic to your handmade projects. This article is designed to provide you with all the necessary tools and explanations to ensure your next creation is a resounding success.
If you are a content creator or a hobbyist looking for SEO-friendly crochet tutorials, understanding the mechanics of the Cross Crochet – Pattern is essential. By following this detailed breakdown, you will learn how to manipulate your hook and yarn to achieve that signature crossed look while maintaining a consistent stitch tension. Let’s dive into the technical aspects and the step-by-step instructions needed to master this versatile fiber art skill.
1. Understanding the Foundation of the Cross Crochet – Pattern
The Cross Crochet – Pattern is fundamentally built upon the concept of skipping a stitch and then working back into it. This creates a diagonal overlap that forms the iconic crossed stitch look. Unlike standard rows of single or double crochet, this method introduces a dynamic geometry to the fabric that is both modern and timeless.
To begin your Cross Crochet – Pattern, you must first establish a foundation chain that accommodates the multiple required for the stitch. Usually, an even number of chains is preferred to ensure the “X” shapes align perfectly across the row. Choosing the right yarn weight is also crucial, as thinner yarns highlight the delicate gaps, while bulkier yarns create a dense, cozy texture.
The primary charm of the Cross Crochet – Pattern is its versatility across different crochet projects. It works beautifully for crochet blankets, lightweight scarves, and even decorative pillow covers. Because the stitches are slightly raised, the finished fabric has a wonderful tactile quality that makes it feel premium and carefully crafted.
When working on this handicraft, you will notice that the height of the stitch depends on whether you are using crossed double crochet or crossed treble crochet. The taller the stitch, the more dramatic the “X” becomes. This flexibility allows you to customize the crochet design to fit the specific needs of your garment or accessory.
One of the most important crochet tips for this pattern is to keep your loops slightly loose. If the tension is too tight, the crossed element will pull the fabric inward, causing it to pucker. Maintaining a relaxed hand ensures that the Cross Crochet – Pattern lies flat and showcases the intricate detail of the overlapping threads.
Finally, remember that the Cross Crochet – Pattern is often reversible, making it an excellent choice for items where both sides will be visible. By practicing the stitch placement, you will soon be able to incorporate this technique into your own original crochet patterns and share them with the global crafting community.
2. Step-by-Step Guide to Executing the Cross Crochet – Pattern
To start the actual Cross Crochet – Pattern, skip the first stitch of the row and work a double crochet into the next stitch. This creates the first half of the cross. It may feel counterintuitive to leave a gap, but this space is necessary for the “return” stitch that defines the entire look.
The magic happens in the next step: work another double crochet into the stitch you just skipped. You will be working “behind” or “over” the first stitch. This creates the intersection that defines the Cross Crochet – Pattern. It is important to insert your hook cleanly into the skipped chain to avoid splitting the yarn fibers.
As you continue across the row, repeat this process of skipping and returning. Consistency is the hallmark of a high-quality handmade crochet item. Ensure that each “X” is roughly the same size as the one before it. This uniformity is what gives the Cross Crochet – Pattern its professional, store-bought appearance despite being made by hand.
When you reach the end of a row in the Cross Crochet – Pattern, it is standard practice to finish with a regular double crochet in the last stitch. This provides a clean, straight edge for your project, which is especially helpful if you plan on adding a crochet border or sewing multiple pieces together later.
Turning your work involves a standard turning chain—usually three chains for a double crochet height. On the return row, you can either repeat the Cross Crochet – Pattern or work a row of single crochet to stabilize the fabric. Mixing these rows can create a beautiful striped texture that highlights the crossed sections even more.
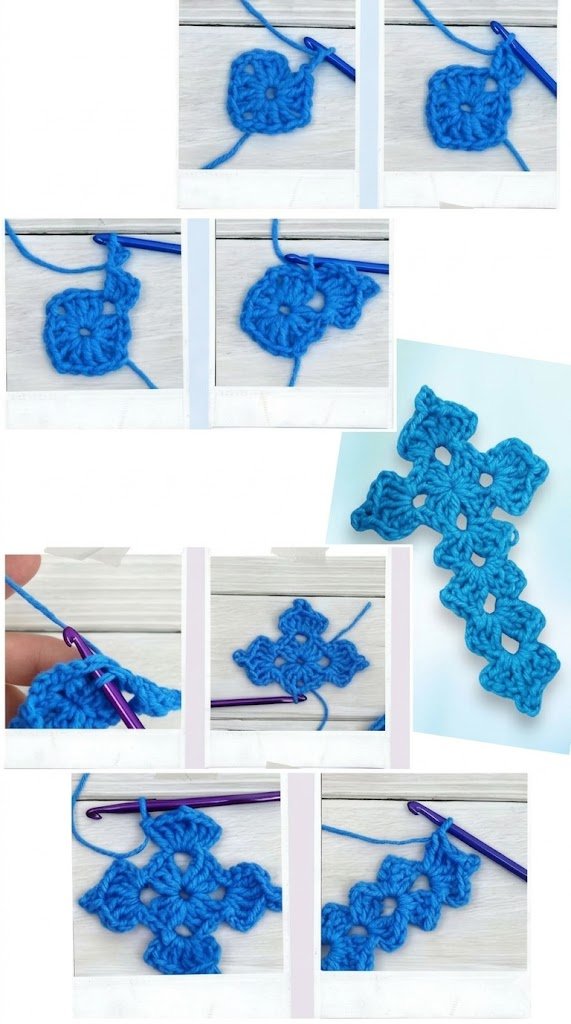
For those looking to optimize their crochet blog content, taking clear, high-resolution photos of these steps is vital. Showing the hook placement during the “return” stitch helps beginners understand the three-dimensional nature of the Cross Crochet – Pattern, making your tutorial a go-to resource for fiber enthusiasts worldwide.
3. Advanced Variations and Colorwork in Cross Crochet – Pattern
Once you are comfortable with the basic Cross Crochet – Pattern, you can experiment with tapestry crochet techniques to introduce multiple colors. By carrying a second strand of yarn, you can make the “X” shapes pop in a contrasting hue, creating a vibrant and modern crochet aesthetic.
Another variation involves the Crossed Half Double Crochet, which creates a shorter, tighter version of the “X”. This is perfect for crochet accessories like headbands or tech sleeves where you want less “hole” and more protection. The Cross Crochet – Pattern adapts remarkably well to different heights and stitch styles.
You can also try the Raised Cross Stitch, where you work around the post of the stitch rather than into the top loops. This creates a textured crochet effect that is very popular in cabled crochet designs. It adds a level of sophistication to the Cross Crochet – Pattern that is sure to impress your audience or customers.
Incorporating beads into crochet is another way to enhance this pattern. By sliding a bead onto the yarn before making the second half of the cross, you can nestle a sparkling detail right at the center of the “X”. This turns a simple Cross Crochet – Pattern into a luxury piece suitable for evening wear or holiday decor.
For those interested in sustainable crafting, using recycled cotton yarn or upcycled materials for this pattern is a great idea. The structural strength of the Cross Crochet – Pattern makes it ideal for heavy-duty items like market bags or rugs, where durability is just as important as visual appeal.
Don’t be afraid to scale the pattern up. Using a giant hook and t-shirt yarn with the Cross Crochet – Pattern allows you to create chunky, oversized baskets or floor poufs very quickly. The large scale of the stitches makes the crossed detail look like architectural art, proving the versatility of this timeless crochet stitch.
4. Troubleshooting and Finishing Tips for Your Pattern
A common issue with the Cross Crochet – Pattern is “leaning” edges. If your piece looks like a parallelogram instead of a rectangle, check your turning chains. Ensure you aren’t accidentally adding or losing stitches at the beginning or end of your crochet rows.
If you find that your Cross Crochet – Pattern is too “gappy,” try dropping down a hook size. Sometimes the natural stretch of the crossed stitch can create larger holes than desired. A smaller hook will tighten the stitch definition and make the “X” look more crisp and pronounced.
Blocking your finished work is a crucial step for any Cross Crochet – Pattern project. Because the stitches overlap, they can sometimes look a bit bunched up right off the hook. Pinning your project to size and lightly steaming it will “set” the crosses, allowing the yarn drape to look its absolute best.
When it comes to weaving in ends, be extra careful with this pattern. Because of the open nature of the crosses, ends can sometimes peek through. Use a tapestry needle to hide the yarn tails inside the densest part of the stitches to ensure a clean finish on both sides of your crochet work.
If you are writing your own crochet pattern to sell, make sure to specify if the cross is worked “front-to-back” or “back-to-front.” This small detail changes the look of the overlap. Being specific in your technical crochet writing helps other crafters replicate your results with the Cross Crochet – Pattern accurately.
Always remember that practice makes perfect. The Cross Crochet – Pattern is a skill that rewards consistency. Spend some time making a small swatch before starting a large project to find the perfect combination of yarn, hook, and tension. This preparation is the secret to creating high-quality crochet items every time.
FAQ: Common Questions About the Cross Crochet – Pattern
How many chains do I need to start the Cross Crochet – Pattern?
Most variations of this pattern require an even number of chains. This allows for pairs of stitches to cross over each other throughout the row. Always check your specific crochet pattern instructions for any additional turning chains required.
Can a beginner try the Cross Crochet – Pattern?
Yes! If you know how to do a basic double crochet, you can learn this. The most challenging part is simply remembering to work into the skipped stitch, but once you do it a few times, it becomes second nature.
Does this pattern use more yarn than regular stitches?
Surprisingly, the Cross Crochet – Pattern uses about the same amount of yarn as standard double crochet rows. While the stitches overlap, they cover the same surface area, making it an efficient way to add texture without wasting materials.
What is the best yarn for a Cross Crochet – Pattern blanket?
A smooth, plied yarn like merino wool or a high-quality acrylic is best. Avoid extremely fuzzy or “eyelash” yarns, as they will hide the beautiful “X” detail that makes this crochet stitch so special.
Is the Cross Crochet – Pattern the same as the Cable Stitch?
While they look similar, they are different. Crochet cables usually involve post stitches and more complex skipping, while the cross stitch is a simpler overlap of standard stitches. Both add great texture to fiber arts.
Conclusion
Mastering the Cross Crochet – Pattern is a fantastic way to expand your skills and create beautiful, textured pieces that look much more complex than they actually are. We have covered the foundations of setting up your rows, the step-by-step execution of the “X” shape, advanced variations for color and texture, and essential finishing tips to ensure your work looks professional. This crochet technique is a staple for anyone serious about handicrafts and high-quality DIY tutorials.
We hope this guide has inspired you to pick up your hook and start a new project today. Whether you are making a simple scarf or a complex heirloom blanket, the Cross Crochet – Pattern will undoubtedly add a touch of elegance to your work.