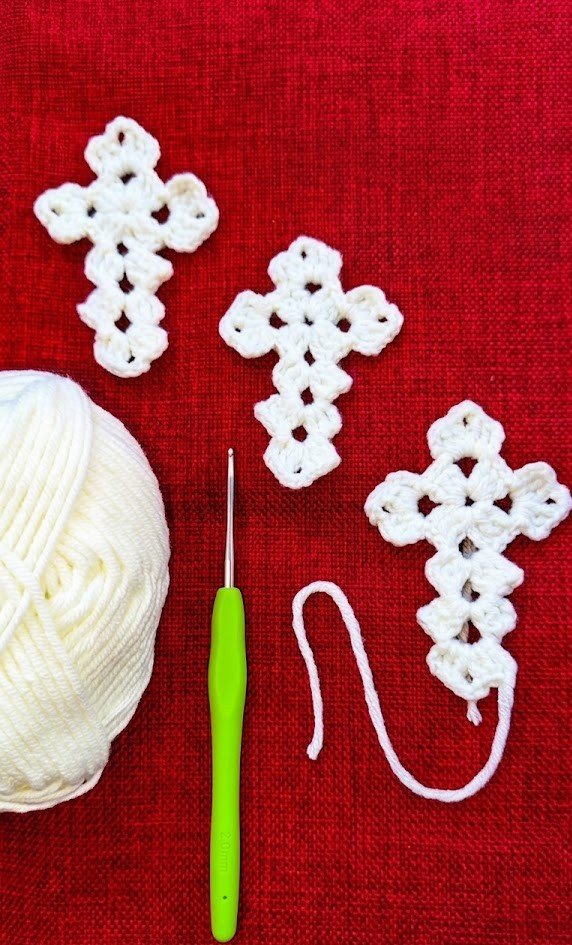
Cross Crochet enthusiasts and beginners alike often find that searching for the perfect Pattern is the first step toward creating a meaningful, handmade heirloom. This unique technique combines the traditional art of crochet with the symbolic shape of the cross, resulting in beautiful items ranging from bookmarks and wall hangings to intricate lace overlays for special occasions. Whether you are looking to create a gift for a religious milestone or simply enjoy the geometric challenge of the design, understanding the fundamentals of this craft is essential for a polished finish.
The beauty of a Cross Crochet project lies in its versatility and the way a simple Pattern can be adapted for various skill levels. By using different yarn weights and hook sizes, a crafter can transform a delicate thread cross into a sturdy, large-scale piece of textile art. Many artisans appreciate the rhythmic nature of the stitches required to form the horizontal and vertical bars, making it a meditative process that rewards patience and precision. As you explore the possibilities of this niche, you will discover that the structural integrity of the stitches is just as important as the aesthetic appeal.
Setting out to master the Cross Crochet method requires a bit of preparation and a clear Pattern to follow. In this comprehensive guide, we will break down the essential terminology, the technical steps for success, and how to optimize your workspace for these specific designs. From choosing the right materials to finishing your edges with professional flair, every detail contributes to the final impact of your work. Let’s dive into the specifics of creating these iconic shapes and explore how you can elevate your stitching game to produce gallery-quality results.
1. Understanding the Fundamentals of Cross Crochet
The term Cross Crochet refers to a specialized niche within the fiber arts where the primary goal is to create the silhouette or texture of a cross. This can be achieved through various methods, such as filet crochet, where open meshes and solid blocks form a picture, or by physically crocheting two rectangular bars and joining them. Understanding the geometry of the Pattern is the first step toward ensuring your finished piece looks symmetrical and professional.
A high-quality Pattern for this type of work usually specifies the exact count of double crochet or single crochet stitches needed to maintain the proportions of the arms. Because the cross is a geometric shape, even a single misplaced stitch can make the design look tilted or uneven. Most creators prefer using a graph or a chart alongside written instructions to visualize the placement of every block and space.
When working on a Cross Crochet piece, tension is your most valuable asset. If your tension is too loose, the Pattern might lose its crisp edges and appear saggy when hung or used. Conversely, very tight tension can make the fabric curl. Finding a middle ground ensures that the cross maintains its iconic shape throughout the life of the item, whether it’s a bookmark or a tablecloth.
The materials you choose for your Cross Crochet project will significantly influence the final look. For instance, using mercerized cotton thread provides a classic, lace-like appearance that is perfect for traditional Pattern designs. If you prefer a more modern, rustic feel, a medium-weight acrylic or wool yarn can give the cross a bold, 3D effect that stands out on blankets or pillows.
In many modern interpretations, Cross Crochet also refers to the “crossed double crochet” stitch, where stitches are worked out of order to create an ‘X’ texture. While this adds a lovely decorative element to any Pattern, it is distinct from the symbolic shape-making. Beginners should clarify which style they are aiming for before purchasing supplies, as the technical requirements for each can vary slightly.
Finally, remember that every Pattern is a roadmap, but you are the driver. You can customize a Cross Crochet design by adding picot borders, incorporating beads, or using variegated yarn to create a stained-glass effect. The key is to start with a solid foundation of basic stitches and build your complexity as your confidence grows in handling the specific structural demands of the shape.
2. Navigating Your Crochet Pattern for Success
Reading a Cross Crochet instruction set can feel like learning a new language, but once you decode the abbreviations, the Pattern becomes a clear set of directions. Common terms like ch (chain), dc (double crochet), and sl st (slip stitch) are the building blocks of almost every design. Before starting, it is a great practice to read through the entire document to identify any special stitches or unique construction methods required.
The gauge of your Pattern is another critical factor that determines the final size of your Cross Crochet work. If the designer used a specific hook size to achieve a 10cm square, and your tension is different, your cross might end up much larger or smaller than intended. Always take the time to crochet a small swatch to ensure your measurements align with the designer’s vision for the piece.
One of the most common challenges in a Cross Crochet project is the transition between the vertical post and the horizontal arms. A well-written Pattern will guide you on how to increase your stitch count or join new yarn to create the side bars without leaving gaps. Precision during these rows is what separates a beginner’s work from an expert’s, as the transition points are often where errors are most visible.
Colorwork can also play a major role in your Pattern execution. Using tapestry crochet techniques, you can work the Cross Crochet design in a contrasting color to the background, making the symbol pop. This requires carrying the non-working yarn behind your stitches, which adds thickness to the fabric and ensures the Pattern is visible from both sides of the work.
As you progress through the Pattern, using stitch markers can prevent a lot of frustration. Marking the center stitch or the beginning of an arm allows you to quickly verify your counts without recounting from the very first row. In Cross Crochet, where symmetry is paramount, these little plastic tools are essential for maintaining the balance of your Pattern as the project grows.
Blocking is the final, often overlooked step in fulfilling the potential of your Pattern. Once the Cross Crochet piece is off the hook, it may look slightly distorted. By pinning it to a blocking board and lightly steaming it or wetting it, you “set” the stitches into their final position. This ensures the cross is perfectly straight and the edges are crisp, showcasing your hard work in its best light.
3. Essential Techniques for a Perfect Finish
To achieve a professional look in Cross Crochet, you must master the art of the invisible join. When you finish a round or a section of the Pattern, simply pulling the yarn through can leave a noticeable knot. Using a darning needle to mimic a stitch at the end of the row creates a seamless edge that makes the start and end of your cross impossible to find.
Another vital technique is the foundation chainless start. Many Cross Crochet designs begin with a long chain, which can often be too tight and cause the bottom of the Pattern to curve. By learning the foundation double crochet, you create the chain and the first row of stitches simultaneously, allowing for much better elasticity and a straighter base for your cross.
Weaving in ends is a chore, but in a delicate Cross Crochet piece, it is also a technical necessity. If you are working a lace Pattern, you must weave the yarn tails through the densest parts of the stitches to hide them effectively. A secure weave ensures that your cross won’t come unraveled after the first wash, preserving the Pattern for generations.
For those creating a Cross Crochet wall hanging, adding a stiffening agent can help the Pattern hold its shape against gravity. A mixture of water and white glue or a commercial fabric stiffener can be applied to the finished cross. This is particularly useful for intricate designs where the thin threads might otherwise fold or limp when displayed on a wall or Christmas tree.
Edge detailing can transform a basic Pattern into something extraordinary. Adding a simple crab stitch (reverse single crochet) or a scalloped shell border around the perimeter of the Cross Crochet design adds a frame that draws the eye inward. It provides a finished, “boutique” look that highlights the geometric precision of the central cross shape.
Lastly, always check your work against the light. Because Cross Crochet often involves negative space, holding your piece up to a window can reveal any missed stitches or inconsistencies in your Pattern that aren’t obvious on a flat surface. Identifying these small issues early allows you to “frog” (unravel) a small section rather than discovering a mistake once the entire project is completed.
4. Scaling and Adapting Your Crochet Projects
One of the most exciting aspects of Cross Crochet is that a single Pattern can be used for multiple purposes. By simply changing the yarn from a fine size 10 thread to a bulky weight yarn, a bookmark design can be scaled up to become a decorative rug or a centerpiece. This versatility allows crafters to get maximum value out of a single high-quality Pattern.
If you are adapting a Cross Crochet design for a baby blanket, safety and softness become the priorities. In this case, you would choose a Pattern with fewer “holes” or gaps to prevent little fingers from getting caught. Using a soft cotton blend ensures the cross remains comfortable against the skin while still maintaining the structural clarity of the design.
For more advanced crafters, combining Cross Crochet with other techniques like Irish Crochet or Broomstick Lace can create a stunning mixed-media effect. You might use a traditional Pattern for the central symbol and then surround it with 3D floral motifs. This elevates the cross from a simple geometric shape to the centerpiece of a complex artistic composition.
Seasonal adaptations are also popular in the world of Cross Crochet. You can adjust your Pattern to include festive colors—like gold and white for Easter or deep greens and reds for the holiday season. Adding metallic thread into your stitches can give the cross a subtle shimmer, making it a perfect gift that looks expensive and thoughtfully crafted.
When scaling a Pattern, remember that your hook size must move in tandem with your yarn. A common mistake is using a hook that is too small for bulky yarn, which makes the Cross Crochet fabric too stiff and uncomfortable. Always refer to the yarn label for the recommended hook, but don’t be afraid to go up half a size if you want the cross to have more drape.
Finally, documenting your adaptations is a gift to your future self. If you modify a Cross Crochet instruction to fit a specific frame or to use a different stitch, write those changes down directly on your Pattern. This ensures that if you ever want to replicate that specific cross again, you won’t have to rely on memory to recreate the magic of your unique design.
Frequently Asked Questions (FAQ)
Q: Is Cross Crochet suitable for absolute beginners?
A: Yes! While some designs look complex, many Cross Crochet projects use basic stitches. If you can do a chain and a double crochet, you can follow a simple Pattern to create a beautiful cross.
Q: What is the best yarn for a Cross Crochet bookmark?
A: Mercerized cotton thread (size 10 or 20) is the gold standard for bookmarks. It is thin enough to fit between book pages and sturdy enough to show the fine details of the Pattern.
Q: How do I prevent my crochet cross from curling at the edges?
A: Curling is usually caused by tight tension. If your Pattern is curling, try using a larger hook or focus on relaxing your hands. Blocking the finished piece will also help flatten it out.
Q: Can I sell items made from a Cross Crochet pattern?
A: This depends on the designer’s copyright. Most designers allow you to sell finished items, but you cannot redistribute or sell the Pattern itself. Always check the “terms of use” section of your specific design.
Q: How long does it take to finish a medium-sized project?
A: A simple Cross Crochet wall hanging can take anywhere from 3 to 6 hours depending on your speed and the complexity of the Pattern. Smaller items like ornaments can be finished in under an hour.
Q: How do I read a filet crochet chart for a cross?
A: In a filet chart, each dark square usually represents a block of 3 or 4 double crochets, and each white square represents a space (usually a dc followed by 2 chains). This creates a grid-like Pattern.
Conclusion
In this article, we explored the intricate and rewarding world of Cross Crochet, a craft that blends tradition with personal creativity. We have discussed how to select the right Pattern, the importance of maintaining consistent tension, and the technical nuances of transitions and finishing.
By mastering these fundamentals, you can create a cross that is not only structurally sound but also a beautiful reflection of the time and care you invested in your work. From choosing the perfect yarn to the final blocking process, every step is an opportunity to refine your skills and produce something truly unique.