If you’re looking for a meaningful, quick, and beautiful handmade project, the Cross keychain crochet – pattern is a perfect choice. This small yet symbolic item is not only a joy to create but also makes a thoughtful gift, a daily reminder of faith, or a unique addition to your bag or keys. Crocheting your own cross keychain allows you to infuse it with personal meaning and creative flair.
The charm of working with a cross keychain crochet – pattern is that it doesn’t require much time or materials, making it an ideal project for beginners and experienced crocheters alike. These keychains are great for craft fairs, church events, baptism gifts, or just as a heartfelt DIY present. And best of all, each cross can be customized with different colors, textures, and embellishments.
In this article, you’ll learn everything you need to know to make your own crochet cross keychain. We’ll cover what materials to use, explore different pattern variations, provide tips for beginners, and show you how to personalize your creations. Whether you’re creating one or a dozen, this guide will help you get started with confidence and inspiration.
1. Choosing the Right Materials for Your Crochet Cross Keychain
Before starting your cross keychain crochet – pattern, gather the right materials. The items you choose can affect the look, feel, and durability of your finished piece, especially if it’s going to be used daily as a keychain.
Yarn selection is key. You’ll want to choose a yarn that’s smooth, strong, and holds its shape well. Cotton yarn is one of the most recommended options because it doesn’t stretch too much and provides a clean, defined stitch—ideal for small, intricate shapes like a cross.
Choose a hook size that pairs well with your yarn weight. For most keychain projects, a smaller hook size like 2.5mm to 3.5mm will give you tighter stitches and a more structured final product. Tighter stitches ensure that your keychain doesn’t lose its shape with use.
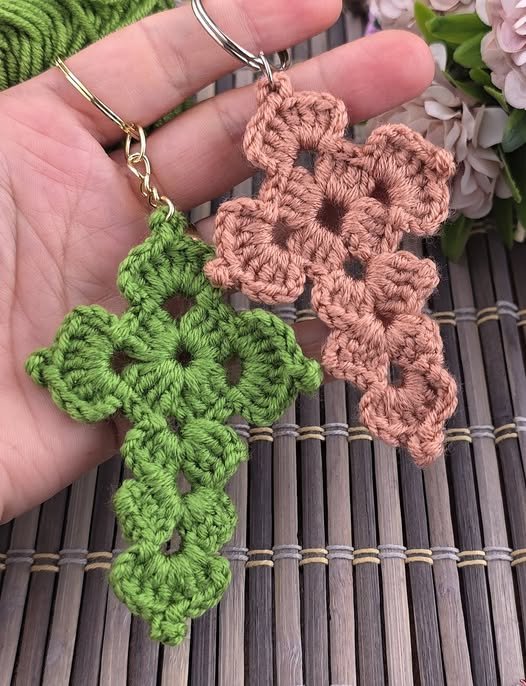
You’ll also need a metal key ring or lobster clasp to attach your crochet cross to keys, bags, or zipper pulls. These are widely available in craft stores or online in various finishes like gold, silver, or antique bronze.
Don’t forget a yarn needle for weaving in ends neatly and possibly sewing parts together, especially if you’re making a cross in multiple pieces. Good finishing makes a huge difference in how professional your keychain looks.
Finally, consider using small decorative elements like beads, tiny tassels, or embroidery thread for adding extra personal touches. These extras can enhance the final look and make your cross keychain even more unique.
2. Simple and Versatile Cross Keychain Crochet Pattern Variations
One of the greatest aspects of a cross keychain crochet – pattern is its versatility. There are many ways to make a crochet cross depending on your skill level, style preference, or the look you’re going for.
A basic pattern usually involves crocheting a small rectangle for the vertical bar and adding a shorter, horizontal bar across the middle. You can create the cross in one piece by using chain stitches and working back in rows, or you can make two pieces and stitch them together for more defined structure.
For a more elegant touch, try using lace or shell stitch variations. These give the cross a delicate, ornamental appearance, perfect for special occasions like baptisms, confirmations, or weddings.
Some patterns use granny square techniques, where the cross is made up of tiny squares joined together in the shape of a cross. This style adds a vintage charm and is excellent if you want to experiment with color combinations.
To give the cross more dimension and stability, consider making two identical pieces and sewing them together with a bit of light stuffing in between. This adds durability, especially if it will be carried around with keys or on a bag.
Another stylish variation involves working the cross in rounds instead of rows. This technique creates a more three-dimensional effect and allows for decorative edging, which can look great when using contrasting colors.
You can also adapt the pattern to make miniature versions or larger display pieces. Just adjust the number of stitches and rows, or use a thicker yarn and larger hook to scale it up for wall décor or ornaments.
3. Tips for Beginners Starting a Crochet Cross Keychain
If you’re new to crochet, the cross keychain crochet – pattern is a great beginner-friendly project. It’s small, manageable, and a wonderful way to practice basic stitches while creating something meaningful.
Start by learning the most common stitches: chain stitch, single crochet, and slip stitch. These are often the only stitches required for simple keychain patterns, and mastering them will build a solid foundation for your crochet journey.
Always make a practice swatch first. This helps you get used to the tension and how the yarn feels with your chosen hook. It’s especially helpful before working on a small and detailed project like a keychain cross.
Follow a written or video pattern closely the first time. Many crochet tutorials are available online for free. If you’re a visual learner, video tutorials can be especially helpful in showing you where to place each stitch.
Keep your tension consistent throughout the project. Uneven stitches can make the cross look wonky or cause the piece to curl. Working slowly and keeping your hands relaxed helps maintain even tension.
Don’t stress about perfection. Your first few tries might not look exactly like the pattern photo, but that’s okay. Each piece improves your skill, and handmade items have their own charm and uniqueness.
Once you complete your first cross, try making another with a slight variation—change the color, try a different yarn texture, or add a small embellishment. This helps you build confidence while exploring creativity.
4. Adding Personal Touches and Creative Uses
A handmade cross keychain crochet – pattern is not just a craft—it’s a heartfelt gift, a personal keepsake, or even a meaningful business idea. Once you’ve learned the basics, you can start adding creative touches to make each one special.
Personalize the cross by using the recipient’s favorite colors or birthstone-inspired hues. This makes the gift more thoughtful and meaningful, especially for birthdays, confirmations, or religious holidays.
Add initials, small charms, or beads to give the piece a signature look. You can attach a tiny metal letter charm to the keyring or embroider the person’s initials onto the cross itself.
Use contrasting yarn colors for the edging or border. A white cross with gold edging, for example, gives a beautiful and spiritual feel. Or go bold with bright, joyful colors for a more modern aesthetic.
Turn your finished cross keychains into gifts or party favors for religious events. They’re ideal for Easter baskets, baptism souvenirs, first communion gifts, or even wedding welcome bags.
If you’re crafty and entrepreneurial, consider selling your handmade cross keychains at craft fairs or online marketplaces. They’re small, lightweight, and quick to produce, making them ideal for handmade sellers.
You can also create matching sets—make a cross keychain along with a small pouch, bookmark, or bracelet in a coordinating design. These bundles make beautiful and cohesive gift ideas.
FAQ: Cross Keychain Crochet – Pattern
Q1: Is the cross keychain crochet project suitable for beginners?
Yes, most cross keychain crochet – pattern designs are beginner-friendly. They usually involve simple stitches like chain and single crochet, making them great for learning.
Q2: What type of yarn is best for crochet keychains?
Cotton yarn is ideal because it’s durable, doesn’t stretch much, and holds its shape well. Acrylic yarn can also be used for a softer texture, but cotton is often preferred for small items.
Q3: How long does it take to crochet a cross keychain?
Depending on the pattern and your skill level, most cross keychains can be completed in 30 to 60 minutes. It’s a great project for a quick gift or weekend craft.
Q4: Can I sell crochet cross keychains made from free patterns?
Yes, but always check the designer’s licensing terms. Many free patterns allow items to be sold as long as credit is given to the designer and the pattern itself is not sold or copied.
Q5: How do I attach the crochet cross to a keyring?
Use a metal jump ring or small loop of yarn stitched securely to the top of the cross. Then connect that to a standard keyring or lobster clasp for easy attachment.
Q6: Can I wash crochet keychains?
Yes, but it depends on the yarn. Cotton keychains can be gently hand-washed and air-dried. Always avoid machine washing if the keychain includes metal parts or embellishments.
Conclusion
Making your own cross keychain crochet – pattern project is a rewarding experience that blends creativity, skill, and spiritual meaning. You’ve learned how to choose the right materials, explored different pattern variations, picked up beginner tips, and discovered creative ways to personalize and use your creations.
Whether you’re crafting for faith, for fun, or to give a gift with a personal touch, this simple yet powerful project can bring joy to both the maker and the recipient.
Try a few different styles, colors, and embellishments to make each keychain unique.If this guide helped you or inspired you to try a crochet cross keychain, please leave your sincere opinion in the comments and feel free to share your suggestions for what you’d like to see in future tutorials or articles.
Happy crocheting!