Creating a Cushion with patchwork border in Prairie Point style. – Pattern is an exceptional way to bring a touch of vintage charm and sophisticated texture into your modern home decor. This specific project focuses on the intersection of traditional quilting techniques and contemporary interior design, offering a unique three-dimensional effect that standard flat cushions simply cannot provide. By following a Cushion with patchwork border in Prairie Point style. – Pattern, you allow yourself to play with fabric geometry, creating small folded triangles—known as Prairie Points—that stand out along the edges of your pillow like a crown of fabric petals.
The allure of the Cushion with patchwork border in Prairie Point style. – Pattern lies in its versatility and the tactile satisfaction of the assembly process. Unlike traditional patchwork that involves sewing flat squares together, this pattern introduces a sculptural element that catches the light and adds a professional, “boutique” finish to your handiwork. Whether you are using scraps from your latest quilt or purchasing a coordinated fat quarter bundle, the Cushion with patchwork border in Prairie Point style. – Pattern serves as a reliable guide to ensuring your triangles are uniform, your seams are hidden, and your finished cushion is durable enough for daily use on a sofa or bed.
In this comprehensive guide, we will explore every technical detail involved in executing a Cushion with patchwork border in Prairie Point style. – Pattern with precision and flair. We will define the two primary components: the Cushion with patchwork border in Prairie Point style, which is the physical textile accessory featuring a decorative perimeter, and the Pattern, which refers to the mathematical template and set of instructions used to cut and fold the fabric correctly. By the end of this tutorial, you will have the confidence to transform simple fabric circles and squares into a stunning masterpiece of textile art that reflects your personal creativity and technical skill.
1. Selecting the Perfect Fabrics for a Cushion with patchwork border in Prairie Point style. – Pattern
Choosing the right textiles for your Cushion with patchwork border in Prairie Point style. – Pattern is the first step toward a successful outcome. Since the Prairie Points involve multiple layers of folding, it is best to use 100% quilting cotton; this fabric holds a crisp crease when ironed, which is essential for maintaining the sharp points of the triangles. Avoid using heavy upholstery fabrics or very thick denim for the border, as these can become too bulky to sew through once they are folded and layered according to the pattern instructions.
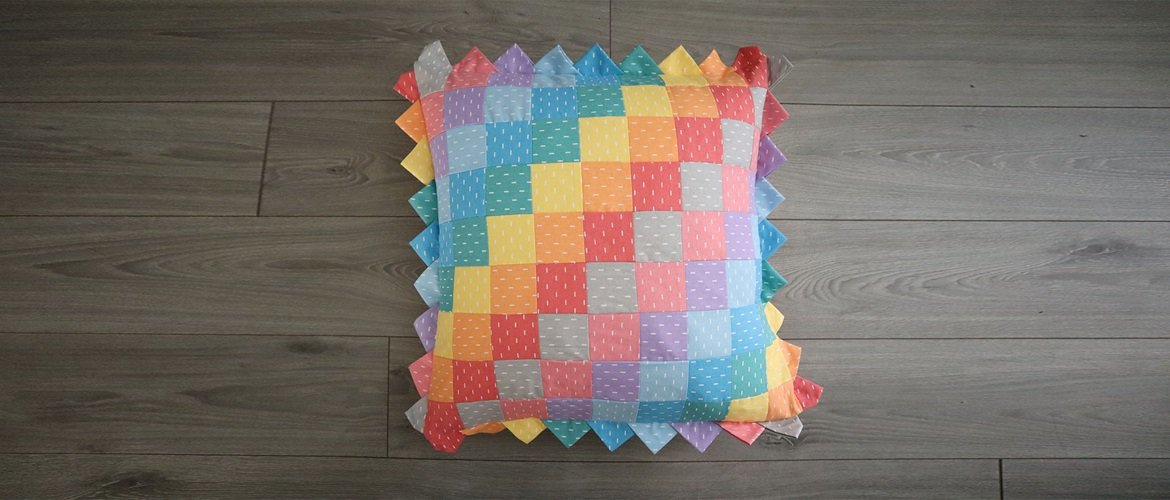
Color theory plays a massive role in making your Cushion with patchwork border in Prairie Point style. – Pattern pop. Many designers suggest using a solid, neutral color for the main body of the cushion and vibrant, patterned fabrics for the Prairie Point border. This creates a frame-like effect that draws the eye toward the texture of the Cushion with patchwork border in Prairie Point style. Alternatively, an “ombré” effect—where the triangles transition from light to dark shades—can add a modern, artistic flair to the traditional pattern layout.
The weight of the fabric is another technical consideration for the Cushion with patchwork border in Prairie Point style. – Pattern. If you are using lighter-weight fabrics like lawn or silk, you may need to apply a very thin fusible interfacing to the back of the squares before folding them. This added stability ensures that the “points” don’t collapse or fray over time. Following the pattern strictly regarding fabric preparation will ensure that the dimensional border remains upright and beautiful throughout the life of the cushion.
When calculating the amount of fabric needed for a Cushion with patchwork border in Prairie Point style. – Pattern, remember that the border is “fabric-hungry.” Each triangle usually starts as a square that is folded twice, meaning you use more material than you would for a flat border. Always check the Pattern requirements for yardage carefully. It is better to have a few extra squares cut than to run out of a specific print halfway through the perimeter of your Cushion with patchwork border in Prairie Point style.
Don’t forget the importance of the backing fabric when working on your Cushion with patchwork border in Prairie Point style. – Pattern. Since the front of the cushion is highly detailed, many crafters choose a simple “envelope closure” for the back using a coordinating solid fabric. This makes it easy to remove the cushion form for washing. A well-designed pattern will provide the specific dimensions for these backing panels to ensure they overlap sufficiently, preventing the inner cushion from peeking out during use.
Lastly, consider the “hand” or feel of the fabric. While the Cushion with patchwork border in Prairie Point style. – Pattern is a decorative piece, it should still be comfortable to lean against. Using a soft flannel or a high-thread-count cotton for the central panel ensures that the cushion is as functional as it is beautiful. By balancing the decorative nature of the patchwork border with the comfort of the main body, you create a piece of home decor that is truly balanced and inviting.
2. Master the Art of Folding and Preparing the Pattern Pieces
The core of the Cushion with patchwork border in Prairie Point style. – Pattern is the construction of the points themselves. To create a standard Prairie Point, you start with a square of fabric (typically 3 to 5 inches, depending on the pattern size). You fold it in half diagonally to form a triangle, and then fold it in half again. This results in a smaller, four-layer triangle with a raw edge at the bottom and neat, folded edges on the sides, which is the signature look of the Cushion with patchwork border in Prairie Point style.
Consistency is vital when following the Cushion with patchwork border in Prairie Point style. – Pattern. Every single square must be folded in the exact same direction to ensure the “overlap” looks uniform around the border. A professional tip is to use a hot iron and a bit of spray starch for each fold. This sets the fibers in place and makes the points much easier to handle when you begin pinning them to the main panel of your Cushion with patchwork border in Prairie Point style.
One of the unique features of a Cushion with patchwork border in Prairie Point style. – Pattern is the way the triangles can be nested. You can choose to have them touch tip-to-tip, or you can overlap them so that the “eye” of each triangle covers the raw edge of the previous one. The pattern will specify the spacing required to ensure you don’t end up with a gap at the corners. Calculating the spacing correctly is a mathematical part of the pattern that ensures a professional, high-end finish.
There are actually two ways to fold points in a Cushion with patchwork border in Prairie Point style. – Pattern: the center-fold method and the side-fold method. The center-fold method creates a symmetrical triangle with a seam down the middle, while the side-fold creates a cleaner, flatter look. Most modern patterns for a Cushion with patchwork border in Prairie Point style prefer the side-fold for its sleek appearance and ease of stitching through multiple layers of fabric and batting.
Once your points are folded and pressed, the Cushion with patchwork border in Prairie Point style. – Pattern will instruct you to stay-stitch them. This involves sewing a very narrow seam (usually 1/8 inch) along the raw bottom edge of each triangle. This tiny step is a “life-saver” because it prevents the triangles from unfolding or shifting while you are trying to attach them to the large cushion panel. It’s these small technical details in the pattern that make the project go smoothly.
Preparation also involves the “corner strategy.” Dealing with the corners of a Cushion with patchwork border in Prairie Point style. – Pattern can be tricky. You might need to fold a special “corner point” that is slightly larger or positioned at a 45-degree angle to turn the corner gracefully. A high-quality Cushion with patchwork border in Prairie Point style. – Pattern will include a diagram specifically for the corners, as this is where most beginners struggle to maintain the geometric flow of the design.
3. Step-by-Step Assembly of the Cushion with patchwork border in Prairie Point style. – Pattern
The assembly of the Cushion with patchwork border in Prairie Point style. – Pattern begins with the “layering” process. You will lay your main cushion front right-side up on your work surface. Then, you place your prepared Prairie Points along the edges, with the points facing inward toward the center of the cushion. This seems counter-intuitive, but when you sew the back of the cushion on and turn it right-side out, the points will “pop” outward to form the beautiful patchwork border seen in the pattern photos.
Pinning is the most time-consuming part of the Cushion with patchwork border in Prairie Point style. – Pattern. You must ensure that the raw edges of the triangles align perfectly with the raw edge of the cushion fabric. Any misalignment here will result in a crooked border. Use plenty of fine quilting pins to hold the layers in place. If your Cushion with patchwork border in Prairie Point style includes multiple colors, this is also the stage where you double-check your color sequence against the pattern layout.
Sewing through these layers requires a bit of power. When following the Cushion with patchwork border in Prairie Point style. – Pattern, it is highly recommended to use a Walking Foot on your sewing machine. A walking foot feeds the top and bottom layers of fabric through the machine at the same rate, preventing the “shifting” that often happens when you have many layers of folded fabric. This ensures that the points of your Cushion with patchwork border in Prairie Point style stay exactly where you pinned them.
Once the points are basted in place, the Cushion with patchwork border in Prairie Point style. – Pattern moves to the final construction. You place your back panels (the envelope pieces) right-side down on top of the cushion front and the “inward-facing” points. You are essentially creating a fabric sandwich. Sew all the way around the perimeter with a standard 1/4 or 1/2 inch seam allowance, as directed by your pattern. Be sure to backstitch at the start and end to secure the seams of your Cushion with patchwork border in Prairie Point style.
After sewing, the “big reveal” happens. You reach through the envelope opening and turn the entire Cushion with patchwork border in Prairie Point style right-side out. As you push the corners out with a turning tool or a chopstick, the Prairie Points will flip out to the exterior, creating that stunning, ruffled patchwork border. This is the most rewarding moment of following the Cushion with patchwork border in Prairie Point style. – Pattern, as you see the two-dimensional pieces transform into a 3D decorative object.
The final step in the Cushion with patchwork border in Prairie Point style. – Pattern is the final press. Use your iron to carefully steam the border, making sure each triangle is lying flat and pointing in the correct direction. If the pattern suggests it, you can “top-stitch” around the edge of the main cushion body to further secure the points and give the Cushion with patchwork border in Prairie Point style a crisp, tailored look. Insert your cushion form, and your project is complete!
4. Maintenance and Decorative Tips for your Patchwork Cushion
A Cushion with patchwork border in Prairie Point style. – Pattern creates a piece of decor that requires a little extra care compared to a plain pillow. Because the points are “free-standing” along the edge, they can occasionally catch on things or fold over during use. To keep your Cushion with patchwork border in Prairie Point style looking its best, give the border a quick steam-ironing whenever it starts to look a bit crushed. This restores the crisp, geometric look intended by the original pattern.
Washing a Cushion with patchwork border in Prairie Point style should be done with caution. While high-quality cotton is durable, the points can fray if they are tossed into a heavy-duty wash cycle with abrasive items like jeans. It is best to turn the cushion cover inside out and wash it on a gentle cycle in a mesh laundry bag. This protects the delicate folds of the patchwork border and ensures the longevity of the Cushion with patchwork border in Prairie Point style. – Pattern you worked so hard to complete.
If you find that the points are too floppy, you can “tack” them down. This is a modification to the Cushion with patchwork border in Prairie Point style. – Pattern where you use a tiny, invisible hand stitch to secure the tip of each triangle to the cushion body. While this reduces the 3D effect slightly, it makes the Cushion with patchwork border in Prairie Point style much more durable for homes with pets or children who might play with the fabric triangles.
You can also adapt the Cushion with patchwork border in Prairie Point style. – Pattern for different seasons. Imagine a version with red and green points for Christmas, or pastel florals for spring. Because the pattern is so versatile, once you master the technique of creating the patchwork border, you can make a variety of covers to swap out throughout the year, keeping your home decor fresh and exciting without needing new cushion inserts.
For a more “shabby chic” look, you can intentionally leave the edges of your triangles raw before folding them in your Cushion with patchwork border in Prairie Point style. – Pattern. After a few washes, the edges will fray slightly, creating a soft, rustic fringe. This is a popular variation of the Cushion with patchwork border in Prairie Point style that adds a cozy, lived-in feel to a farmhouse or cottage-style room, proving that the pattern can be adapted to many different aesthetics.
Finally, consider the scale of your Cushion with patchwork border in Prairie Point style. – Pattern. You don’t have to limit this style to large sofa cushions. The same pattern can be scaled down to make tiny “pincushions” or scaled up for large floor poufs. By mastering the Prairie Point technique, you gain a valuable skill in your quilting repertoire that goes far beyond a single Cushion with patchwork border in Prairie Point style. – Pattern, opening the door to endless creative possibilities in textile design.
Frequently Asked Questions (FAQ)
What is a “Prairie Point” in quilting?
A Prairie Point is a folded fabric triangle used as a decorative border or embellishment. In a Cushion with patchwork border in Prairie Point style. – Pattern, these triangles are tucked into the seam of the cushion to create a three-dimensional, jagged, or scalloped edge that adds texture and visual interest.
How many squares do I need to cut for the border?
This depends on the size of your cushion and the size of your triangles. A typical Cushion with patchwork border in Prairie Point style. – Pattern will require you to measure the perimeter of your cushion and divide that by the width of your folded triangle (accounting for overlap). For a 16-inch square cushion, you might need between 40 to 60 squares.
Can I use silk or satin for this pattern?
While possible, silk and satin are slippery and don’t hold a crease as well as cotton. If you choose these fabrics for your Cushion with patchwork border in Prairie Point style. – Pattern, you will definitely need to use iron-on interfacing and perhaps a few more pins to keep the layers from sliding during the sewing process.
Do I need a special sewing machine for this?
No, a standard home sewing machine is fine. However, because you are sewing through many layers of fabric at the border of the Cushion with patchwork border in Prairie Point style, a “denim” or “heavy-duty” needle (size 90/14) and a walking foot are highly recommended to prevent skipped stitches or fabric pulling.
How do I stop the points from fraying?
Using high-quality quilting cotton and stay-stitching the raw edges as directed in the Cushion with patchwork border in Prairie Point style. – Pattern is the best defense. For extra protection, you can use a small amount of liquid seam sealant (like Fray Check) on the corners of the triangles before you turn the cushion right-side out.
Is this pattern suitable for beginners?
Yes, it is a great “next step” for a beginner who has already made a basic pillow. The Cushion with patchwork border in Prairie Point style. – Pattern introduces the concept of 3D construction and layering, which are fundamental quilting skills, but it remains a manageable project that can be completed in a few hours.
Conclusion
Mastering the Cushion with patchwork border in Prairie Point style. – Pattern is a delightful way to elevate your sewing skills and create a bespoke piece of home decor. We have covered the importance of selecting the right quilting cotton, the precision required in folding the Prairie Points, and the step-by-step assembly that brings the three-dimensional patchwork border to life.
This project proves that with a bit of patience and a reliable pattern, you can create high-end, textured accessories that stand out from mass-produced items. Whether you are decorating your own home or making a heartfelt gift, the Cushion with patchwork border in Prairie Point style is a timeless design that celebrates the beauty of geometric fabric art.