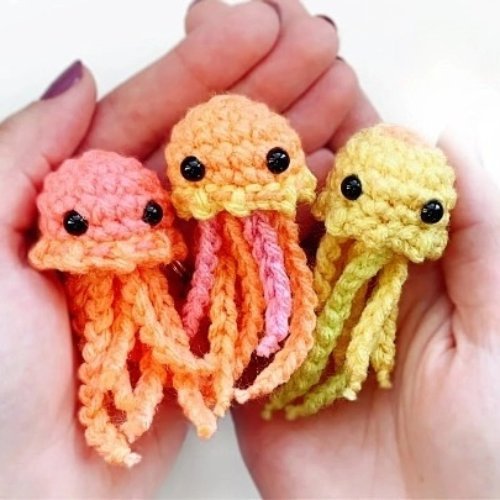
The Cute Baby Jellyfish – Crochet Amigurumi – Pattern is one of the most delightful and beginner-friendly projects in the world of fiber arts, offering a perfect entry point for those looking to explore sea-themed creations. If you have ever felt intimidated by complex patterns with dozens of limbs and intricate color changes, this aquatic friend is the antidote to your crafting stress. The simplicity of a jellyfish’s anatomy—a dome-shaped head and flowing tentacles—makes it an ideal canvas for experimenting with different yarn textures and vibrant color palettes while practicing the fundamental techniques of amigurumi.
Creating a Cute Baby Jellyfish – Crochet Amigurumi – Pattern allows you to bring a touch of the ocean’s magic into your home or nursery without the maintenance of a real aquarium. These little creatures are not just toys; they serve as excellent sensory items for infants, desk companions for adults, and even colorful car accessories. Because they are relatively small, they work up quickly, providing that instant gratification that every crafter craves when starting a new project on a rainy afternoon or during a quiet weekend.
In this comprehensive guide, we are going to dive deep into every aspect of the Cute Baby Jellyfish – Crochet Amigurumi – Pattern, ensuring you have all the tools and knowledge necessary to succeed. We will explore the best yarn choices for that “squishy” feel, the technical stitches required for bouncy tentacles, and the safety considerations for making these as gifts for children. Whether you are a veteran with the hook or a total novice, this guide is designed to help you navigate the waves of the crochet amigurumi world with ease and joy.
1. Essential Materials for Your Cute Baby Jellyfish – Crochet Amigurumi – Pattern
The foundation of a successful Cute Baby Jellyfish – Crochet Amigurumi – Pattern begins with selecting a high-quality yarn that matches the vibe you want to achieve. For a classic, durable look, 100% cotton yarn is the gold standard because it provides crisp stitch definition and holds its shape exceptionally well over time. However, if you want your jellyfish to be extra soft and huggable, many crafters prefer using chenille or velvet yarn, which gives the finished toy a plush, professional appearance often seen in high-end boutiques.
You will also need to select the correct crochet hook size to ensure your stitches are tight enough to keep the stuffing inside. For amigurumi, it is common practice to use a hook that is one or two sizes smaller than what the yarn label suggests; for example, if using worsted weight yarn, a 3.0mm or 3.25mm hook is usually perfect. This creates a dense fabric that prevents the white polyester fiberfill from peeking through the gaps, ensuring your amigurumi sea creature looks solid and well-made.
Eyes are the soul of any Cute Baby Jellyfish – Crochet Amigurumi – Pattern, and you have several options depending on who the final recipient will be. Plastic safety eyes provide a glossy, realistic look and are very easy to install, but they are generally not recommended for children under the age of three due to potential choking hazards. For babies, it is much better to use embroidery thread to stitch on sleepy eyes or simple dots, making the toy 100% soft and safe for teething and cuddling.
Stuffing is what gives your Cute Baby Jellyfish – Crochet Amigurumi – Pattern its “baby” roundness, so don’t skimp on quality. Use a high-loft polyester fiberfill that is washable and non-allergenic. When stuffing the dome of the jellyfish, the trick is to add small handfuls at a time and shape it with your fingers as you go. You want the head to be firm but still “squishy” to the touch, embodying the soft nature of a real baby jellyfish floating through the current.
To help you keep track of your progress, stitch markers are an absolute necessity for this project. Since amigurumi is typically worked in a continuous spiral without joining the rounds, it is incredibly easy to lose your place. A simple plastic clip or even a scrap of contrasting yarn placed at the beginning of each round will save you from the frustration of having to “frog” or rip out your work because the jellyfish pattern count went astray.
Lastly, you will need a few basic notions like sharp embroidery scissors and a blunt-tipped yarn needle. The needle is essential for weaving in your ends and for sewing the bottom “tentacle plate” to the main body. A well-executed Cute Baby Jellyfish – Crochet Amigurumi – Pattern hides all the knots and yarn tails inside the body, resulting in a clean, professional finish that looks like it was plucked straight from a luxury toy store shelf.
2. Mastering the Core Stitches and Jellyfish Anatomy
The most common stitch you will use throughout the Cute Baby Jellyfish – Crochet Amigurumi – Pattern is the single crochet (sc). This stitch is the workhorse of the crochet world, providing the strength and density needed for 3D objects. If you can master the single crochet, you can complete 90% of this project. It is a repetitive, rhythmic stitch that allows you to relax and enjoy the process of seeing your ocean-themed crochet come to life round by round.
To create the dome shape of the head, you must master the increase (inc) and the invisible decrease (inv dec). Increasing involves placing two single crochets into the same stitch to expand the circle. The invisible decrease is a specialized amigurumi technique where you work only into the front loops of two adjacent stitches to join them; this prevents the small bumps or gaps that a standard decrease might leave, keeping your baby jellyfish surface smooth and sleek.
The “Magic Ring” or “Magic Circle” is the secret to a perfect start for your Cute Baby Jellyfish – Crochet Amigurumi – Pattern. This technique allows you to pull the starting hole completely closed, so no stuffing can leak out of the very top of the jellyfish’s head. It can be a bit tricky for beginners to learn at first, but once you master it, you will use it for almost every amigurumi project you ever make, as it provides a much cleaner look than the traditional chain-start method.
Once the head is finished, you will move on to the “tentacle plate,” which is a flat circle that closes the bottom of the dome. In many Cute Baby Jellyfish – Crochet Amigurumi – Pattern variations, the tentacles are actually attached directly to this plate before it is sewn onto the body. This makes the assembly much easier because you are working on a flat surface rather than trying to navigate the curves of a stuffed toy, ensuring your crochet tentacles are evenly spaced.
Creating the “boingy” or curly tentacles is perhaps the most fun part of the Cute Baby Jellyfish – Crochet Amigurumi – Pattern. To achieve this effect, you simply chain a specific length and then place 2 or 3 single crochets (or half-double crochets) into every single chain. This “over-crowding” of stitches causes the yarn to naturally twist and spiral on itself, creating a spiral tentacle that bounces back when pulled, which is a fantastic sensory feature for little hands.
Finally, you might want to add a “frill” around the base of the head to give your Cute Baby Jellyfish – Crochet Amigurumi – Pattern more character. This is often done using a shell stitch or a simple picot edge in the front loops of the final round of the body. This small detail mimics the delicate, wavy membrane of a real jellyfish and adds a layer of sophisticated texture that elevates the simple dome shape into a true work of crochet art.
3. Creative Color Variations and Customization Tips
When it comes to the Cute Baby Jellyfish – Crochet Amigurumi – Pattern, there are no rules for color. While real jellyfish are often translucent or white, crochet versions thrive in rainbow gradients or pastel “candy” colors. Using a variegated yarn can create a beautiful marbled effect without you having to change colors manually. This is a great way to make a unique jellyfish toy that looks complex but is actually very simple to execute.
If you want to create a “family” of jellyfish, you can easily scale the Cute Baby Jellyfish – Crochet Amigurumi – Pattern by changing your yarn weight. Use a thin lace-weight yarn with a 1.5mm hook for a tiny keychain-sized jellyfish, or go big with jumbo blanket yarn and a 10mm hook to create a giant, floor-sized jellyfish pillow. The proportions of the pattern stay exactly the same, but the final size will change dramatically based on your yarn and hook choice.
Adding personality to your Cute Baby Jellyfish – Crochet Amigurumi – Pattern can be as simple as changing the facial expressions. Instead of standard eyes, try giving your jellyfish a “winking” eye or adding a tiny pink blush under the eyes using a bit of pink yarn or even a real cosmetic blush. These small handmade details turn a generic toy into a character with a story, which is why people cherish handmade amigurumi so much more than mass-produced items.
Texture is another area where you can get creative with your Cute Baby Jellyfish – Crochet Amigurumi – Pattern. Try making some tentacles long and straight using simple chains, while making others thick and curly. You can even add “bubbles” by crocheting small bobble stitches onto the tentacles or the head. Mixing different types of yarn, like a shiny metallic thread held together with a matte cotton, can simulate the shimmering quality of bioluminescent creatures in the deep sea.
For those who enjoy a bit of sparkle, you can incorporate beads or sequins into the tentacles of your Cute Baby Jellyfish – Crochet Amigurumi – Pattern. Just be sure to string the beads onto your yarn before you start crocheting them into the chains. This makes the jellyfish look like it’s dripping with water droplets. Again, keep safety in mind and only add these hard elements if the toy is intended for an older child or for adult home decor.
Don’t forget that your Cute Baby Jellyfish – Crochet Amigurumi – Pattern doesn’t have to be a standalone toy. You can attach a loop of yarn to the top to turn it into an ornament, or hang several of them at different heights from a wooden hoop to create a stunning underwater-themed mobile for a nursery. The versatility of the jellyfish shape makes it one of the most adaptable designs in the entire crochet community, limited only by your imagination.
4. Care, Cleaning, and Longevity of Amigurumi Toys
Because your Cute Baby Jellyfish – Crochet Amigurumi – Pattern is likely to be handled, squeezed, and possibly drooled on by little ones, knowing how to clean it is essential. If you used 100% cotton or acrylic yarn, the toy is generally machine washable. Place it inside a mesh laundry bag to protect the delicate tentacles from getting tangled or snagged, and use a cold, gentle cycle. Air drying is always preferred over the dryer to keep the polyester stuffing from clumping.
Over time, you might notice “pilling” on your Cute Baby Jellyfish – Crochet Amigurumi – Pattern, which are those small fuzzy balls that form on the surface of the fabric. This is a natural result of friction and play. You can easily remove these with a small fabric shaver or by very carefully trimming them with embroidery scissors. Maintaining the surface of your handmade crochet toy will keep it looking fresh and gift-ready for many years.
If you find that the tentacles of your Cute Baby Jellyfish – Crochet Amigurumi – Pattern are starting to lose their “boing” and are looking a bit limp, you can “re-train” them. Simply dampen the tentacles with a bit of water and wrap them around a pencil or a knitting needle, securing them with a clip until they dry. This acts like a hair curler for your yarn, restoring the spiral shape and making your jellyfish look bouncy and new again.
Sunlight can be an enemy to your Cute Baby Jellyfish – Crochet Amigurumi – Pattern, especially if you used dyed natural fibers like wool or certain cottons. Prolonged exposure to direct UV rays can cause the vibrant colors to fade or bleach out. To keep your crochet sea life looking bright, store it away from windowsills or areas with heavy sun. A little bit of care goes a long way in preserving the artistic value of your hand-stitched creations.
Check the seams and safety eyes of your Cute Baby Jellyfish – Crochet Amigurumi – Pattern periodically. While amigurumi is quite sturdy, the constant pulling on tentacles can sometimes stress the stitches where the bottom plate meets the body. A quick “tune-up” with a yarn needle to reinforce any loose areas will prevent the stuffing from escaping. Being proactive with amigurumi maintenance ensures your jellyfish remains a safe and beautiful companion for a long time.
Finally, if you are gifting the results of your Cute Baby Jellyfish – Crochet Amigurumi – Pattern, it is a lovely touch to include a small “care card.” Let the recipient know the fiber content and washing instructions you followed. This shows the level of love and care you put into the hand-crafted gift and ensures the new owner knows exactly how to treat their new aquatic friend to keep it in perfect condition for its new life in its “forever home.”
FAQ – Frequently Asked Questions
Is the Cute Baby Jellyfish – Crochet Amigurumi – Pattern good for beginners?
Yes, it is one of the best projects for beginners! The shapes are basic (spheres and chains), and there are no complicated limbs to sew on. It’s a fantastic way to practice the “magic ring” and “invisible decrease” techniques that are foundational to all amigurumi work.
How long does it take to finish one jellyfish?
An experienced crocheter can finish a Cute Baby Jellyfish – Crochet Amigurumi – Pattern in about 1 to 2 hours. Beginners might take 3 to 4 hours as they learn to manage the tension and count the rounds. It is a perfect “one-sitting” project that provides a quick sense of accomplishment.
What is the best yarn for a “no-sew” look?
If you want a very clean look, try a “plush” or “blanket” yarn. The fuzziness of the yarn hides the stitches and the seams, making the Cute Baby Jellyfish – Crochet Amigurumi – Pattern look more like a manufactured plushie than a crochet item. Just be aware that it can be harder to see your stitches with this type of yarn!
Can I make the tentacles longer?
Absolutely! To make longer tentacles in your Cute Baby Jellyfish – Crochet Amigurumi – Pattern, simply increase the number of chains in your starting row for each tentacle. Just remember that the more chains you have, the more stitches you will have to work back into them, which will consume more yarn and take more time.
Why is my jellyfish head looking lopsided?
Lopsidedness usually happens if you miss an increase or decrease in a round, causing one side to have more stitches than the other. Using a stitch marker at the start of every round and counting your stitches at the end of each round will prevent this common amigurumi mistake.
How do I make the jellyfish glow in the dark?
You can actually buy glow-in-the-dark yarn! Using this for the tentacles or the frill of your Cute Baby Jellyfish – Crochet Amigurumi – Pattern adds an amazing bioluminescent effect that looks incredible at night, making it a very popular choice for children’s bedrooms.
Conclusion
In this guide, we have explored the wonderful world of the Cute Baby Jellyfish – Crochet Amigurumi – Pattern, covering everything from the essential materials and the core stitches to creative ways to customize your sea friend. We’ve learned that whether you use soft cotton or plush velvet, the key to a beautiful amigurumi lies in tight tension, proper stuffing, and those tiny “handmade” details like embroidered eyes or spiral tentacles. This project is a perfect example of how simple shapes can be transformed into something full of personality and charm through the art of crochet. We hope you feel inspired to pick up your hook and create an entire “smack” of jellyfish to brighten up your home!
What did you think of this Cute Baby Jellyfish – Crochet Amigurumi – Pattern? Did you find the tentacle section helpful, or do you have your own secret trick for making the perfect spiral? Please leave your sincere opinion and any suggestions in the comments below! Your feedback helps us create better content, and we would love to hear about the colors and yarns you chose for your own little ocean explorers. Happy crocheting!