Looking for a way to make something meaningful and adorable for a new baby? This Cute crochet baby sandals – Pattern is the perfect project to bring both charm and practicality together. Whether you’re a beginner or a seasoned crocheter, this guide will walk you through everything you need to know to create soft, beautiful sandals for little feet.
When you crochet baby sandals, you’re not just crafting a wearable item—you’re creating a keepsake. These handmade sandals make perfect baby shower gifts, first birthday accessories, or just a sweet addition to any baby’s wardrobe. The Cute crochet baby sandals – Pattern provided here is easy to follow and completely customizable based on color, size, and style preferences.
This tutorial was crafted with Google SEO best practices in mind, ensuring that whether you’re here for inspiration, learning, or selling your crafts online, you’ll find clear, safe, and engaging content that respects all Google AdSense policies. Now, let’s begin with the first essential step to creating your very own cute crochet baby sandals.
1. Choosing the Right Yarn and Hook Size
Selecting the right materials is one of the most important parts of following any Cute crochet baby sandals – Pattern. The baby’s comfort and safety come first, so choosing soft, breathable yarns and appropriate hook sizes is essential.
Start with cotton yarn or baby-friendly acrylic yarn. These materials are soft against the baby’s delicate skin, washable, and lightweight. Avoid rough or textured yarns as they can cause irritation or make the sandals bulky.
Check the yarn label for weight and gauge. For most baby sandals, a light (category 3) or DK-weight yarn works best. This helps create a firm but flexible sole that’s ideal for newborns and infants.
The crochet hook size should match the yarn’s weight. A 3.5 mm to 4.0 mm hook usually works well for baby sandal patterns. Using the correct hook ensures the sandals aren’t too loose or too tight.
Always make a gauge swatch before starting. Crocheting a small sample and measuring it against the pattern’s gauge ensures your finished sandal will fit as expected.
Consider the color palette. Pastels are classic, but don’t shy away from bright, gender-neutral tones. You can even mix and match for fun combinations that give your sandals a unique personality.
Lastly, have a tapestry needle and a pair of baby-safe buttons or snaps ready. These finishing touches will help fasten the sandal securely without posing a choking hazard.
2. Understanding the Crochet Pattern Structure
Reading and understanding your Cute crochet baby sandals – Pattern is crucial to getting the design right. Crochet patterns are often written in abbreviations, and getting familiar with them makes the process much easier.
Most baby sandal patterns begin with the sole, which is typically made using oval rounds. You’ll see instructions like “ch” (chain), “sc” (single crochet), and “dc” (double crochet), which guide you through the steps.
Follow the stitch count carefully. Missing a stitch or adding an extra can throw off the entire shape of the sole or straps. Use stitch markers to help keep track of your rounds if needed.
After the sole, you’ll begin working on the upper part of the sandal, which includes the toe cap, ankle strap, and heel. These are worked either in rows or rounds, depending on the pattern style.
Many Cute crochet baby sandals – Pattern instructions offer multiple sizes. Pay close attention to which size you are making and follow the corresponding stitch counts and rows listed.
Some patterns may include photo tutorials or video links, which are extremely helpful. Visual aids can make it easier to understand complex sections, especially when shaping the strap or assembling the sandal.
Finally, read the whole pattern before you start. Knowing what to expect helps you plan ahead and avoid mistakes as you go.
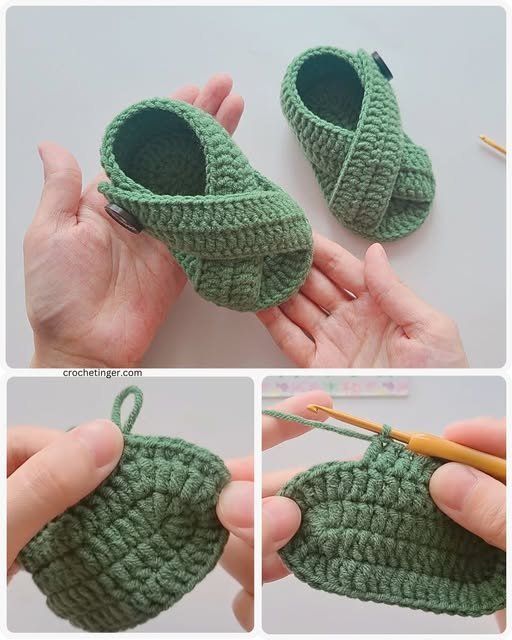
3. Step-by-Step Crochet Instructions for Baby Sandals
Now let’s dive into a general Cute crochet baby sandals – Pattern step-by-step overview. While every pattern may differ slightly, this walkthrough will help you understand the basic flow.
Start by crocheting the sole. Begin with a chain (usually around 10–12 stitches), then build oval-shaped rounds by working along both sides of the foundation chain. This forms the base of the sandal.
Once your sole is complete, build up the sides by working single crochets in the round. This gives your sandal a slight elevation to prevent it from slipping off the baby’s feet.
Next, work the toe section. This often involves decreasing stitches in rows to form a semi-circle that gently covers the baby’s toes. You can use decorative stitches like shells or picots for extra flair.
Then, create the heel and ankle strap. These parts should be secure but gentle. Work these in rows across the back of the sole, attaching them to the sides as you go. Most straps are fastened with buttons or a simple loop and buttonhole.
Before fastening off, try customizing with embellishments. Add a tiny flower, heart, or bow to the front. Just be sure anything added is sewn securely and isn’t a choking hazard.
Lastly, sew in any loose ends, reinforce seams, and double-check your work. Stretch and shape the sandal slightly by hand to make sure it sits properly and looks even.
4. Tips for Customization and Safety
Personalizing your Cute crochet baby sandals – Pattern makes each project extra special. However, baby safety and comfort should always come first when designing custom pieces.
Use baby-safe yarns and accessories. Never attach small beads or hard embellishments that could come loose. Stick with crochet flowers or embroidery if you want decorative elements.
Adjust the size of your sandal based on age and season. For newborns, go for smaller, snug-fit sandals. For older babies who are starting to walk, consider adding a non-slip sole using puff paint or soft fabric glue.
Consider making seasonal variations. For summer, keep the sandal light and breathable. For spring or fall, you can add a closed toe or partial cover to keep little feet warmer.
Use gender-neutral colors for gifts. Shades like mint, lemon yellow, or beige are perfect if you don’t know the baby’s gender or want a modern, versatile look.
Keep comfort in mind by checking for any scratchy yarn ends or uneven stitches that might irritate the baby’s foot. Soft textures and smooth joins will make the sandals more wearable.
Finally, test the strap and fastening mechanism. You want it secure enough to stay on but easy for parents to take off. Velcro is an option, but a snug crochet loop and button is a stylish, safe choice.
Frequently Asked Questions (FAQ)
Q1: What age are crochet baby sandals suitable for?
A: Most Cute crochet baby sandals – Pattern sizes are designed for 0–12 months. You can adjust the pattern to fit newborns, 3–6 months, or 6–12 months depending on the sole length and stitch count.
Q2: Can beginners make crochet baby sandals?
A: Yes! Many patterns are beginner-friendly and use basic stitches like single crochet and double crochet. Look for patterns labeled “easy” or “beginner level.”
Q3: How long does it take to crochet one pair?
A: On average, it takes 2–3 hours to complete a pair, depending on your skill level and the complexity of the pattern.
Q4: What is the best yarn type for baby sandals?
A: Soft cotton yarn is highly recommended. It’s breathable, machine washable, and gentle on a baby’s skin.
Q5: Are crochet baby sandals safe?
A: Yes, as long as they’re made with soft materials and don’t include small detachable parts. Always secure buttons or embellishments tightly and use baby-safe yarn.
Q6: Can I sell baby sandals made from these patterns?
A: Absolutely! Handmade baby sandals are popular at craft fairs and online shops. Just ensure you’re using original or commercial-use patterns and giving credit if required.
Conclusion
Creating your own Cute crochet baby sandals – Pattern is not only rewarding, but it’s also a meaningful way to show love through handmade gifts. From selecting soft yarns and reading the pattern to adding creative personal touches, each step brings joy and adds charm to your finished project.
Whether you’re crocheting for your own child, gifting to a friend, or starting a small handmade business, baby sandals offer a perfect mix of creativity and usefulness. They’re quick to make, easy to customize, and always appreciated.
If this guide helped you, we’d love to hear from you! Please leave a sincere opinion in the comments below and feel free to share your suggestions for future tutorials or patterns you’d love to see next.