If you’re in search of a fun and beginner-friendly Halloween project, the Cutie Ghost Crochet Pattern might just be your next favorite. This adorable little ghost is the perfect balance of spooky and sweet, making it ideal for decorating your home, giving as a gift, or even selling at craft fairs. With just a small amount of yarn and a little time, you can create a handmade charm that brings smiles instead of scares.
The Cutie Ghost Crochet Pattern is particularly popular because it’s simple enough for beginners but customizable enough to keep advanced crocheters entertained. These tiny ghouls can be made in under an hour, and with a few tweaks, each one can have its own personality—smiling, blushing, or even holding a pumpkin.
This guide will walk you through every stage of crafting your own cutie ghost. From choosing the right materials and understanding the stitches to creative personalization and frequently asked questions, everything you need is right here. Whether you’re prepping for Halloween, building your amigurumi skills, or just love cute crafts, this is the perfect pattern to try.
1. Getting Started with the Cutie Ghost Crochet Pattern
Before you begin crocheting your adorable ghost, it’s important to understand what makes the Cutie Ghost Crochet Pattern so appealing. This small project often uses basic amigurumi techniques, meaning it’s created in the round and stuffed to give it shape and dimension.
Most patterns begin with a magic ring, which allows you to start crocheting in a tight circle with no hole in the center. From there, you’ll work in continuous rounds, using simple stitches like single crochet, increases, and decreases. These stitches form the body of the ghost, which is usually shaped like a teardrop or cone with a frilly bottom edge.
One of the best things about the Cutie Ghost Crochet Pattern is how forgiving it is. Even if your stitch count is slightly off, the final ghost still ends up looking charming and unique. This makes it a stress-free project, especially if you’re new to the world of crochet or amigurumi.
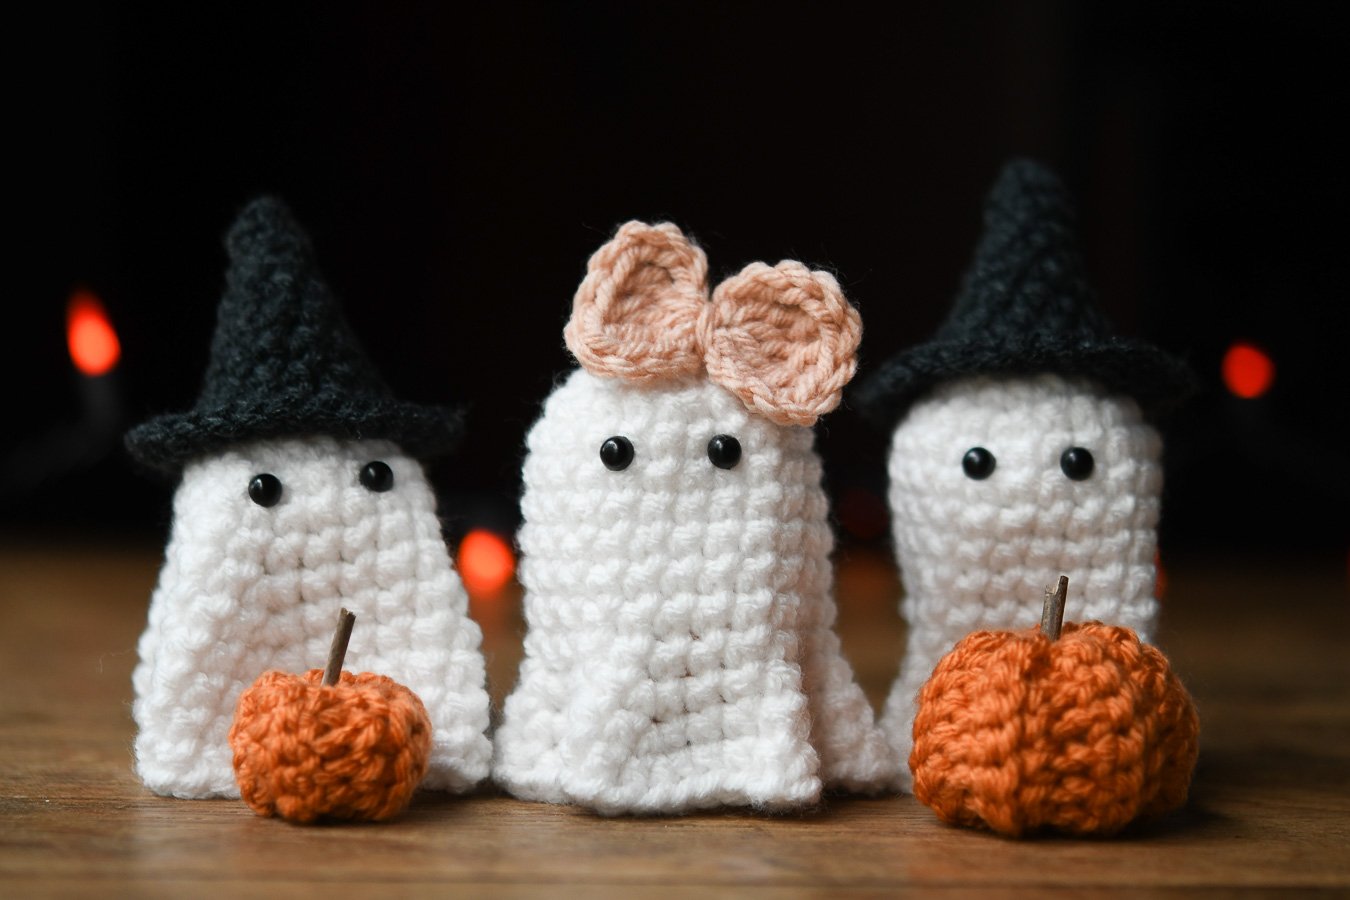
Patterns vary slightly depending on the designer, but most ghosts are approximately 3 to 5 inches tall, making them the perfect size for hanging decorations, keychains, or desk companions. Some patterns even include accessories like bows, pumpkins, or witch hats.
When selecting your pattern, be sure to choose one that includes detailed instructions and photos, especially if you’re a visual learner. Many designers offer both free and paid versions, and some include video tutorials to help you follow along.
You’ll also want to check the required materials before starting. Most Cutie Ghost Crochet Patterns are quite simple, but knowing what you need ahead of time saves time and frustration once you’re ready to crochet.
2. Materials and Tools You’ll Need
To make a cute ghost that lasts, it’s essential to use the right materials. Luckily, the Cutie Ghost Crochet Pattern doesn’t require anything fancy, which makes it a great stash-busting project.
The most common yarn used for these tiny ghosts is worsted weight acrylic yarn, especially in white, which gives the ghost its classic look. Acrylic is budget-friendly, durable, and holds its shape well, making it perfect for amigurumi. You can also experiment with cotton yarn for a slightly firmer finish.
A 3.5mm or 4.0mm crochet hook is usually ideal for working with worsted yarn in amigurumi. The goal is to create tight stitches so that the stuffing doesn’t show through. If your stitches feel too loose, switch to a smaller hook size for better results.
For stuffing, you’ll need polyester fiberfill, which is soft, washable, and widely available. Don’t overstuff the ghost; it should hold its shape without stretching the stitches. Use a small amount to round out the shape, especially at the top and bottom.
You’ll also need a yarn needle to weave in ends and sew any optional details, such as arms or accessories. Safety eyes (typically 6mm to 8mm) are often used to give your ghost that classic cute expression. If you’re making the ghost for a small child or pet, consider embroidering the eyes instead for added safety.
Optional embellishments include felt, embroidery thread, fabric glue, or ribbon for details like cheeks, mouths, bows, or Halloween props. You can get as creative as you’d like, or keep it minimal for a classic ghost look.
Finally, a stitch marker is helpful when working in continuous rounds. It marks the beginning of each round and helps you keep your place as you increase and decrease to shape the ghost’s body.
3. Step-by-Step Overview of the Pattern
Now that you’ve gathered your materials, it’s time to bring your Cutie Ghost Crochet Pattern to life. The following steps outline a common approach to creating this charming little ghost. Keep in mind that specific instructions may vary depending on the pattern you’re following.
Step 1: Start with the Magic Ring
Create a magic ring and work several single crochets into the center. This forms the tight, rounded top of the ghost’s head. Pull the ring closed and join if required, depending on the pattern instructions.
Step 2: Build the Body
Continue working in rounds, increasing the stitch count evenly to shape the head and upper body. This gives the ghost a full, rounded appearance. Use your stitch marker to keep track of the beginning of each round.
Step 3: Decrease for the Bottom Section
Once you’ve reached the widest point, begin decreasing to taper the body slightly. Don’t forget to stuff the ghost with fiberfill before closing it off. Stuff gradually and shape as you go for a clean, balanced look.
Step 4: Add the Frilly Base
Many patterns finish with a frilly edge at the bottom, giving the ghost a floating effect. This is often achieved using shell stitches or a series of chains and single crochets in each stitch around the bottom.
Step 5: Attach Eyes and Embroider Details
Once the ghost is fully shaped, attach safety eyes or embroider them with black yarn or thread. You can also add cheeks with pink felt or embroidery floss, and stitch on a smile or spooky expression.
Step 6: Customize Your Ghost
This is where the fun really begins. Add a tiny bow, crochet hat, mini pumpkin, or even a little sign that says “Boo!” Personalization makes your ghost one-of-a-kind and gives it character.
4. Fun Uses for Your Cutie Ghost Creation
One of the best things about the Cutie Ghost Crochet Pattern is how versatile it is. These little ghosts can be used in so many creative and functional ways—not just for Halloween!
Use your cutie ghost as a hanging decoration by adding a loop of yarn at the top. Hang it from a doorknob, car mirror, Halloween tree, or window. They also make adorable garland when strung together in a series.
Turn your ghost into a keychain or bag charm by attaching a metal ring or clip to the top. It’s a simple way to bring festive vibes with you wherever you go, and it also makes a cute gift.
Use smaller versions of the ghost pattern as Halloween party favors. Add a little tag that says “You’ve been boo’d!” and place them in treat bags for a fun surprise for guests, students, or coworkers.
If you’re a seller on Etsy or participate in craft fairs, these tiny ghosts are a perfect product. They’re fast to make, low-cost, and popular during the fall season. Offering them in different colors or expressions can increase appeal.
Some crafters use these ghosts as pet toys, especially for cats. Just be sure to make them safe by avoiding small parts like plastic eyes—embroider features instead, and use pet-safe stuffing.
Lastly, consider using them for storytime props or classroom activities. Teachers and parents love using themed toys to make reading fun, and a soft, squishy ghost makes a great companion for Halloween books.
FAQ – Cutie Ghost Crochet Pattern
1. Is the Cutie Ghost Crochet Pattern suitable for beginners?
Yes! Most versions of this pattern are beginner-friendly and only require basic stitches like single crochet, increases, and decreases.
2. How long does it take to crochet one ghost?
On average, it takes about 45 minutes to an hour to complete one ghost, depending on your crochet speed and any added details.
3. What size should my finished ghost be?
Most cutie ghosts are between 3 to 5 inches tall, but the final size can vary depending on your yarn weight and hook size.
4. Can I sell the ghosts I make using this pattern?
Yes, many designers allow the sale of finished items made from their patterns, but always check the specific terms of use and give proper credit.
5. What’s the best yarn for this pattern?
Worsted weight acrylic or cotton yarn is ideal. Acrylic gives a soft and plush finish, while cotton holds shape well and is slightly firmer.
6. Can I make this ghost without safety eyes?
Absolutely! If you prefer a softer or child-safe version, embroider the eyes with black yarn or use felt pieces glued or sewn on securely.
Conclusion
The
Cutie Ghost Crochet Pattern is more than just a seasonal project—it’s a fun, fast, and creative way to bring joy into your crafting. Whether you’re a beginner picking up a hook for the first time or a seasoned pro looking for a quick Halloween project, this adorable ghost offers endless possibilities.
From decorating your home to creating gifts and selling online, the uses for this tiny ghost are only limited by your imagination. With just a few stitches and some simple materials, you can make something that spreads smiles and adds handmade charm to any space.
We’d love to hear what you think! If you’ve tried the Cutie Ghost Crochet Pattern, share your thoughts and suggestions below. Have tips or creative ideas? Let others in the crochet community know. Happy crocheting—and happy haunting! 👻