Creating a Daisy Bouquet Crochet – Pattern is one of the most rewarding projects for any fiber artist looking to bring a touch of eternal spring into their home. Whether you are looking to brighten up a corner of your living room or searching for the perfect handmade gift, this crochet flower tutorial offers a versatile and joyful experience. By mastering this Daisy Bouquet Crochet – Pattern, you gain the ability to create realistic, durable blooms that never wilt, allowing your creativity to flourish across various seasons and decor styles.
The beauty of a Daisy Bouquet Crochet – Pattern lies in its simplicity and the iconic status of the flower itself, which symbolizes purity and new beginnings. This project is ideal for those who enjoy repetitive, meditative stitches that result in a stunning visual payoff once the individual components are assembled. Using a free crochet daisy pattern approach, you can experiment with different yarn weights, from delicate thread for a dainty look to chunky cotton for a bold, modern floral arrangement.
In this comprehensive guide, we will dive deep into the essential steps of the Daisy Bouquet Crochet – Pattern, ensuring your final piece looks professional and polished. We will cover everything from selecting the right soft cotton yarn to the assembly techniques that give your bouquet its lifelike bounce. By following these SEO-optimized crochet instructions, you will be able to produce a high-quality finished product that is perfect for selling at craft fairs or featuring on your own handicraft blog.
1. Choosing the Right Materials for Your Daisy Bouquet Crochet – Pattern
Selecting the correct yarn is the foundation of a successful Daisy Bouquet Crochet – Pattern. For a classic look, a mercerized cotton yarn in weight 3 or 4 is highly recommended because it provides excellent stitch definition and a slight sheen that mimics real petals. You will need a crisp white for the petals, a vibrant sunny yellow for the flower centers, and a deep leaf green for the stems and foliage.
The hook size is equally important when working on your Daisy Bouquet Crochet – Pattern. Usually, a 3.5mm (E) crochet hook works best with standard cotton yarn to ensure the stitches are tight enough so that the stuffing or wire doesn’t show through. If your tension is naturally loose, consider dropping down a hook size to maintain the structural integrity of each crochet daisy petal.
Don’t forget the structural elements that turn individual flowers into a Daisy Bouquet Crochet – Pattern. You will need floral wire (usually 18 or 20 gauge) to provide support for the stems and a hot glue gun or floral tape to secure the blooms. Having a pair of wire cutters nearby is essential for customizing the length of your handmade flower stems to fit your favorite vase.
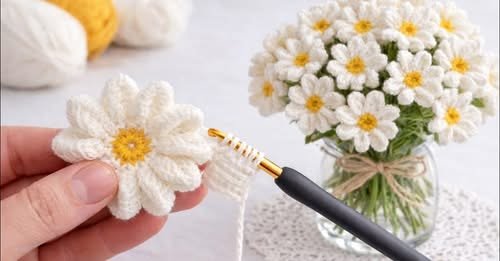
For the stuffing of the flower centers, a small amount of polyester fiberfill is necessary to give the yellow “button” of the daisy a 3D effect. This small detail makes a huge difference in the Daisy Bouquet Crochet – Pattern, transforming a flat circle into a realistic botanical replica. Make sure to use high-quality filling that won’t clump over time, preserving the shape of your crochet flower bouquet.
Stitch markers and a sharp tapestry needle are the unsung heroes of the Daisy Bouquet Crochet – Pattern. Since you will be working in rounds for the center, a stitch marker helps you keep track of your increases without losing your place. The tapestry needle is vital for weaving in ends and invisibly joining the petals to the center, ensuring your DIY crochet gift looks flawless from every angle.
Lastly, consider the presentation of your finished Daisy Bouquet Crochet – Pattern. Many crafters like to use a bit of fabric stiffener on the petals to prevent them from curling too much over time. Having a decorative ribbon or a piece of rustic burlap on hand can help you wrap the bouquet, adding that final professional touch to your handcrafted crochet project.
2. Master the Core Techniques of the Daisy Bouquet Crochet – Pattern
The most distinctive part of the Daisy Bouquet Crochet – Pattern is the petal construction, which often uses a combination of chains, slip stitches, and double crochets. Each petal is usually worked directly into the yellow center or created separately and sewn on later. Mastering the chain-loop technique is the fastest way to create a full, lush daisy that looks symmetrical and vibrant.
To start the center of your Daisy Bouquet Crochet – Pattern, you will likely use the magic ring technique. This allows you to pull the center tight, leaving no visible hole where the stem attaches. Working in a continuous spiral of single crochet stitches creates a sturdy base that can hold the weight of the petals and the wire insert without sagging.
When you transition to the petals in the Daisy Bouquet Crochet – Pattern, consistency is key. Each petal should have the same number of stitches to ensure the flower looks balanced. Using a treble crochet stitch for the middle of the petal can give it a lovely elongated shape, which is a hallmark of the Oxeye daisy style often featured in high-end crochet flower patterns.
Integrating the green leaves into your Daisy Bouquet Crochet – Pattern adds much-needed contrast and realism. Leaves are typically worked in rows, starting with a foundation chain and then working on both sides of the chain to create an oval or pointed shape. Using half double crochets toward the edges of the leaf helps create a natural-looking taper that complements the crochet daisy blooms.
Assembly is where your Daisy Bouquet Crochet – Pattern truly comes to life. You will learn to wrap the floral wire with green yarn, using a small amount of glue at the top and bottom to secure it. This technique, known as yarn-wrapping stems, is a favorite among professional crochet designers because it creates a seamless transition from the flower head to the base of the bouquet.
Precision in the Daisy Bouquet Crochet – Pattern involves hiding your yarn tails inside the flower center or along the stem. Using a seamless join technique when changing colors from yellow to white will make your work look like it came from a boutique. Practice makes perfect, and after your third or fourth flower, you will find a rhythm that makes this crochet floral project move along quickly.
3. Customizing Colors and Sizes in Your Daisy Bouquet Crochet – Pattern
One of the best things about the Daisy Bouquet Crochet – Pattern is how easily it can be adapted to fit any color palette. While white and yellow are traditional, “Gerbera” style daisies in bright pinks, oranges, and purples are incredibly popular. By simply swapping your yarn, you can turn a standard crochet flower pattern into a vibrant, multi-colored centerpiece that fits a nursery or a festive party.
Varying the size of the flowers in your Daisy Bouquet Crochet – Pattern adds a level of sophistication and “organic” feel to the arrangement. To make smaller daisies, you can use fingering weight yarn and a 2.0mm hook, while larger focal flowers can be made by doubling the yarn strands. This variety creates visual interest and makes your crochet bouquet look like it was hand-picked from a wild meadow.
You can also experiment with the “fullness” of your Daisy Bouquet Crochet – Pattern by adding more layers of petals. A double-layered daisy, where one set of petals sits behind another, creates a pom-pom effect that is very trendy in modern home decor. This variation is a great way to use up leftover scraps of white yarn while enhancing the 3D texture of your crochet floral art.
The length of the stems in your Daisy Bouquet Crochet – Pattern can also be customized depending on the intended use. Long stems are perfect for floor vases, while shorter stems are better for crochet wedding bouquets or table decor. Being able to bend the wire also allows you to “pose” your flowers, giving your Daisy Bouquet Crochet – Pattern a more dynamic and lifelike appearance.
Don’t forget that the Daisy Bouquet Crochet – Pattern can be used for more than just bouquets. Individual flower heads can be attached to hair clips, hats, or even used as crochet appliques for blankets and pillows. This versatility is why this specific handicraft pattern is a staple for many digital content creators who focus on DIY home improvement and fashion.
Finally, consider adding “buds” to your Daisy Bouquet Crochet – Pattern. These are simple green calyxes with just a tiny peek of white or yellow yarn showing, suggesting a flower that hasn’t fully opened yet. Adding two or three buds to your crochet arrangement provides a level of detail that sets your work apart from basic tutorials and makes your SEO-optimized content more valuable to readers.
4. Maintenance and Display Tips for Your Daisy Bouquet Crochet – Pattern
Once you have completed your Daisy Bouquet Crochet – Pattern, keeping it looking fresh is quite simple compared to real flowers. Unlike living plants, your crochet daisies only need a light dusting every now and then. If they get particularly dusty, a quick blast from a hair dryer on a cool setting is usually enough to clean your handmade yarn flowers without damaging the delicate stitches.
For those who want their Daisy Bouquet Crochet – Pattern to stay upright and firm, applying a light mist of clear matte sealer can help. This prevents the cotton fibers from attracting as much dust and adds a layer of protection against humidity. It is a professional secret used by many who sell crochet home decor to ensure their products last for years in the customer’s home.
If you find that the petals of your Daisy Bouquet Crochet – Pattern are starting to droop, you can easily “re-shape” them by hand. Because cotton has a bit of memory, a gentle tug and flatten with your fingers will usually restore the original shape. This durability is one of the main reasons why the Daisy Bouquet Crochet – Pattern is such a popular search term for eco-conscious decorators.
Storing your Daisy Bouquet Crochet – Pattern is also a breeze. If you want to swap your decor for the holidays, simply wrap the bouquet in acid-free tissue paper and place it in a sturdy box. Avoid vacuum-sealing your crochet flowers, as this can crush the fiberfill centers and permanently crease the petals, making it harder to revive your crochet floral arrangement next spring.
For a unique display, try placing your Daisy Bouquet Crochet – Pattern in non-traditional containers like vintage teapots, mason jars, or even a wall-mounted wooden crate. The rustic nature of crochet pairs perfectly with “shabby chic” or “cottagecore” aesthetics. Your Daisy Bouquet Crochet – Pattern can serve as a permanent “welcome” sign when placed in a hallway or entry table.
Lastly, remember that your Daisy Bouquet Crochet – Pattern makes an incredible gift for people with allergies. Since it doesn’t produce pollen, it is the perfect way to bring the joy of flowers into a hospital room or a scent-sensitive office. Sharing your crochet success story and photos of your finished bouquet online can also help inspire other makers in the crochet community to try this rewarding project.
FAQ: Common Questions About the Daisy Bouquet Crochet – Pattern
Is the Daisy Bouquet Crochet – Pattern suitable for beginners?
Yes, the Daisy Bouquet Crochet – Pattern is very beginner-friendly because it uses basic stitches like single crochet and double crochet. The most challenging part is handling the wire for the stems, but the floral work itself is straightforward and repetitive.
What is the best yarn for a crochet daisy?
The best yarn for a Daisy Bouquet Crochet – Pattern is 100% cotton. Cotton holds its shape much better than acrylic and doesn’t “pill,” ensuring that your crochet flowers look crisp and professional for a long time.
How long does it take to finish a full bouquet?
A single flower for your Daisy Bouquet Crochet – Pattern typically takes about 20 to 30 minutes once you are familiar with the steps. A full bouquet of 10 to 12 flowers can usually be completed over a weekend.
Can I wash my crochet daisy bouquet?
While you can technically wash cotton, it is not recommended to submerge the Daisy Bouquet Crochet – Pattern in water because of the internal metal wire, which could rust. Spot cleaning with a damp cloth is the safest method for your yarn crafts.
Do I have to use wire for the stems?
While you can crochet a “tube” for a stem, using wire in your Daisy Bouquet Crochet – Pattern is highly recommended if you want the flowers to stand up in a vase. Without wire, the heavy flower heads will likely flop over.
How many petals should a crochet daisy have?
Most variations of the Daisy Bouquet Crochet – Pattern feature between 12 and 18 petals. The number depends on how closely you space them around the yellow center and the look you are trying to achieve.
Conclusion
In this article, we have explored the intricate and joyful process of creating a Daisy Bouquet Crochet – Pattern. We covered the essential materials needed, such as mercerized cotton yarn and floral wire, and discussed the core techniques like the magic ring and treble crochet petals. We also looked at how to customize your crochet daisies by playing with colors and sizes to create a unique, organic-looking arrangement. Finally, we touched on maintenance tips to ensure your handmade floral decor stays beautiful for years to come.
This Daisy Bouquet Crochet – Pattern is more than just a craft project; it is a way to bring lasting beauty into your environment through the art of fiber. We hope this guide helps you feel confident in starting your own floral journey. Please feel free to leave your sincere opinion on this tutorial and share any suggestions or variations you discovered while making your bouquet. Happy crocheting!