The Drawstring Crochet Bag Pattern – Star Stitch is a charming and functional project that combines beautiful stitchwork with practicality.
Whether you’re a beginner or an experienced crocheter, this pattern is an excellent way to showcase your skills while creating a stylish, everyday accessory.
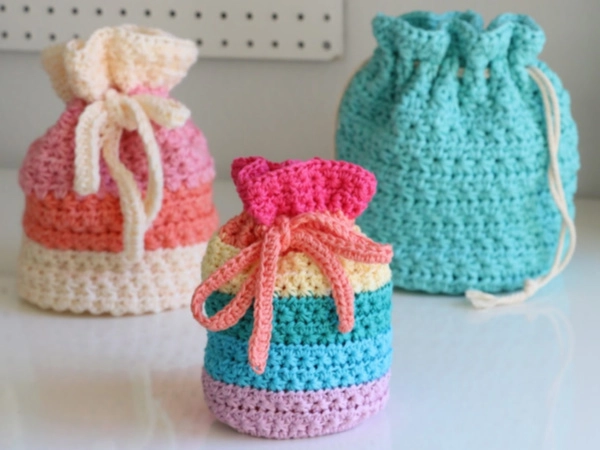
The star stitch, with its textured and unique appearance, adds a touch of elegance to any bag, making it stand out in both fashion and functionality.
In this article, we will guide you through the steps to crochet your very own drawstring bag using the star stitch, provide customization tips, and answer some frequently asked questions to ensure your success.
Crocheting a bag is always a rewarding experience, and the Drawstring Crochet Bag Pattern – Star Stitch offers the perfect blend of simplicity and elegance. The star stitch itself is an eye-catching technique, and when paired with a drawstring closure, it results in a practical, versatile bag that can be used for a variety of purposes. Whether you’re using it for everyday errands, trips to the beach, or as a gift for someone special, this crochet bag will surely impress with its texture and functionality. Let’s dive into the details of this pattern and explore how you can create your own.
As you follow along, you’ll find that creating this bag involves basic crochet stitches along with the star stitch, which may be new to some, but it’s a fun and rewarding technique to learn. The beauty of the Drawstring Crochet Bag Pattern – Star Stitch lies in its versatility and customization options. You can experiment with different yarn colors, sizes, and even embellishments to make the bag your own. Now, let’s explore the materials you’ll need to get started.
1. Materials Needed for the Drawstring Crochet Bag
Before diving into your crochet project, it’s essential to gather all the materials you’ll need to ensure a smooth and successful crochet experience. For the Drawstring Crochet Bag Pattern – Star Stitch, you’ll need the following:
- Yarn: For this pattern, medium-weight yarn (such as worsted weight) works best. Choose a color that suits your style, but consider vibrant or neutral shades depending on your desired look. You’ll need approximately 200-300 yards of yarn for a standard-sized bag. Cotton yarn is a great option for a sturdy, durable bag, while acrylic yarn is soft and easy to work with.
- Crochet Hook: The size of the hook you use should correspond with the yarn weight. For worsted weight yarn, a 5mm (H-8) hook is typically recommended, but make sure to check your yarn’s label for any specific recommendations. A slightly smaller or larger hook may be necessary depending on your tension.
- Stitch Markers: These are helpful for keeping track of your rounds, especially when working in the round. They ensure that you don’t lose your place in the pattern.
- Yarn Needle: After completing your bag, a yarn needle is essential for weaving in any loose ends and ensuring a neat finish.
- Drawstring: For the closure of your bag, you’ll need a length of sturdy cord or yarn to create the drawstring. You can either make your own using yarn or purchase a pre-made cord.
- Scissors: Don’t forget a sharp pair of scissors to cut your yarn when finishing off your project.
With these materials in hand, you’re all set to begin your crochet journey with the Drawstring Crochet Bag Pattern – Star Stitch.
2. Step-by-Step Instructions for Creating the Drawstring Crochet Bag
Now that you have your materials ready, it’s time to dive into the steps required to create your Drawstring Crochet Bag using the star stitch. Follow these steps carefully to ensure a smooth crochet experience:
- Start with a Magic Ring: Begin by creating a magic ring (also known as a magic circle), which will serve as the foundation for your bag. This technique creates a tight and adjustable loop, perfect for starting a crochet project worked in the round.
- Work the First Round: Crochet a few stitches (typically single crochet or double crochet) into the magic ring. This is the base of your bag. Use a stitch marker to keep track of the start of each round, which is especially important as you continue to work in the round.
- Increase for the Bottom of the Bag: To give your bag a flat and round shape, you’ll need to increase stitches in each round. Follow the pattern to increase the number of stitches as you go to create a circular base.
- Work the Star Stitch: The star stitch is the highlight of this pattern. It creates a textured, star-like pattern that adds dimension and interest to your crochet work. To create the star stitch, you’ll need to yarn over and pull through multiple loops before finishing the stitch. This technique is explained in detail within the pattern, and while it might feel challenging at first, with practice, it becomes quite rewarding.
- Continue in Rounds: After the bottom of the bag is complete, you will continue crocheting in rounds to form the body of the bag. Keep following the pattern and using the star stitch to build up the sides of your bag. Ensure that your tension remains consistent as you work.
- Finish the Top of the Bag: Once you’ve reached the desired height for your bag, it’s time to finish the top. You will typically add a few rows of simple stitches (such as single crochet) to form a clean edge where the drawstring will go through.
At this point, your bag is nearly complete, and it’s time to add the drawstring.
3. How to Add the Drawstring Closure
Adding the drawstring closure is an essential part of completing your Drawstring Crochet Bag. Here’s how to do it:
- Create a Drawstring: You can either crochet a simple chain using your yarn or use a pre-made cord. If you choose to crochet a chain, make sure it is long enough to thread through the top of the bag and tie a knot. Aim for about 50-60 inches of length, depending on the size of your bag.
- Thread the Drawstring: Using a yarn needle, thread the drawstring through the top of the bag. If you’ve worked in a solid row or round at the top, create a space for the drawstring by weaving it between the stitches or creating a small channel.
- Tie the Drawstring: Once the drawstring is threaded through, tie a knot at both ends to secure it. You can also add decorative beads or tassels to the ends for extra flair if desired.
- Test the Closure: Pull the drawstring to test its function. It should close the bag neatly when pulled and open easily when released.
- Secure Loose Ends: Use your yarn needle to weave in any loose ends from your yarn or drawstring. This ensures a clean and polished look for your bag.
- Optional Embellishments: If you want to add more personality to your bag, consider adding embellishments like buttons, crochet flowers, or even a lining inside the bag. These little touches can elevate your bag and make it uniquely yours.
Now your Drawstring Crochet Bag is complete, ready to be used for carrying your essentials, and showcasing your crochet skills.
4. Customizing the Drawstring Crochet Bag
The Drawstring Crochet Bag Pattern – Star Stitch is highly customizable, allowing you to put your personal touch on the finished product. Here are a few ways to personalize your bag:
- Color Choices: While autumn-inspired colors like browns, oranges, and reds are lovely, you can customize the bag with any color combination you like. Choose bold, bright colors for a fun and youthful look, or opt for neutral tones for a more minimalist style.
- Size Adjustments: You can make your bag larger or smaller by adjusting the number of rounds or rows you crochet. This makes the pattern versatile for different needs—whether you’re making a small coin bag or a larger beach tote.
- Different Yarn Types: Consider experimenting with different yarns to achieve various textures. Cotton yarn gives the bag a sturdy, structured feel, while soft acrylic yarn will make it more flexible and lightweight.
- Add Appliqués or Embellishments: Personalize your bag by attaching crochet flowers, hearts, or geometric shapes. This can add a playful or sophisticated touch, depending on your style.
- Experiment with Stitch Variations: You can modify the pattern to include other fun stitches, such as the shell stitch or puff stitch, for added texture and depth.
- Add a Lining: For a more durable and polished finish, consider lining your bag with fabric. This will give it a professional look and also provide extra structure and support.
Customizing the Drawstring Crochet Bag allows you to create a truly one-of-a-kind piece that reflects your style.
FAQ about the Drawstring Crochet Bag Pattern – Star Stitch
Q1: Is the Drawstring Crochet Bag Pattern – Star Stitch suitable for beginners? While the star stitch may take some practice, this pattern is still beginner-friendly as long as you are familiar with basic crochet techniques like chaining, single crochet, and double crochet.
Q2: Can I use a different type of yarn for this project? Yes, you can use different yarns, but be sure to adjust your hook size accordingly. Consider using yarn that provides structure for the bag, like cotton or a cotton blend.
Q3: How can I make my Drawstring Crochet Bag larger or smaller? To adjust the size, simply add or subtract rounds for the body and rows for the top, keeping in mind that increasing the
size may require more yarn.
Q4: What is the best way to make the star stitch? The star stitch involves multiple yarn overs and pulling through loops. Be patient, and refer to online tutorials if needed for visual guidance.
Q5: How do I secure the drawstring? Once threaded through the top of the bag, tie the ends of the drawstring in knots to secure it in place.
Conclusion
The Drawstring Crochet Bag Pattern – Star Stitch is a beautiful and practical project that results in a functional and stylish accessory. Whether you’re a beginner or an experienced crocheter, this pattern offers endless possibilities for customization. By following the instructions outlined in this article, you can create a bag that is uniquely yours. Remember, crocheting is all about creativity, so have fun with colors, yarn choices, and embellishments. We’d love to hear your thoughts and suggestions on this pattern—leave a comment below and let us know what you’d like to see in future crochet projects! Happy crocheting!