Finding the perfect Easter Bunny Baskets em Crochet – Pattern is one of the most rewarding ways to prepare for the spring season, offering a personalized touch to holiday celebrations. As the air turns crisp and the flowers begin to bloom, crafters everywhere start looking for creative projects that bring joy to children and adults alike. This specific Easter Bunny Baskets em Crochet – Pattern provides a wonderful opportunity to practice your stitching skills while creating a functional piece of art that can hold chocolates, colored eggs, or small toys.
The beauty of following an Easter Bunny Baskets em Crochet – Pattern lies in the versatility of the design, allowing you to customize every detail from the length of the ears to the fluffiness of the tail. Unlike store-bought plastic bins, a crochet basket is sustainable, washable, and carries the sentimental value of being handmade. When you use a high-quality Easter Bunny Baskets em Crochet – Pattern, you are not just making a container; you are crafting a childhood memory that can be brought out year after year as a beloved family tradition.
To succeed with your Easter Bunny Baskets em Crochet – Pattern, it is important to understand the basic construction techniques, such as working in the round and creating sturdy walls that won’t collapse. Most enthusiasts prefer using cotton yarn for this type of project because it offers the structural integrity needed for a basket to stand upright. By diving into this Easter Bunny Baskets em Crochet – Pattern, you will explore various stitches, color changes, and finishing touches that turn simple yarn into a character-filled bunny that captures the magic of Easter Sunday.
1. Choosing the Right Materials for Your Easter Bunny Baskets em Crochet – Pattern
Selecting the appropriate yarn is the first step in bringing your Easter Bunny Baskets em Crochet – Pattern to life. For a basket that maintains its shape, a worsted weight or bulky cotton yarn is highly recommended. Cotton is less stretchy than acrylic, ensuring that when the basket is filled with heavy chocolate eggs, it doesn’t sag or lose its adorable bunny form.
The hook size is another critical component of the Easter Bunny Baskets em Crochet – Pattern. Usually, you will want to use a hook that is slightly smaller than what the yarn label suggests. This creates a tighter tension and a denser fabric, which is essential for “basket-style” projects where you don’t want the contents to peek through the stitches or the sides to flop over.
Don’t forget the importance of stitch markers when following an Easter Bunny Baskets em Crochet – Pattern. Since these baskets are almost always worked in a continuous spiral to avoid a visible seam, it is very easy to lose track of where a round begins. A simple marker will save you hours of frustration and ensure your bunny’s face and ears are perfectly symmetrical.
The Easter Bunny Baskets em Crochet – Pattern often requires a few notions beyond just yarn and hooks. You will need a tapestry needle for weaving in ends and sewing on the ears and facial features. Many crafters also choose to use safety eyes for a professional look, though embroidered eyes are a safer alternative if the basket is intended for a very young child.
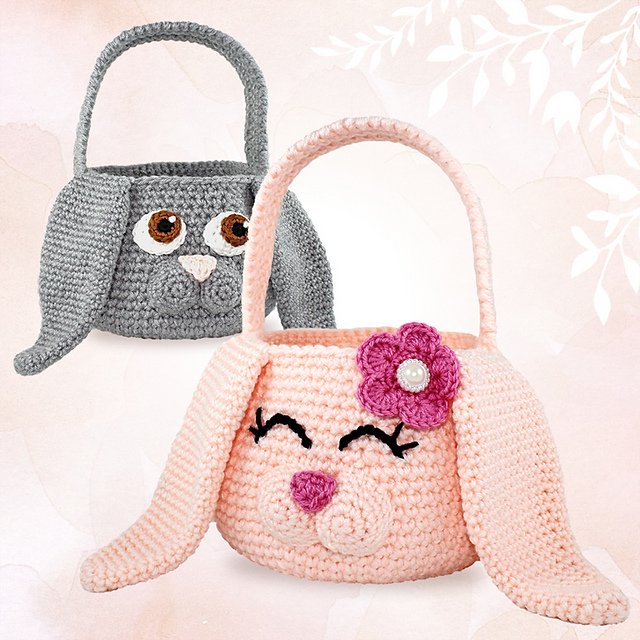
Color choice plays a massive role in the final aesthetic of your Easter Bunny Baskets em Crochet – Pattern. While traditional white and grey are popular, don’t be afraid to experiment with pastel pinks, blues, or even a “chocolate” brown bunny. The pattern serves as your blueprint, but the colors you choose define the personality of the finished Easter character.
Lastly, consider the “stuffing” for the ears. Some versions of the Easter Bunny Baskets em Crochet – Pattern call for lightly stuffed ears to give them a 3D effect, while others prefer flat, floppy ears. If you want the ears to stand straight up, you might even consider inserting a bit of millinery wire or stiffened felt, depending on the specific instructions provided in your crochet guide.
2. Master the Core Stitches Used in the Easter Bunny Baskets em Crochet – Pattern
The foundation of nearly every Easter Bunny Baskets em Crochet – Pattern is the magic ring (or magic circle). This technique allows you to start stitching in the round without leaving a hole at the very bottom of the basket. Mastering the magic ring ensures that your basket base is solid and professional-looking, preventing small treats from falling out.
The most common stitch you will encounter in an Easter Bunny Baskets em Crochet – Pattern is the single crochet (sc). This stitch is preferred because it creates a tight, sturdy fabric. Some modern patterns might suggest the “waistcoat stitch” (also known as the knit stitch) which provides even more rigidity to the walls, making the basket feel almost like it was woven.
Increasing and decreasing are vital skills for shaping the Easter Bunny Baskets em Crochet – Pattern. You will use increases to expand the flat circle for the base and decreases if the pattern includes a slightly tapered top or for shaping the tips of the bunny ears. Understanding how to execute an invisible decrease will keep your project looking smooth and high-end.
Texture can be added to your Easter Bunny Baskets em Crochet – Pattern by using the “back loop only” (BLO) technique. Often, a pattern will instruct you to work in the BLO for one round to create a sharp 90-degree turn from the base to the walls. This creates a distinct “edge” that helps the basket sit flat on a table or floor.
The ears are usually the most iconic part of the Easter Bunny Baskets em Crochet – Pattern. These are often made separately and involve a mix of single crochet, half-double crochet, and double crochet to create a tapered, leaf-like shape. Following the pattern closely during this stage is important so that both ears end up the same size and length.
Finishing the top edge of your Easter Bunny Baskets em Crochet – Pattern often involves a crab stitch (reverse single crochet) or a simple slip stitch border. This gives the rim of the basket a finished, “piped” look and adds one last layer of stability to the opening, ensuring the basket doesn’t stretch out of shape when handled by excited children.
3. Customizing Your Easter Bunny Baskets em Crochet – Pattern for Different Ages
When making an Easter Bunny Baskets em Crochet – Pattern for toddlers, safety is the primary concern. Instead of using plastic safety eyes which can be a choking hazard, use your yarn needle to embroider a simple nose and eyes. A sleepy-eye look with a few curved stitches can make the bunny look incredibly sweet and gentle.
For older children, you can make the Easter Bunny Baskets em Crochet – Pattern more interactive. Consider adding a small crochet pocket on the inside of the basket for a “special” gold coin or a hidden note. You can also adjust the handle length so it fits comfortably over their arm while they are out on an Easter egg hunt in the garden.
The size of your Easter Bunny Baskets em Crochet – Pattern is easily adjustable by changing your yarn weight. If you want a giant floor basket to hold a large stuffed animal, use jumbo chenille yarn and a 10mm hook. If you want tiny “favor” baskets for a dinner party, use embroidery floss or thin cotton thread with a tiny steel hook.
Adding a “tail” to your Easter Bunny Baskets em Crochet – Pattern is a must for the full bunny effect. You can make a traditional yarn pom-pom using a pom-pom maker or crochet a small sphere and stuff it. Attaching this to the back of the basket adds a whimsical touch that makes the design look adorable from every single angle.
Some people use the Easter Bunny Baskets em Crochet – Pattern as a base for other animals too. By changing the ear shape and the facial embroidery, the same basket base can become a lamb or a chick. However, the bunny remains the classic choice, and many crafters enjoy making a whole “warren” of baskets in various colors for their nieces and nephews.
If you are an advanced crafter, you might modify the Easter Bunny Baskets em Crochet – Pattern to include tapestry crochet elements. This involves carrying two colors of yarn at once to create a pattern, like polka dots or a name, directly into the walls of the basket. This level of personalization makes the crochet pattern a true one-of-a-kind heirloom piece.
4. Maintenance and Display of Your Crochet Easter Creations
Because the Easter Bunny Baskets em Crochet – Pattern results in a fabric item, it will eventually need cleaning, especially after being filled with sticky candies. If you used cotton yarn, you can usually hand wash the basket in cool water and reshape it while damp. Let it air dry over a bowl or a coffee tin to ensure it regains its perfectly round shape.
Storing your Easter Bunny Baskets em Crochet – Pattern properly will keep it looking new for many years. Don’t squash it at the bottom of a heavy decoration box. Instead, stuff the inside with tissue paper to maintain the form and place it in a breathable cotton bag. This prevents the yarn from getting “fuzzy” or pilling during the off-season.
If you find that your basket has become a bit “floppy” over time, you can use a fabric stiffener spray. Lightly mist the walls of the finished Easter Bunny Baskets em Crochet – Pattern and let it dry. This acts like starch and will give the crochet stitches back their original rigidity, making the bunny stand tall and proud once again.
Displaying your work doesn’t have to be limited to Easter Sunday. A beautifully made Easter Bunny Baskets em Crochet – Pattern can function as nursery decor all year round. It’s a great place to store baby socks, pacifiers, or small rattles. The neutral tones of a well-made crochet bunny fit perfectly into the “boho-chic” nursery trend that is currently very popular.
If you are making these items to sell at craft fairs, presentation is everything. Place a bit of “paper grass” inside the basket created from your Easter Bunny Baskets em Crochet – Pattern and wrap it in clear cellophane with a pretty bow. Highlighting that it is a handmade pattern and eco-friendly will appeal to customers looking for quality alternatives to mass-produced items.
Finally, the most important part of completing an Easter Bunny Baskets em Crochet – Pattern is the sense of accomplishment. Crocheting is a mindful activity that reduces stress, and seeing a finished character emerge from a ball of string is a magical experience. Whether you are a hobbyist or a professional, this pattern is a joyful celebration of the spring season and the art of crochet.
FAQ: Frequently Asked Questions about Easter Bunny Baskets em Crochet – Pattern
1. How long does it take to finish an Easter Bunny Baskets em Crochet – Pattern?
For an intermediate crocheter, a standard-sized basket usually takes between 4 to 6 hours. This depends on the complexity of the ears and whether you are adding extra embellishments like flowers or a bow tie to your bunny.
2. Can I use acrylic yarn for this pattern?
While you can use acrylic, it is much softer and more prone to stretching. If you use acrylic for your Easter Bunny Baskets em Crochet – Pattern, you may need to line the inside with felt or fabric to give it enough structure to hold its contents without deforming.
3. What is the best size for an Easter egg hunt basket?
A diameter of 6 to 8 inches is usually perfect. This size is large enough to hold a decent amount of eggs but light enough for a child to carry easily. Most Easter Bunny Baskets em Crochet – Pattern designs are scaled to this standard size.
4. How do I make the ears stand up on my crochet bunny?
The secret is usually tight stitches or a bit of reinforcement. You can sew a piece of stiff felt to the back of the ears or use a very “stiff” yarn like hemp or twine held together with your cotton yarn to provide extra lift.
5. Is this pattern suitable for someone who only knows the basics?
Yes! If you know how to make a magic ring, a single crochet, and how to increase/decrease, you can successfully complete most Easter Bunny Baskets em Crochet – Pattern variants. It is a great “first 3D project” for beginners.
6. Where can I find variations of this design?
Many designers offer variations of the Easter Bunny Baskets em Crochet – Pattern on platforms like Ravelry or Etsy. Some feature long, “floppy” lop ears, while others feature short, upright ears. You can choose the one that matches your favorite bunny breed!
Conclusion
In this comprehensive guide, we have explored the delightful journey of creating an Easter Bunny Baskets em Crochet – Pattern, from selecting the sturdiest cotton yarns to mastering the essential single crochet and magic ring techniques.
We discussed how to customize the basket for safety and style, and how to maintain the finished product so it lasts for many holidays to come. This project is the perfect intersection of utility and whimsy, proving that handmade gifts truly are the heart of any celebration.