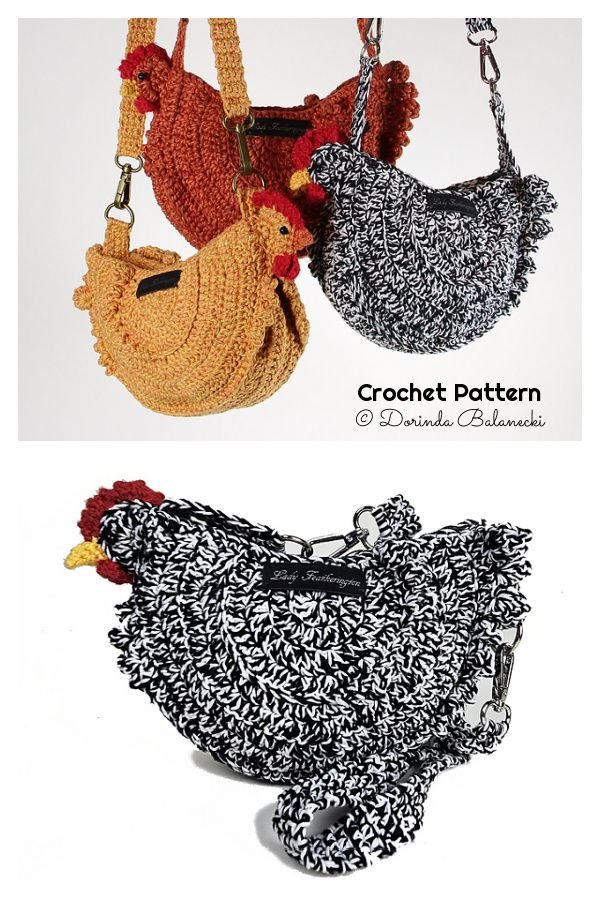
If you’re looking to add a touch of handmade charm to your Easter celebrations, creating an Easter Chicken Bag Crochet – Pattern is a delightful and practical project to consider.
These adorable little bags are perfect for gifting small treats, decorating your home, or even as a fun holiday accessory for kids and adults alike. With just a hook, some colorful yarn, and a little imagination, you can crochet a chicken-themed bag that’s bursting with personality.
The Easter Chicken Bag Crochet – Pattern is more than just a craft—it’s a creative way to make memories. Whether you’re filling them with chocolate eggs, coins, or notes of kindness, these bags carry not only gifts but love.
They’re ideal for Easter egg hunts, party favors, or seasonal decorations that bring a cozy, handmade vibe to your celebration.
In this article, we’ll walk you through everything you need to know to create your own Easter Chicken Bag Crochet – Pattern, from choosing materials to stitching tips, customization ideas, and beyond. Let’s bring this joyful little chicken to life and make this Easter extra special with a handmade touch.
1. Materials You’ll Need for the Easter Chicken Bag
Getting started with your Easter Chicken Bag Crochet – Pattern means collecting the right supplies. Having the right materials on hand helps make the process smoother, especially for beginners or those crafting on a deadline.
The most important material is yarn. Choose worsted weight cotton or acrylic yarn in cheerful Easter colors like yellow, white, orange, and red. Cotton yarn is great for structure and durability, while acrylic yarn offers vibrant color and affordability.
You’ll need a crochet hook that matches your yarn weight—usually between 4.0mm (G) and 5.0mm (H) is ideal. A smaller hook keeps the stitches tight, which is important if the bag will hold small items like candies or coins.
Basic tools such as scissors, a yarn needle, and stitch markers will help you through the process. A stitch marker is especially helpful to keep track of your rounds or rows, particularly if the bag is crocheted in a spiral.
You may also want to include some extras for embellishment, such as safety eyes, small buttons, or even felt pieces for the beak, comb, and wings. Alternatively, you can crochet all features to keep it 100% yarn-based.
Lastly, prepare some soft stuffing if you’d like your chicken bag to be more plush and decorative. While most are made as hollow pouches, a stuffed version can double as a toy or shelf decoration for the season.
2. Crocheting the Base and Body of the Bag
The body of your Easter Chicken Bag Crochet – Pattern is where the magic begins. Most chicken bags start with a flat circular or oval base and are worked upward in rounds to form the pouch.
Begin by creating a magic ring or chain circle and work your first round of single crochet (sc) or half double crochet (hdc). Continue increasing evenly until your base reaches the desired size—around 4 to 5 inches in diameter is typical for a small treat bag.
Once the base is complete, you’ll work in the round without increasing to form the height of the bag. Depending on the look you’re going for, you can use simple single crochet stitches or alternate rows with decorative stitches like puff stitches or shells for texture.
Keep checking the shape as you go. It should start to look like a soft cylinder or bucket. This is the “body” of your chicken, and you can make it tall or short depending on how much you want to store inside.
When the main body is finished, fasten off and weave in the ends neatly. You now have a basic pouch ready to be transformed into an adorable Easter chicken.
Some patterns include a drawstring or flap to close the top, but many Easter Chicken Bag Crochet – Pattern designs leave it open for easy access—especially for kids. A crocheted or braided handle can also be added to make it easy to carry.
3. Adding Features: Beak, Comb, Eyes, and Wings
Now it’s time to give your Easter Chicken Bag Crochet – Pattern its signature personality. This is where your creativity can really shine as you bring your chicken to life with simple but charming features.
Start with the beak. A small triangle crocheted in orange or yellow yarn works perfectly. You can make this using just a few rows of single crochet, then stitch it securely to the front center of the bag.
The comb, or crest, on top of the chicken’s head is typically made using red yarn. Crochet a small scalloped shape or several bobble stitches in a row. Sew it to the top of the bag to give your chicken a proud, festive look.
For the eyes, you have a few options. You can sew on small black buttons, attach safety eyes, or crochet small white and black circles. Placing the eyes slightly above and to the sides of the beak gives the chicken a friendly appearance.
Wings are another fun addition. Crochet two small ovals or half-circle shapes and attach them to the sides of the bag. Some crafters like to sew them flat, while others use a little stuffing to make them pop out in 3D.
You can also add little feet or legs by making short chains and attaching small claws at the end. These dangle adorably from the bottom and really complete the chicken’s look.
Finally, consider giving your chicken a bow, a ribbon, or even a tiny hat if you’re feeling whimsical. The Easter Chicken Bag Crochet – Pattern is meant to be fun and festive—so don’t hold back!
4. Customization Ideas and Usage Tips
What makes the Easter Chicken Bag Crochet – Pattern truly special is how customizable it is. Whether you’re making one bag or a dozen, there are endless ways to tailor each one for your needs and style.
Try using different yarn textures or color combinations. A speckled yarn gives a feathered appearance, while pastels make the chicken look soft and sweet. You could even make a rainbow chicken for extra fun at Easter.
Personalize the bags by adding initials, name tags, or small crochet flowers. If you’re gifting these, include a note inside each one with a kind Easter message or a family memory to make it more meaningful.
For young children, consider adding a small bell or rattle inside the bag to make it interactive. Just ensure it’s securely fastened and that the materials used are safe for kids.
If you’re hosting an Easter party or hunt, you can make each chicken bag a different color and assign them to guests or family members. This not only looks great as a group but also avoids mix-ups during the event.
Beyond Easter, these chicken bags can serve as spring decorations, reusable treat pouches, or even coin purses. They make great table centerpieces when filled with faux grass and chocolate eggs.
Finally, if you’re selling handmade crafts, the Easter Chicken Bag Crochet – Pattern is a great seasonal item. They’re quick to make, appealing to both adults and children, and perfect for craft fairs or online shops.
FAQ: Easter Chicken Bag Crochet – Pattern
Q1: Is the Easter Chicken Bag Crochet – Pattern suitable for beginners?
Yes! Most chicken bag patterns use basic stitches like single crochet and are worked in rounds, making them perfect for beginners with some basic experience.
Q2: How much yarn do I need for one chicken bag?
You’ll need approximately 50–100 grams of worsted weight yarn, depending on the size and how many colors or embellishments you add.
Q3: Can I machine wash the finished bag?
If using cotton or machine-washable acrylic yarn, yes. Always check the yarn label. It’s best to air dry to preserve shape and details.
Q4: How long does it take to complete one bag?
On average, 2 to 4 hours, depending on your skill level and complexity of features. Once you make one, the next will go faster!
Q5: Can I sell the finished bags from this pattern?
Yes, most free or paid patterns allow selling finished items with credit to the designer. Always check licensing terms for commercial use.
Q6: Where can I find free Easter Chicken Bag patterns?
Many crochet websites, crafting blogs, and platforms like Ravelry and Pinterest offer free downloadable patterns for chicken bags, often with photo tutorials.
Conclusion
Creating an Easter Chicken Bag Crochet – Pattern is a joyful and rewarding way to bring handmade charm to your Easter celebration. From stitching the simple base to adding whimsical details like beaks and wings, each step brings you closer to a finished piece that’s both functional and festive. With the ability to customize colors, features, and sizes, this project is suitable for crafters of all levels and can be treasured for years to come.
We hope this article inspired you to grab your hook and yarn and try your hand at this fun holiday craft. If you enjoyed this guide, please leave your honest opinion and suggestions in the comments below. We’d love to see your creations and hear how you personalized your Easter chicken bags!
Let me know if you’d like this article formatted as a printable PDF or adapted for a blog or shop!