Creating an Easter napkin holder in the shape of a crochet bunny – Pattern is a delightful way to bring a touch of handmade charm to your holiday table setting this spring. There is something incredibly special about using a pattern to create functional art, and this specific Easter napkin holder serves as both a festive decoration and a practical accessory for your guests. Whether you are an experienced crafter or just picking up a hook for the first time, following a dedicated crocheted bunny guide ensures that your stitches are uniform and your finished product looks professional and inviting.
When you decide to work on an Easter napkin holder in the shape of a crocheted bunny – Pattern, you are engaging in a tradition of seasonal decorating that emphasizes warmth and personal effort. The shape of a crocheted bunny is iconic for the season, symbolizing renewal and joy, which makes it the perfect motif for a brunch or dinner gathering. By using a specific pattern, you can replicate the design across a full set of holders, ensuring that every seat at your table features a consistent and adorable crocheted bunny to greet your family and friends.
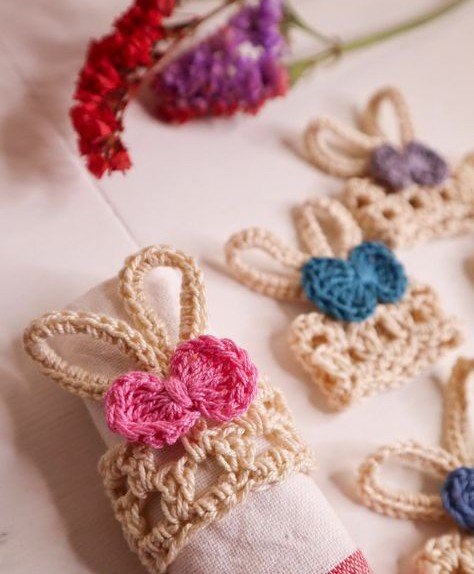
The beauty of this Easter napkin holder in the shape of a crocheted bunny – Pattern lies in its versatility and the ability to customize colors to match your linens. A crocheted bunny can be made in classic white, soft pastels, or even rustic earthy tones depending on the vibe of your Easter celebration. Beyond just being a napkin holder, these little creations often become cherished keepsakes that children and adults alike look forward to seeing year after year. Let’s explore the intricate details of how to master this crocheted bunny pattern and elevate your holiday decor.
1. Choosing the Right Materials for Your Easter Napkin Holder in the Shape of a Crocheted Bunny – Pattern
The first step in executing your Easter napkin holder in the shape of a crocheted bunny – Pattern is selecting the appropriate yarn and hook. For a napkin holder, you want a fabric that is durable yet soft, which is why mercerized cotton yarn is often the top choice for a crocheted bunny. Cotton holds its shape well, which is essential when the bunny needs to wrap securely around a rolled or folded napkin without drooping.
Your crocheted bunny pattern will usually specify a hook size, typically ranging from 2.5mm to 3.5mm depending on the yarn weight. Using a smaller hook than usual for the yarn can help create tighter stitches, ensuring that the shape of a crocheted bunny remains crisp and defined. This tightness is vital for the napkin holder functionality, as it provides the structural integrity needed to stand upright or hold the ring shape.
In addition to yarn, an Easter napkin holder in the shape of a crocheted bunny – Pattern often requires small safety eyes or embroidery thread for the face. If you are making these for a home with small children, embroidering the eyes is a safer alternative to plastic beads. These tiny details are what breathe life into the crocheted bunny, transforming a simple loop of yarn into a character with personality and Easter spirit.
Stuffing is another component you might need if your pattern includes a 3D head for the bunny. A small amount of polyester fiberfill allows the shape of a crocheted bunny to pop, giving it a plush, high-quality feel. When following the pattern, be careful not to overstuff, as you want the Easter napkin holder to remain lightweight and easy to handle during a busy meal.
You should also consider the ring part of the Easter napkin holder. Some patterns involve crocheting directly around a wooden or plastic ring, while others create a crocheted strap that buttons or sews together. The Easter napkin holder in the shape of a crocheted bunny – Pattern you choose will dictate this, but having a few options on hand allows for more creative freedom.
Lastly, don’t forget your finishing tools like a tapestry needle and sharp scissors. Weaving in the ends of your crocheted bunny is a crucial step to ensure the napkin holder doesn’t unravel after a few uses. A well-finished Easter napkin holder in the shape of a crocheted bunny – Pattern should look as clean on the back as it does on the front, reflecting the care you put into your craft.
2. Mastering the Stitches Required for the Crocheted Bunny Shape
To successfully complete the Easter napkin holder in the shape of a crocheted bunny – Pattern, you need to be comfortable with a few basic stitches. Most crocheted bunny designs rely heavily on the single crochet (sc), which creates a dense, sturdy fabric. This stitch is the backbone of the bunny’s body and ears, providing the “canvas” for the rest of your Easter themed details.
The magic ring (or magic circle) is a technique frequently used at the start of an Easter napkin holder in the shape of a crocheted bunny – Pattern. This method allows you to start crocheting in the round without leaving a hole in the center. It is particularly useful for the head or the base of the crocheted bunny, ensuring a seamless and professional look for your napkin holder.
Increases and decreases are the “sculpting” tools of any crocheted bunny pattern. By adding or subtracting stitches in specific rows, you create the curves of the bunny head and the points of the ears. A good Easter napkin holder in the shape of a crocheted bunny – Pattern will clearly mark these transitions, allowing you to see the shape of a crocheted bunny emerge as you work.
The ears are perhaps the most defining feature of the Easter napkin holder. Depending on the pattern, you might use half double crochets (hdc) or double crochets (dc) to give the ears a bit of height and floppiness. The shape of a crocheted bunny ears can vary from long and upright to short and perky, giving your napkin holder a unique look.
Working in the back loops only (BLO) is another trick often found in an Easter napkin holder in the shape of a crocheted bunny – Pattern. This technique creates a ridge that can help the crocheted bunny sit flat against the napkin or create a decorative texture. Understanding these subtle stitch variations will make your Easter napkin holder stand out from basic store-bought versions.
Tension control is the final element of stitch mastery for your crocheted bunny. If your tension is too loose, the napkin holder will be floppy; if it’s too tight, it may be difficult to insert the napkin. Consistent tension ensures that every Easter napkin holder in the shape of a crocheted bunny – Pattern you produce is identical in size, which is vital for a symmetrical table setting.
3. Assembling Your Easter Napkin Holder with Precision
Once all the individual pieces of your Easter napkin holder in the shape of a crocheted bunny – Pattern are ready, assembly begins. This is where the crocheted bunny truly comes together. Using a tapestry needle, you will sew the ears onto the head, ensuring they are placed symmetrically to maintain the balanced shape of a crocheted bunny.
The connection between the bunny and the ring is the most functional part of the Easter napkin holder. Your pattern might suggest sewing the crocheted bunny onto a pre-made ring or joining a crocheted band. It is important to reinforce these stitches, as the napkin holder will experience frequent handling and stretching as napkins are pulled in and out.
Adding the facial features is the most creative part of the Easter napkin holder in the shape of a crocheted bunny – Pattern. A small pink triangle for the nose and two simple dots for the eyes can convey a world of emotion. When working on a crocheted bunny, keeping the expression simple often yields the most “elegant” result for a festive Easter table.
If your pattern includes a tail, a small pom-pom or a crocheted puff stitch works wonders. The tail is often placed on the back of the napkin holder ring, providing a 360-degree decorative experience. This attention to detail is what makes a handmade Easter napkin holder in the shape of a crocheted bunny – Pattern so much more special than a generic alternative.
Starching your finished crocheted bunny is a professional tip not always found in every pattern. A light spray of fabric stiffener can help the ears stay upright and the napkin holder retain its cube-shaped or circular structure. This ensures that the shape of a crocheted bunny remains perfect throughout your entire holiday meal.
Finally, do a “test fit” with your chosen napkins. Different fabrics have different thicknesses, and you want to ensure your Easter napkin holder in the shape of a crocheted bunny – Pattern is wide enough to accommodate them. Adjusting the band length is an easy way to customize the pattern for bulky cloth napkins or thin paper ones, making your crocheted bunny highly adaptable.
4. Tips for Customizing and Scaling Your Crocheted Bunny Pattern
The versatility of the Easter napkin holder in the shape of a crocheted bunny – Pattern allows for endless customization. You can experiment with multi-colored yarns to create “calico” bunnies or use a fuzzy mohair-blend yarn to give your crocheted bunny a soft, realistic texture. Customizing the fabric feel adds a sensory layer to your Easter decorations.
You can also vary the size of the shape of a crocheted bunny by simply changing your yarn weight. A thicker bulky yarn will result in a large, statement napkin holder, while embroidery floss can create a miniature crocheted bunny for a delicate tea party. The pattern logic remains the same; only the scale of the Easter project changes.
Incorporating beads or ribbons into your Easter napkin holder in the shape of a crocheted bunny – Pattern is another way to add flair. A small satin bow tied around the bunny’s neck or a tiny bell can make the napkin holder feel more luxurious. These embellishments make the crocheted bunny feel like a boutique item.
For a cohesive look, you can use the same pattern to create matching items. A large crocheted bunny can serve as a centerpiece, while the smaller ones act as the Easter napkin holder set. This creates a “bunny family” theme across your dining room, which is a hallmark of well-planned Easter decor.
Think about the “function after the feast.” You can modify the Easter napkin holder in the shape of a crocheted bunny – Pattern to include a small loop on the back so it can be hung as an ornament after the holiday. This gives your crocheted bunny a second life beyond just being a napkin holder, making it a more sustainable craft project.
Lastly, don’t be afraid to document your process and any changes you make to the pattern. Every artist has a unique “hand,” and your version of the Easter napkin holder in the shape of a crocheted bunny – Pattern will have its own special character. Sharing your finished crocheted bunny photos online is a great way to inspire other makers in the Easter crafting community.
FAQ: Common Questions about the Easter Bunny Napkin Holder Pattern
What is the best yarn for a crocheted bunny napkin holder?
Cotton yarn is generally considered the best choice. It is less “fuzzy” than wool, which prevents stray fibers from getting on your napkins. It also provides the necessary stiffness to maintain the shape of a crocheted bunny while being easy to wash if it gets stained during dinner.
How long does it take to make one napkin holder?
Depending on your skill level and the complexity of the pattern, a single Easter napkin holder usually takes between 30 to 60 minutes. Because they are small, they are excellent “interim” projects that you can work on while watching TV or traveling.
Can I use this pattern to make other animals?
Yes! The basic structure of the Easter napkin holder in the shape of a crocheted bunny – Pattern can easily be adapted. By changing the ear shape, you can turn your crocheted bunny into a lamb or a chick, allowing you to create a diverse Easter themed set for your table.
How do I clean my crocheted napkin holders?
If you used cotton yarn, you can hand wash them in cool water with a mild detergent. Reshape the crocheted bunny while it is damp and let it air dry. Avoid the dryer, as the heat can distort the shape of a crocheted bunny and cause the napkin holder to shrink.
Is this pattern suitable for children to try?
This is a great project for older children or teenagers who have mastered the basic stitches. The small size of the Easter napkin holder provides a quick sense of accomplishment, making the crocheted bunny pattern a fun holiday activity for the whole family.
Do I need a ring for the napkin holder?
Not necessarily. While some patterns use a wooden ring, many Easter napkin holder in the shape of a crocheted bunny – Pattern designs create a ring entirely out of yarn. This makes the crocheted bunny more flexible and entirely handmade.
Conclusion
In this guide, we have explored the wonderful world of creating an Easter napkin holder in the shape of a crocheted bunny – Pattern. We covered everything from choosing the best cotton yarns and hooks to mastering the essential stitches like the magic ring and single crochet.
We also discussed the importance of assembly and the creative ways you can customize your crocheted bunny to fit your personal style. By following a structured pattern, you can create a beautiful, functional napkin holder that adds a touch of handmade elegance to any Easter celebration.