If you’re on the hunt for a fun and stylish DIY project, then this Easy Granny Rectangle Crochet Bag – Pattern is exactly what you need.
Whether you’re new to crochet or a seasoned yarn lover, this bag is a beginner-friendly and rewarding pattern that results in a functional and fashionable accessory.
In this article, we’ll break down everything you need to know to complete your very own granny rectangle crochet bag.
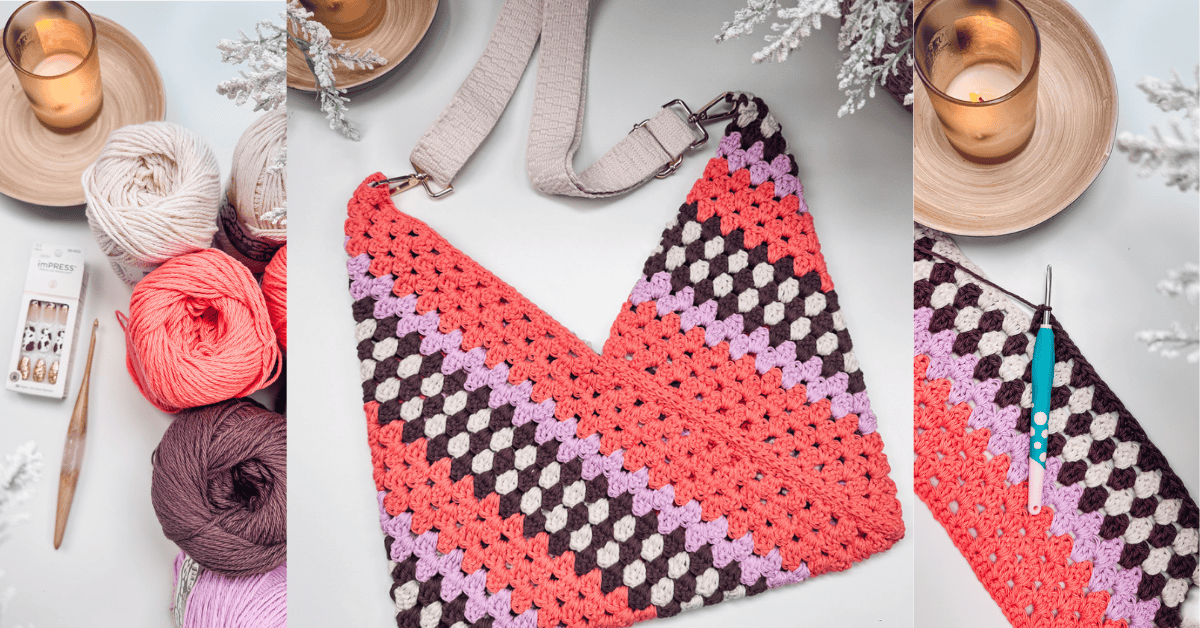
The Easy Granny Rectangle Crochet Bag – Pattern combines traditional techniques with modern flair. It’s a creative, eco-conscious way to express your personality and reduce waste by using leftover yarn. Plus, it’s a versatile project — perfect for everyday use or even as a handmade gift.
From choosing the right yarn to understanding how to shape your rectangle into a beautiful bag, we’ll guide you through the full process. Stick with us as we walk you through step-by-step instructions, pro tips, and answers to the most common questions about crocheting your own granny rectangle bag.
1. Choosing Materials for Your Granny Rectangle Crochet Bag
When starting your Easy Granny Rectangle Crochet Bag – Pattern, the first step is selecting the right materials. The beauty of this pattern is that it’s flexible — you can use a wide range of yarns and hooks depending on your personal preference and desired look.
Opt for medium-weight (worsted) cotton yarn for a sturdy and washable finish. Cotton is highly recommended because it offers durability while maintaining the classic stitch definition of granny squares. For a softer look, you can experiment with acrylic or even a blend of cotton and bamboo.
You’ll also need the right crochet hook. Most granny rectangle patterns work well with a 4.5 mm to 5.5 mm hook. Check the yarn label for guidance, and do a swatch test to ensure your gauge is consistent. Consistency is key to achieving a professional-looking bag.
Don’t forget additional tools like stitch markers, scissors, a yarn needle for weaving in ends, and lining fabric if you want to give your bag a polished interior. You may also want to include a zipper or magnetic clasp for closure, depending on your needs.
Color choice plays a huge role in the final look of your bag. The traditional granny square often features multiple colors, making this an ideal way to use up leftover yarns. Choose contrasting or complementary shades to create visual interest.
If you prefer a modern or minimalist look, consider sticking to a monochrome or two-tone palette. Keep in mind that darker colors will hide dirt better, especially if you plan to use your bag regularly.
Before you begin crocheting, take some time to gather all materials in one place. Being prepared ensures a smooth and enjoyable crafting experience from start to finish.
2. Understanding the Granny Rectangle Stitch Pattern
The magic behind the Easy Granny Rectangle Crochet Bag – Pattern lies in its stitch structure. While many people are familiar with the classic granny square, the granny rectangle is a variation that elongates the form, making it perfect for bags and clutches.
This stitch pattern typically begins with a chain foundation, followed by double crochet (dc) clusters arranged into corners and sides. As you build each round, the rectangle expands symmetrically, creating a balanced and visually pleasing design.
One of the best things about granny rectangles is that they maintain the charm and texture of traditional squares but offer more usable shape for bags and totes. They also work up quickly, making them great for last-minute projects or gifts.
As with any crochet project, tension matters. Maintain a steady rhythm and ensure your stitches aren’t too tight or too loose. This helps the rectangle keep its shape and makes assembling your bag much easier later on.
Each round of the granny rectangle includes increases at the corners. This is where you’ll place two or three dc clusters separated by chain stitches. The sides, in contrast, are made of single dc clusters placed in chain spaces from the previous round.
Once your rectangle reaches the desired size, you can stop increasing and move on to assembling your bag. For most patterns, around 8 to 10 rounds create a medium-sized bag, but feel free to adjust according to your needs.
3. Assembling and Shaping Your Crochet Bag
Now that you’ve completed the base using the Easy Granny Rectangle Crochet Bag – Pattern, it’s time to shape your project into a functional bag. This step transforms your flat work into a stylish three-dimensional accessory.
Start by folding the rectangle in half, lining up the edges. Using a slip stitch or whip stitch, sew the sides together to form the body of the bag. Make sure your stitches are tight and secure, especially if you plan to carry heavier items.
To add more structure, consider crocheting or sewing a lining inside the bag. Choose a cotton or linen fabric that complements your yarn colors. This not only improves durability but also keeps your bag from stretching over time.
The next step is adding handles. You can crochet handles directly onto the bag using chains and single crochets, or attach ready-made leather or wooden handles for a more professional finish. Position the handles evenly for balance.
For added functionality, consider adding interior pockets, a zipper, or a snap closure. These features enhance usability and help keep your items safe inside the bag. Make sure closures are sewn on firmly and aligned properly.
Decorative touches like tassels, buttons, or embroidery can personalize your crochet bag. These small details can reflect your style and turn a simple project into a one-of-a-kind masterpiece. Don’t be afraid to get creative!
Finally, block your finished bag to ensure a neat and polished look. Wet the bag lightly, shape it by hand, and let it dry flat. Blocking helps the stitches settle and gives your bag a clean, crisp appearance.
4. Styling and Caring for Your Crochet Bag
After completing your Easy Granny Rectangle Crochet Bag – Pattern, you’ll want to show it off and keep it in excellent shape for years to come. Styling and maintenance are essential parts of owning handmade crochet items.
Styling your bag can be both fun and practical. Pair it with boho-chic outfits, summer dresses, or even denim for a casual and stylish look. The colorful granny stitch design adds personality to any ensemble.
Use your bag for daily errands, beach trips, or as a reusable shopping tote. Its lightweight structure and roomy design make it both fashionable and functional. It’s a great conversation starter, too — people will definitely ask where you got it!
To care for your bag, hand wash it gently in cold water with mild detergent. Avoid twisting or wringing, as this can distort the shape. Lay flat to dry, reshaping it if necessary. This will maintain the integrity of your stitches and structure.
Avoid prolonged exposure to sunlight, as some yarns may fade. If your bag gets stained, spot-clean it immediately. Always check the yarn label for specific washing instructions before attempting to clean.
If your bag begins to lose shape or sag, you can reinforce it by inserting a stiff fabric lining or even interfacing. This helps maintain the form while still showcasing the beauty of your granny crochet work.
Store your crochet bag flat or hanging to avoid creases. During colder months, keep it in a sealed container with a lavender sachet to protect against moths or moisture. Proper care will extend its life and preserve your hard work.
FAQ – Easy Granny Rectangle Crochet Bag
1. Is the Easy Granny Rectangle Crochet Bag suitable for beginners?
Yes, it’s an excellent beginner project! The granny stitch is repetitive and easy to follow, making it perfect for those just starting out with crochet.
2. How long does it take to complete this crochet bag?
Most crafters can complete this bag in 4–6 hours, depending on experience and size preferences. It’s a relatively quick project with satisfying results.
3. Can I use scrap yarn for this pattern?
Absolutely! This pattern is ideal for using leftover yarns. Just make sure all yarns are similar in weight to maintain consistency.
4. What size should my finished rectangle be before folding?
A rectangle of about 12×18 inches usually creates a medium-sized bag, but you can adjust this based on your needs.
5. Do I need to line the bag?
Lining is optional but recommended. It adds durability and prevents stretching, especially if you plan to carry heavier items.
6. Can I make a shoulder or crossbody version of this bag?
Yes, by adjusting the handle length or attaching a longer strap, you can easily convert it into a shoulder or crossbody bag.
Conclusion
Creating your own Easy Granny Rectangle Crochet Bag – Pattern is not only fun but also incredibly satisfying. We’ve covered everything from selecting materials to shaping, styling, and maintaining your unique handmade accessory. This is a project that combines practicality, sustainability, and creativity — a true gem for any crocheter.
Now it’s your turn! Give the pattern a try and let your creativity shine. If you’ve enjoyed this guide, please leave your honest feedback and any suggestions for future tutorials. We love hearing from our readers and fellow crafters!